UNCERTAIN [/ˌənˈsərtn/]
Adjective
Not known or definite. Not completely confident or sure of something
As I continue to relate these behind-the-scenes breakdowns about our upcoming short film, No Runners, to Willy Wonka and the Chocolate Factory (again, the Gene Wilder version), I would like to take this moment to congratulate you on making it pass blog installment one and reaching installment two. I realize last week’s blog was riddled with what seemed like an endless amount of letters placed together to create words and I just wouldn’t shut up. So, if you are here following last week’s installment—congratulations. You are one step closer to taking over my chocolate factory (please understand I am not actually Willy Wonka nor do I own or have any rights or ties whatsoever to any kind of chocolate factory, factory, chocolate, or Willy Wonka. But, in my refrigerator, I do have chocolate milk from Trader Joe’s. So…).
We are only a couple of short weeks away from the release of this project, and that means today, we are diving into the physical production of No Runners. In total, we had seven days of shooting that stretched from April to the end of July, plus a one-day VO session in August.
So, grab a snack and/or a drink and sit back and relax, because this bitch is going to be painfully long and detailed—and I’m not even going to break down all seven days! Just a few. However, if you have any questions about other days, feel free to ask them in the comments below and I will get back to you. Also, if you’re curious who of the bunch has failed during our tour of the chocolate factory, that name would be Wes Williams. He appears to have not only failed to read last week’s installment but has since gone onto not return any texts or phone calls I have placed with him since the public announcement of this project. He will NOT be getting my chocolate factory at the end of this tour.
Now, as Michael Scott and Holly Flax of Dunder Mifflin Scranton once re-wrote the words to “Let’s Get Physical” by Olivia Newton-John by singing, “Let’s get ethical, ethical… I wanna get ethical with you.” Let me do the same, but instead sing, “Let’s get technical, technical… I wanna get technical with you.”
PRODUCTION – DAY 01 – INT – TREVOR’S HOUSE
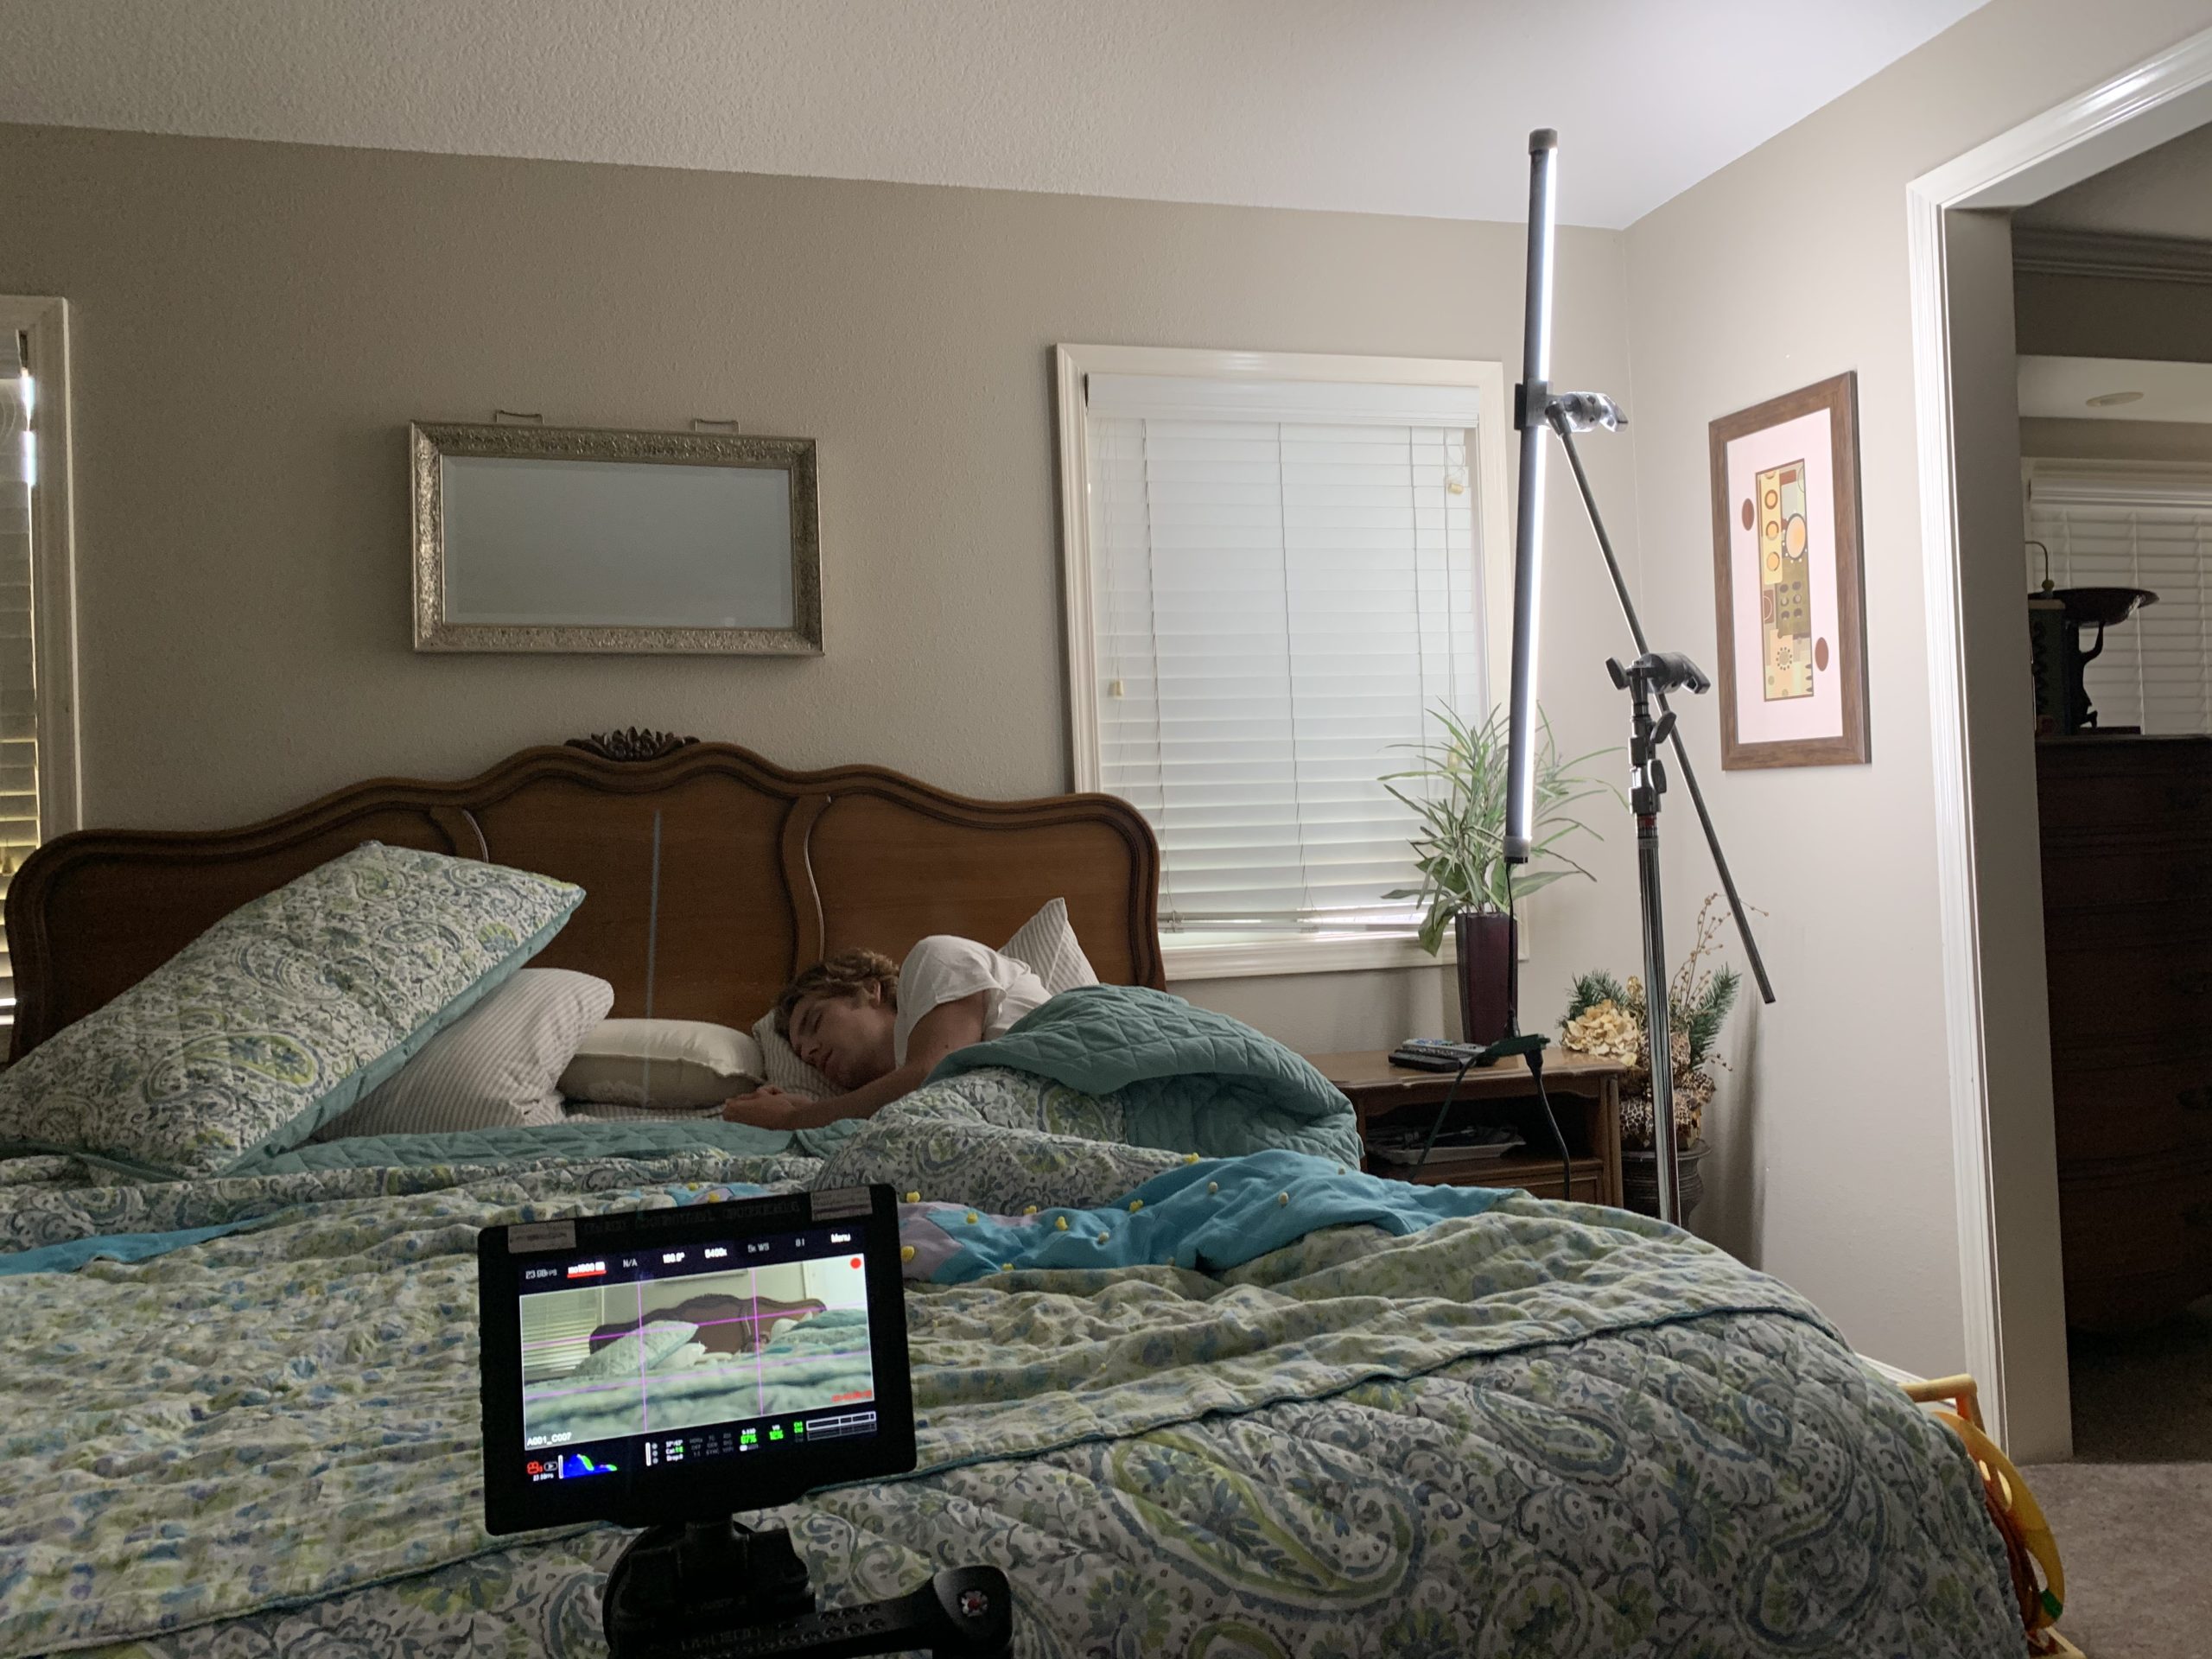
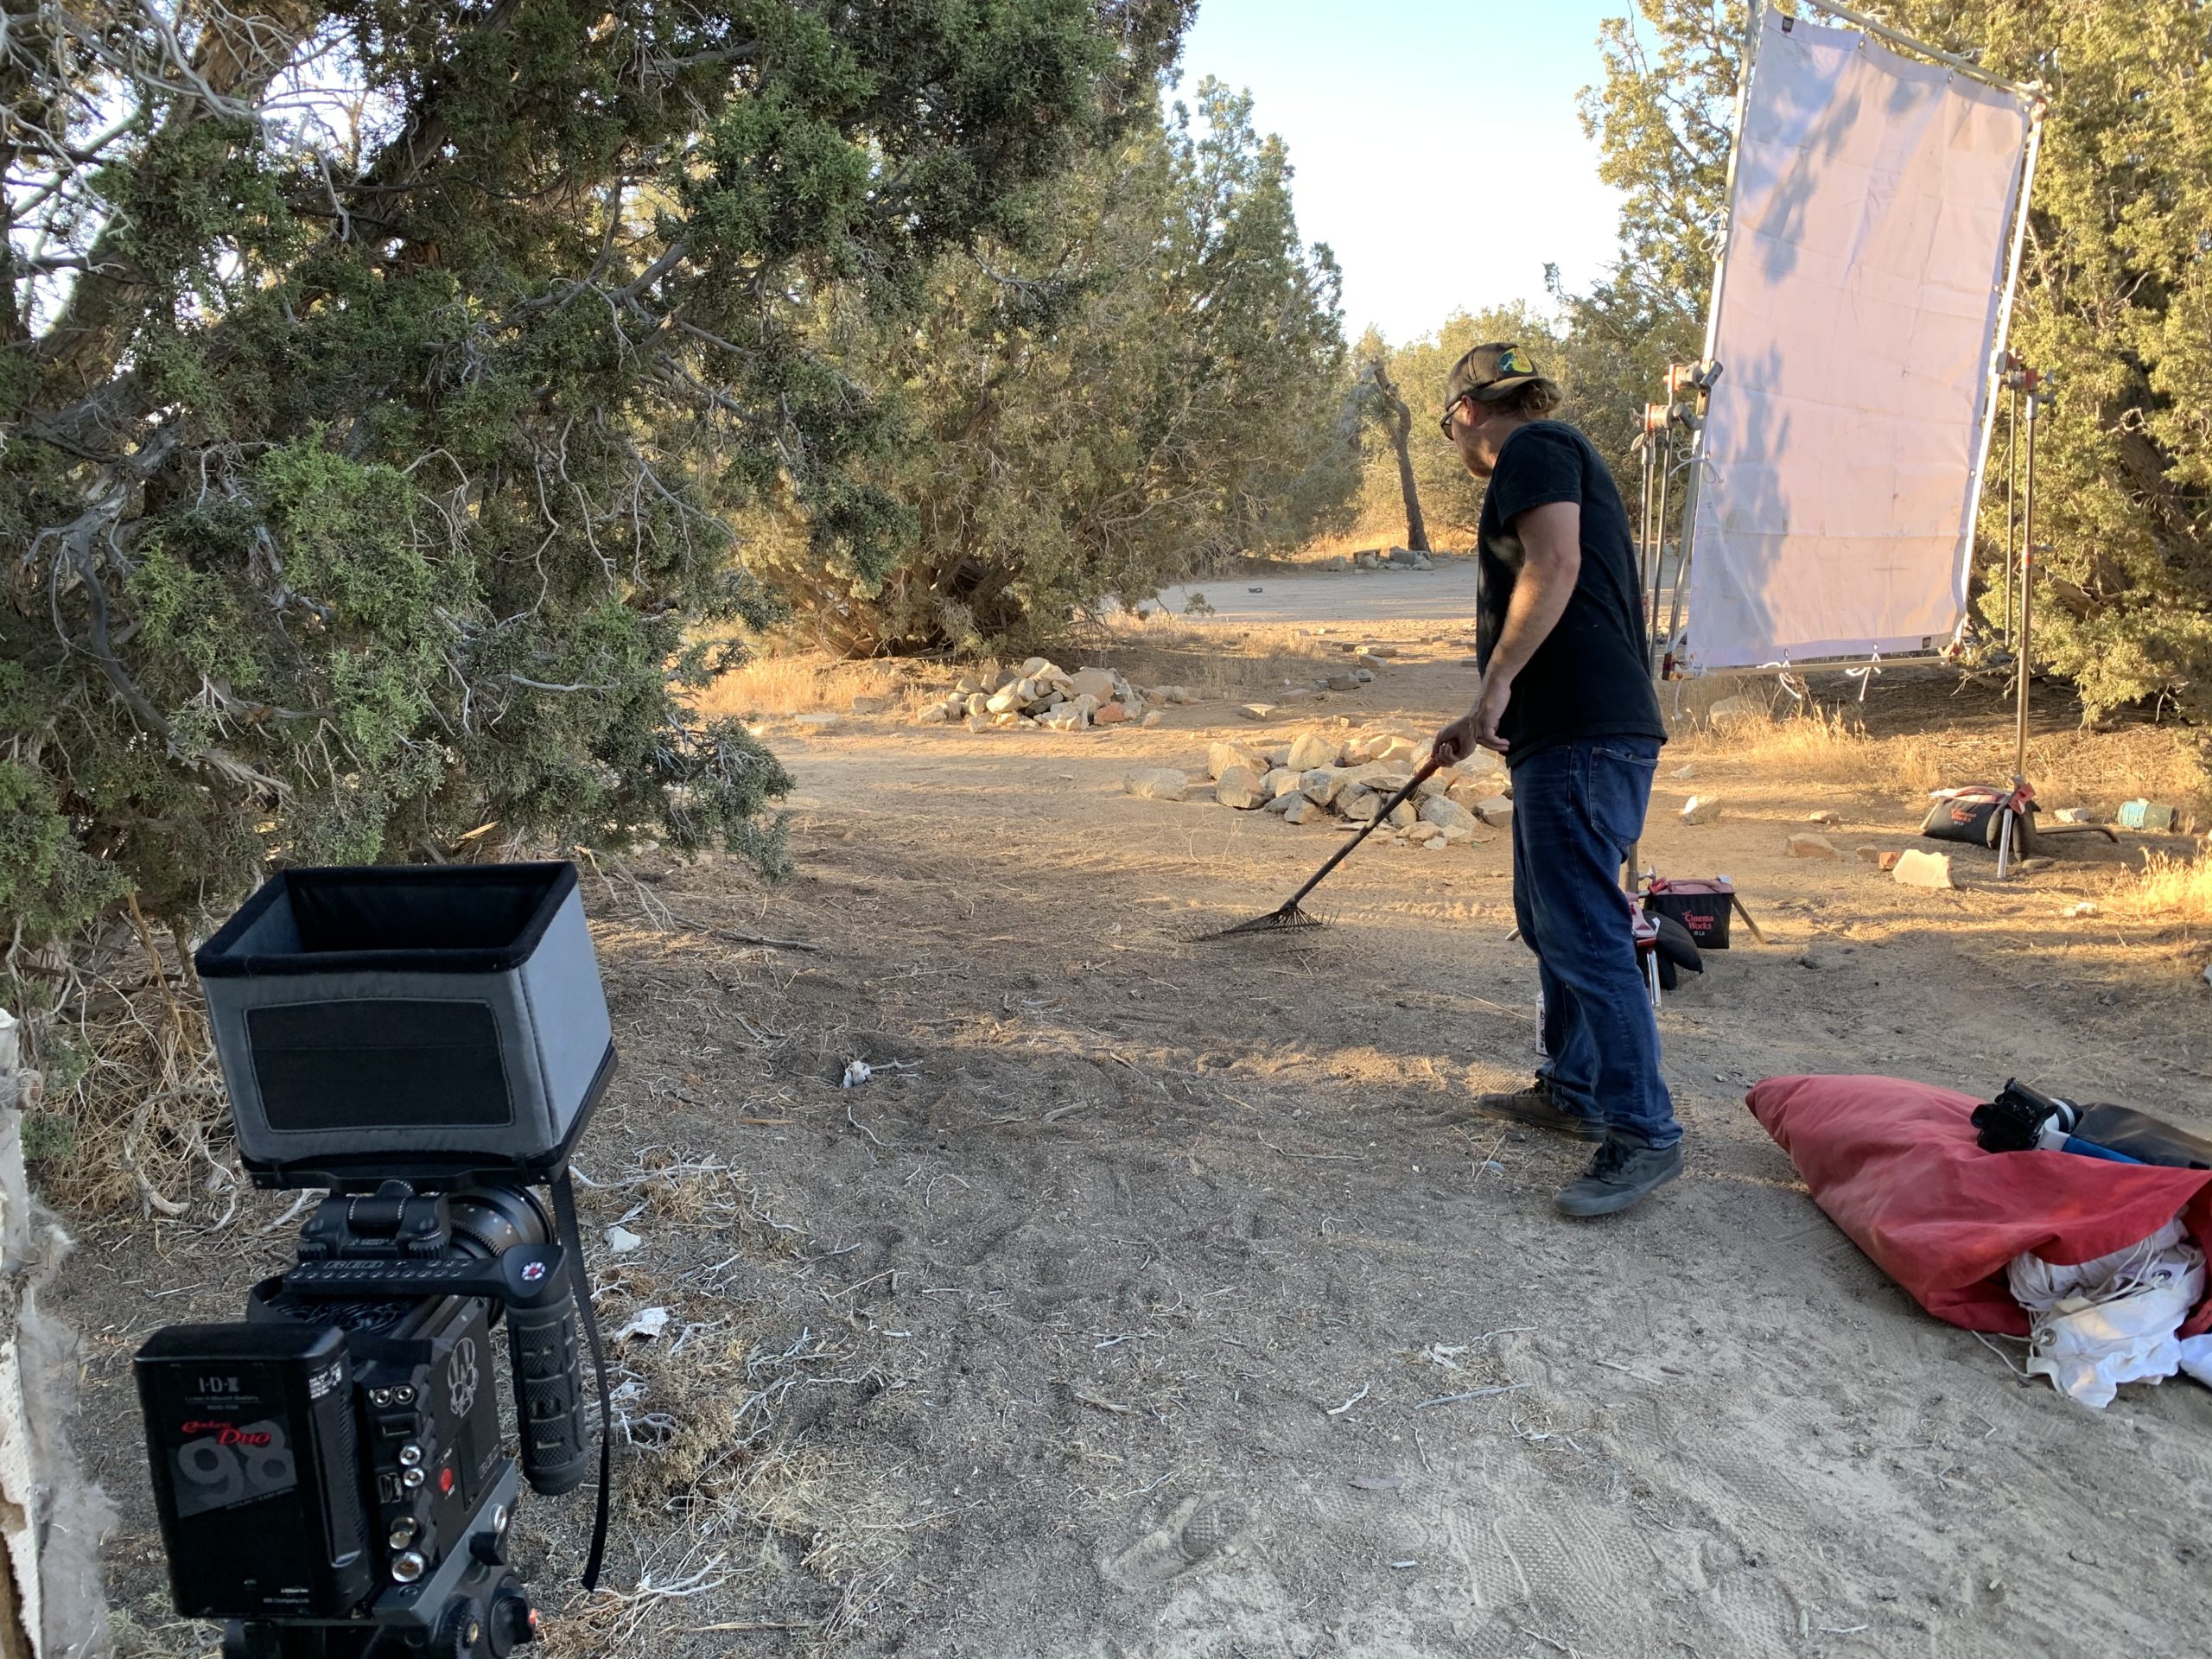
With my truck loaded down with every piece of camera and grip and electric equipment I own, my assistant camera (AC), grip, rigger, and BTS photo/video guru Brandon Carter (again, we all wore many hats on this one) and I snagged a couple of Mocha Frappes (no whip, gotta watch my boyish figure) from McDonald’s and headed on out to Trevor’s house for day one of production on No Runners. Now, I have to admit, while I felt safe because I was doing this with friends, I was fucking nervous and uncertain while driving to set for day one. Why? Because I knew I had to execute and if I couldn’t get my lighting right, this whole thing would simply shit the bed. I had a general idea of camera position and also the blocking of Trevor that I was after, but my main concerns were my ability to light this sequence and achieve the look I was after. If you can, you always want to light from the windows, placing your units outside and, one of the biggest reasons why is simple: it allows you maximum freedom of camera placement and movement because you are not framing out c-stands, lights, sand bags, cords, etc.
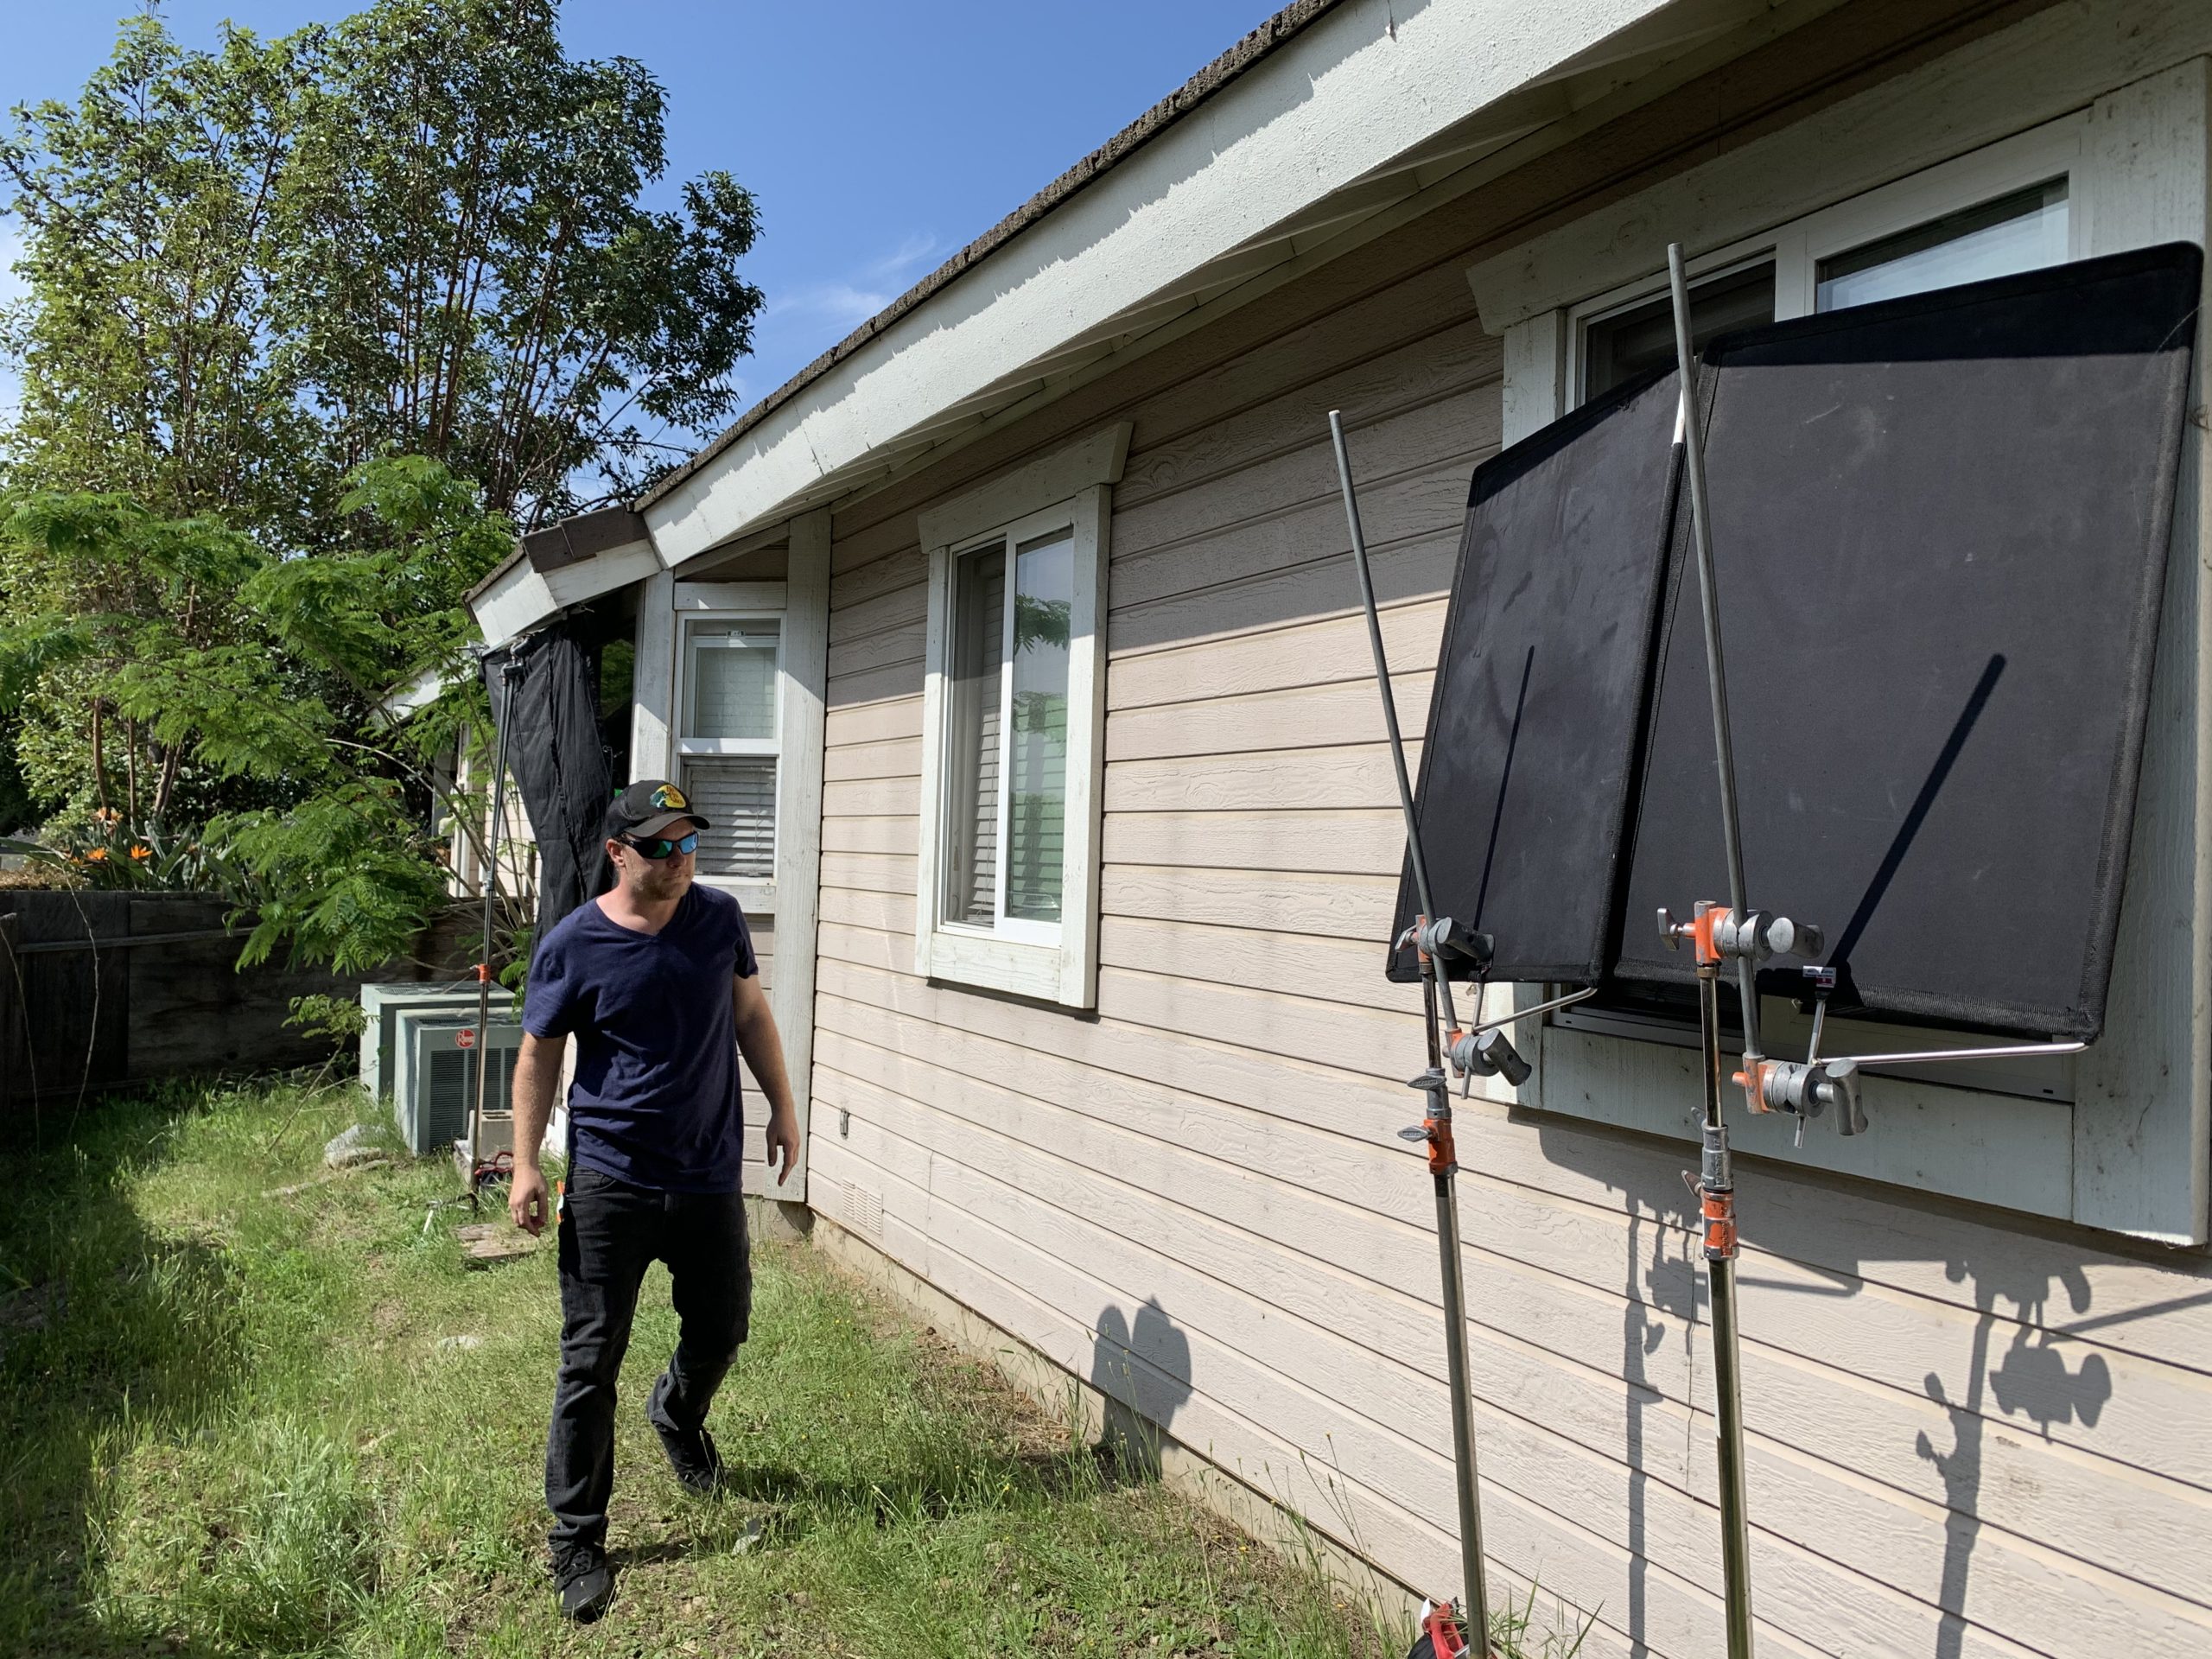
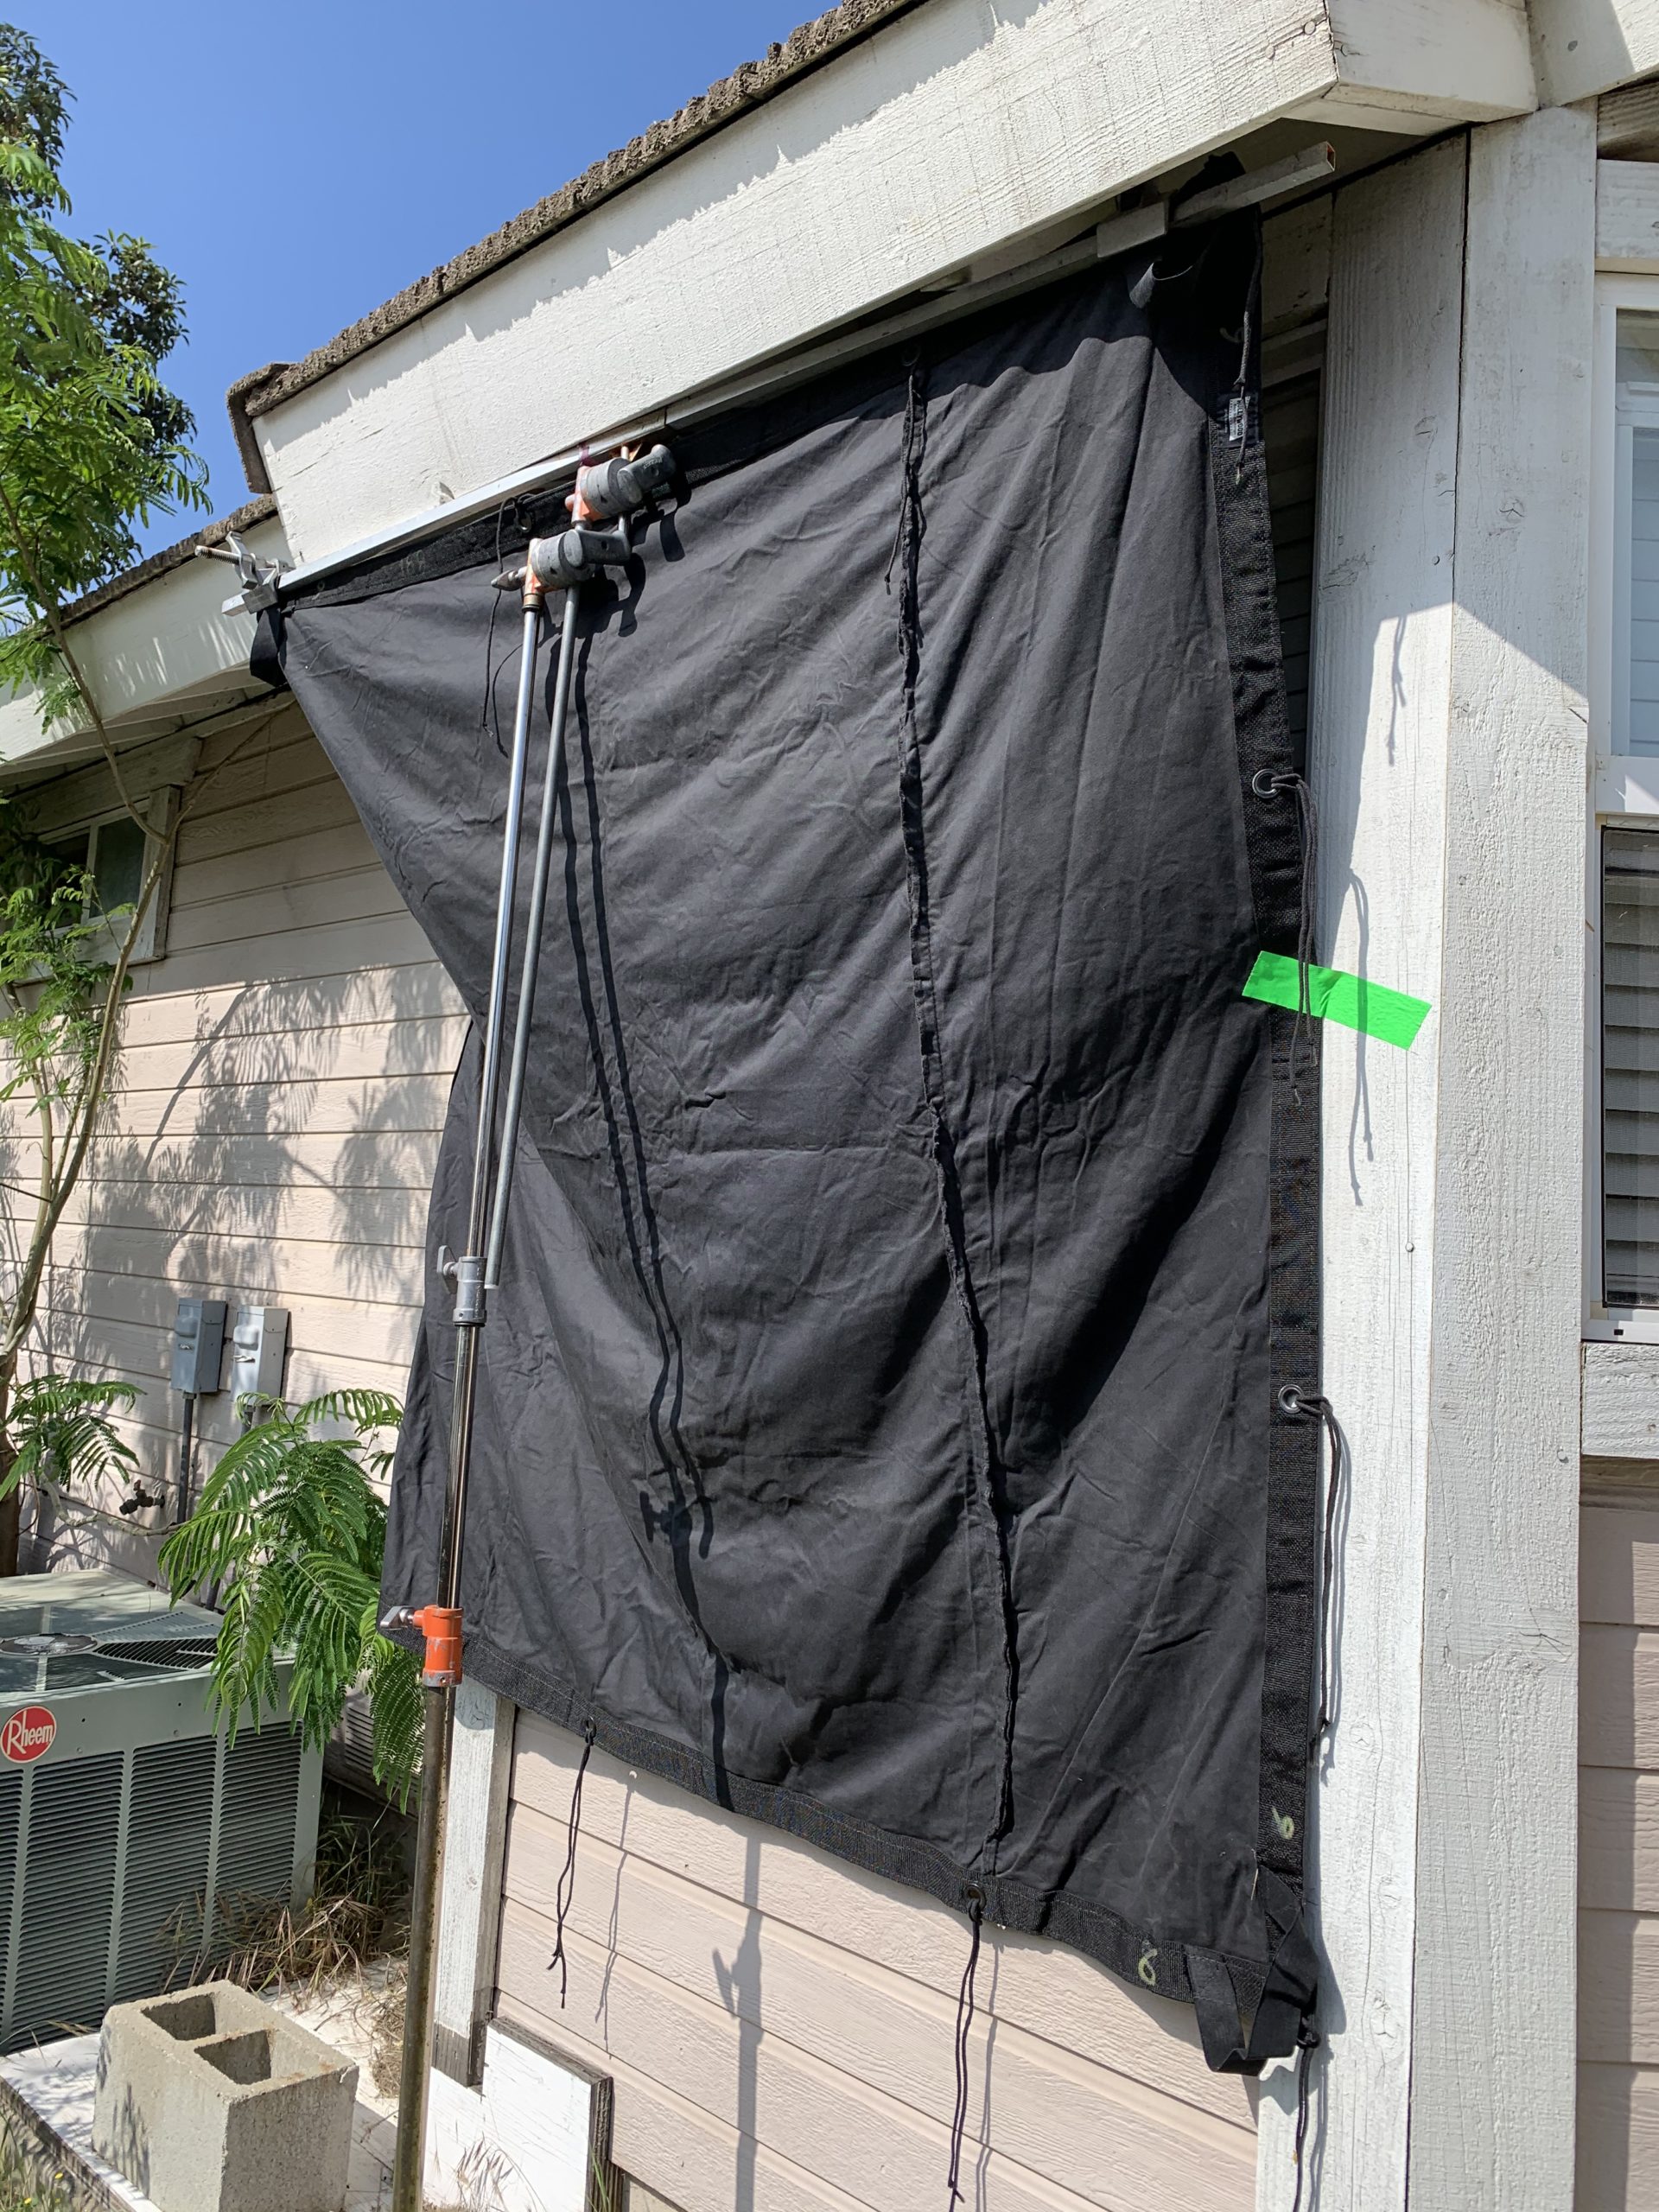
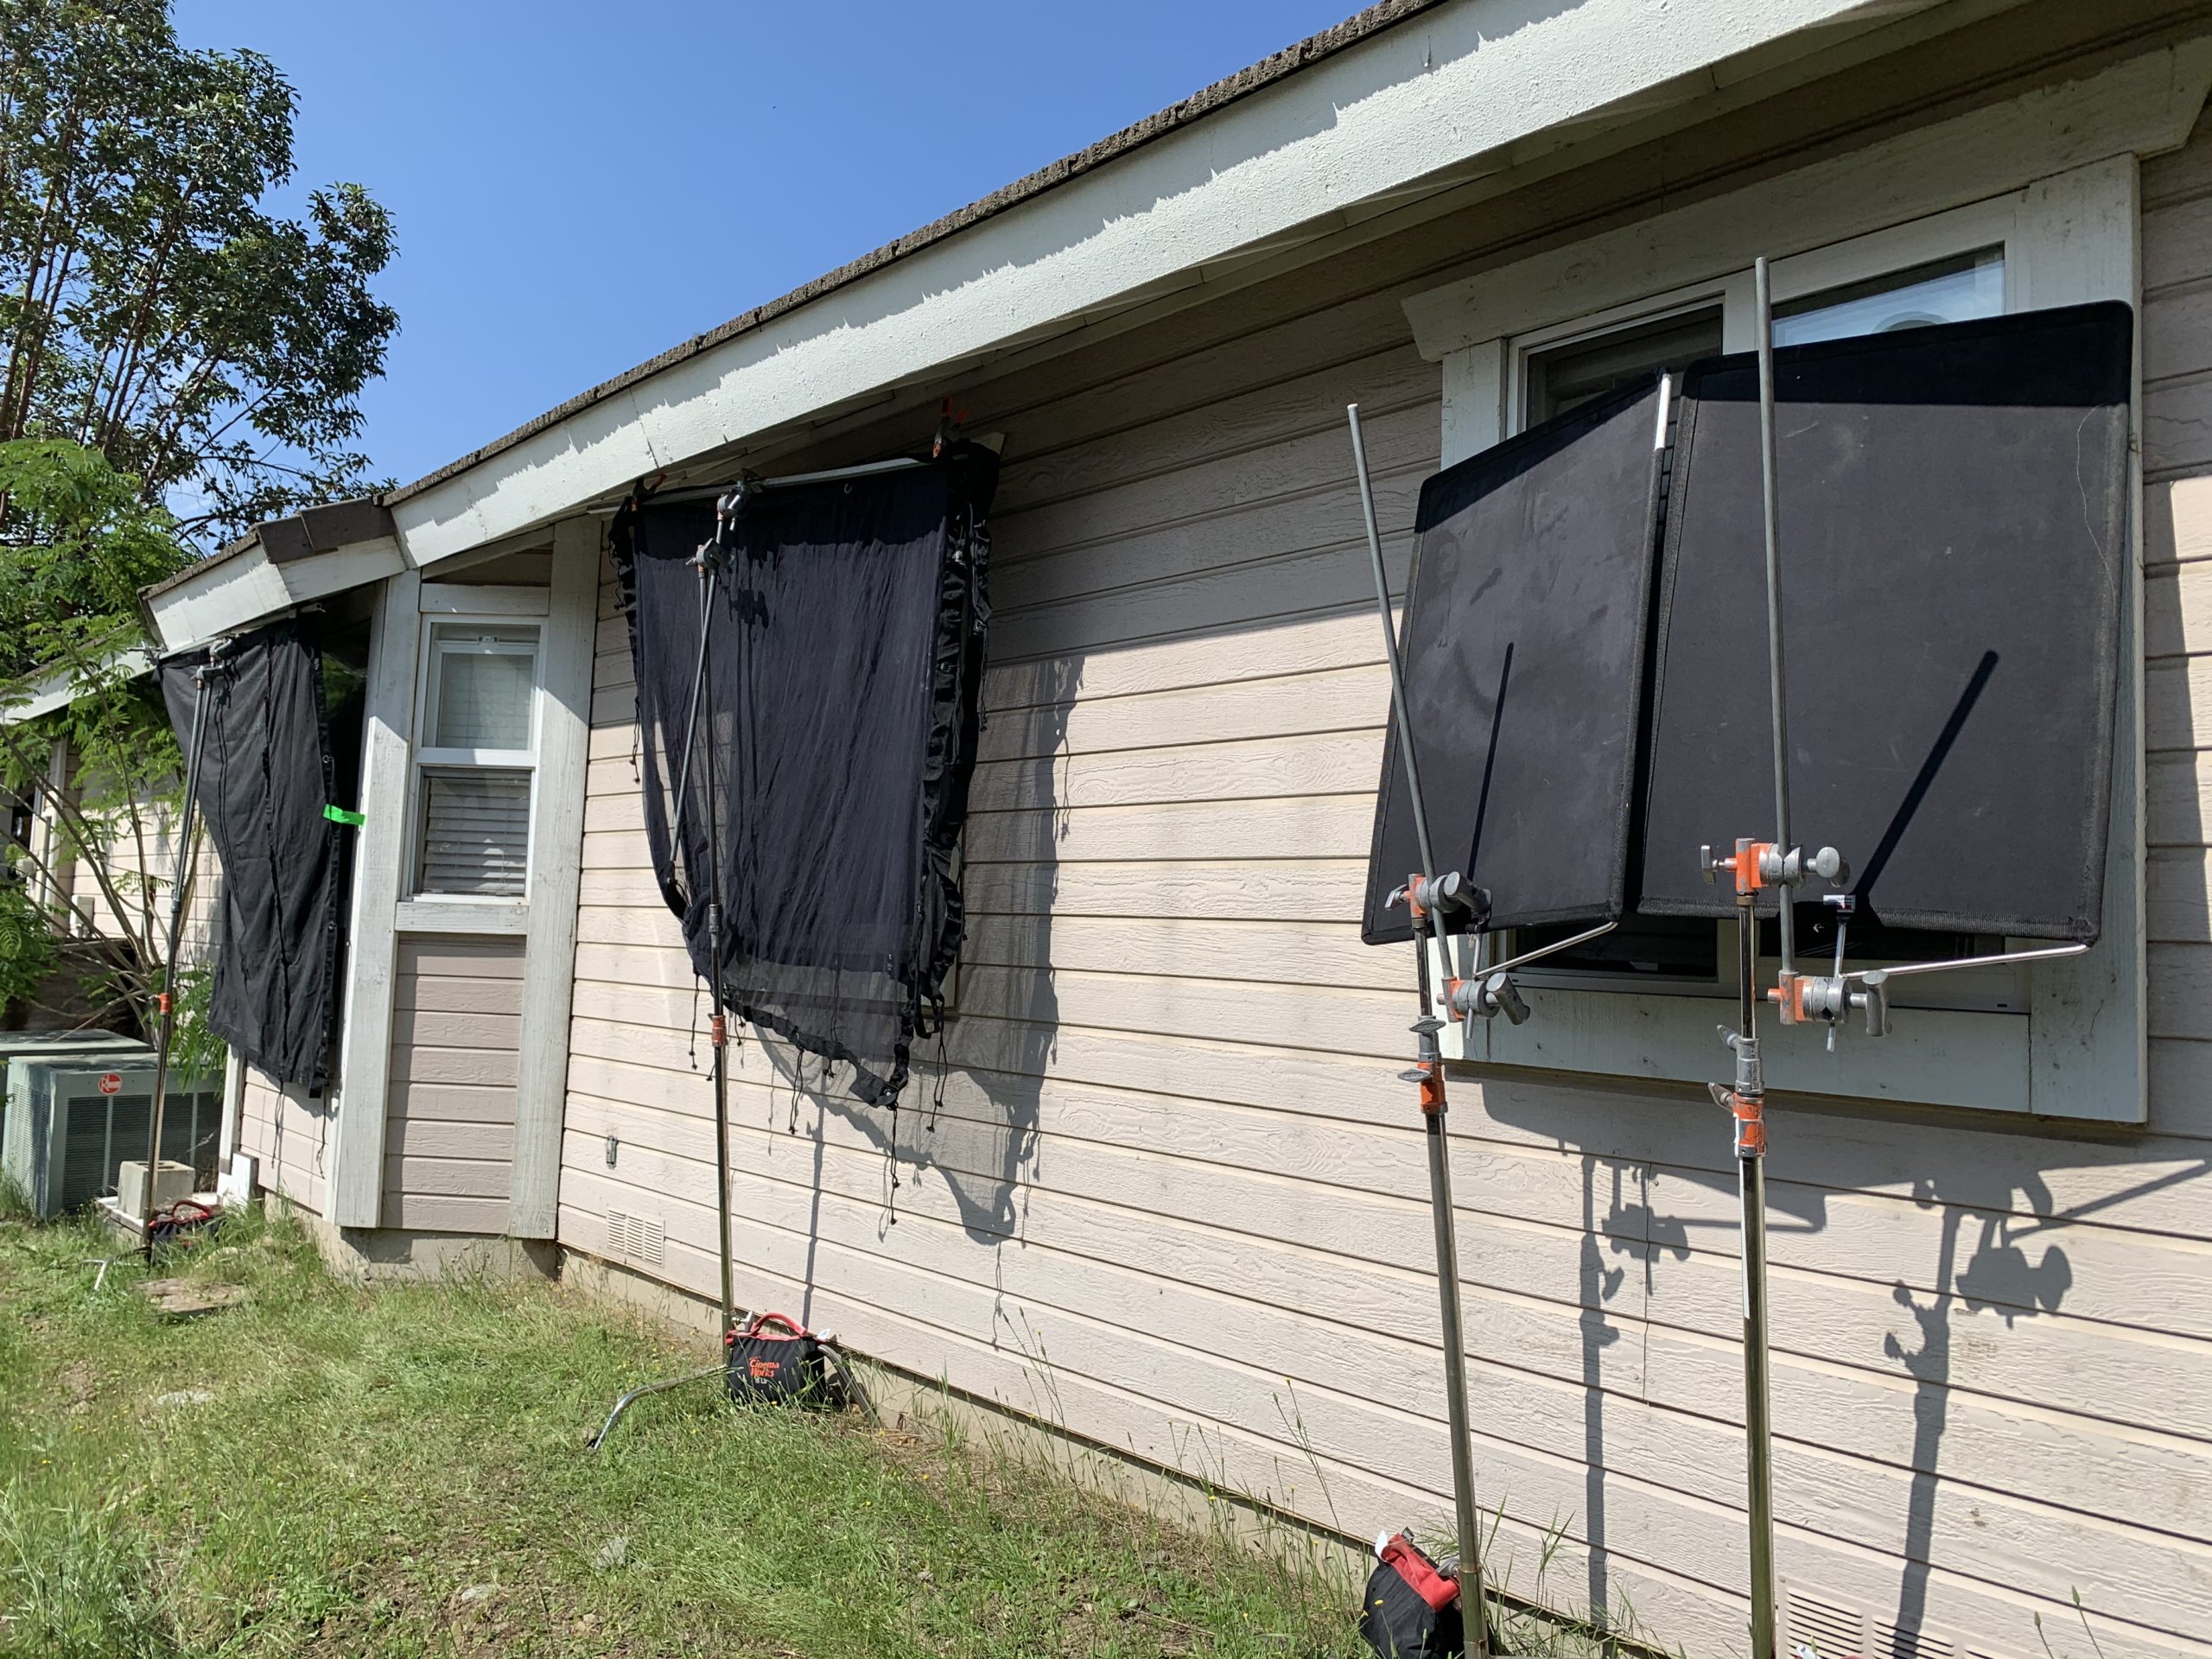
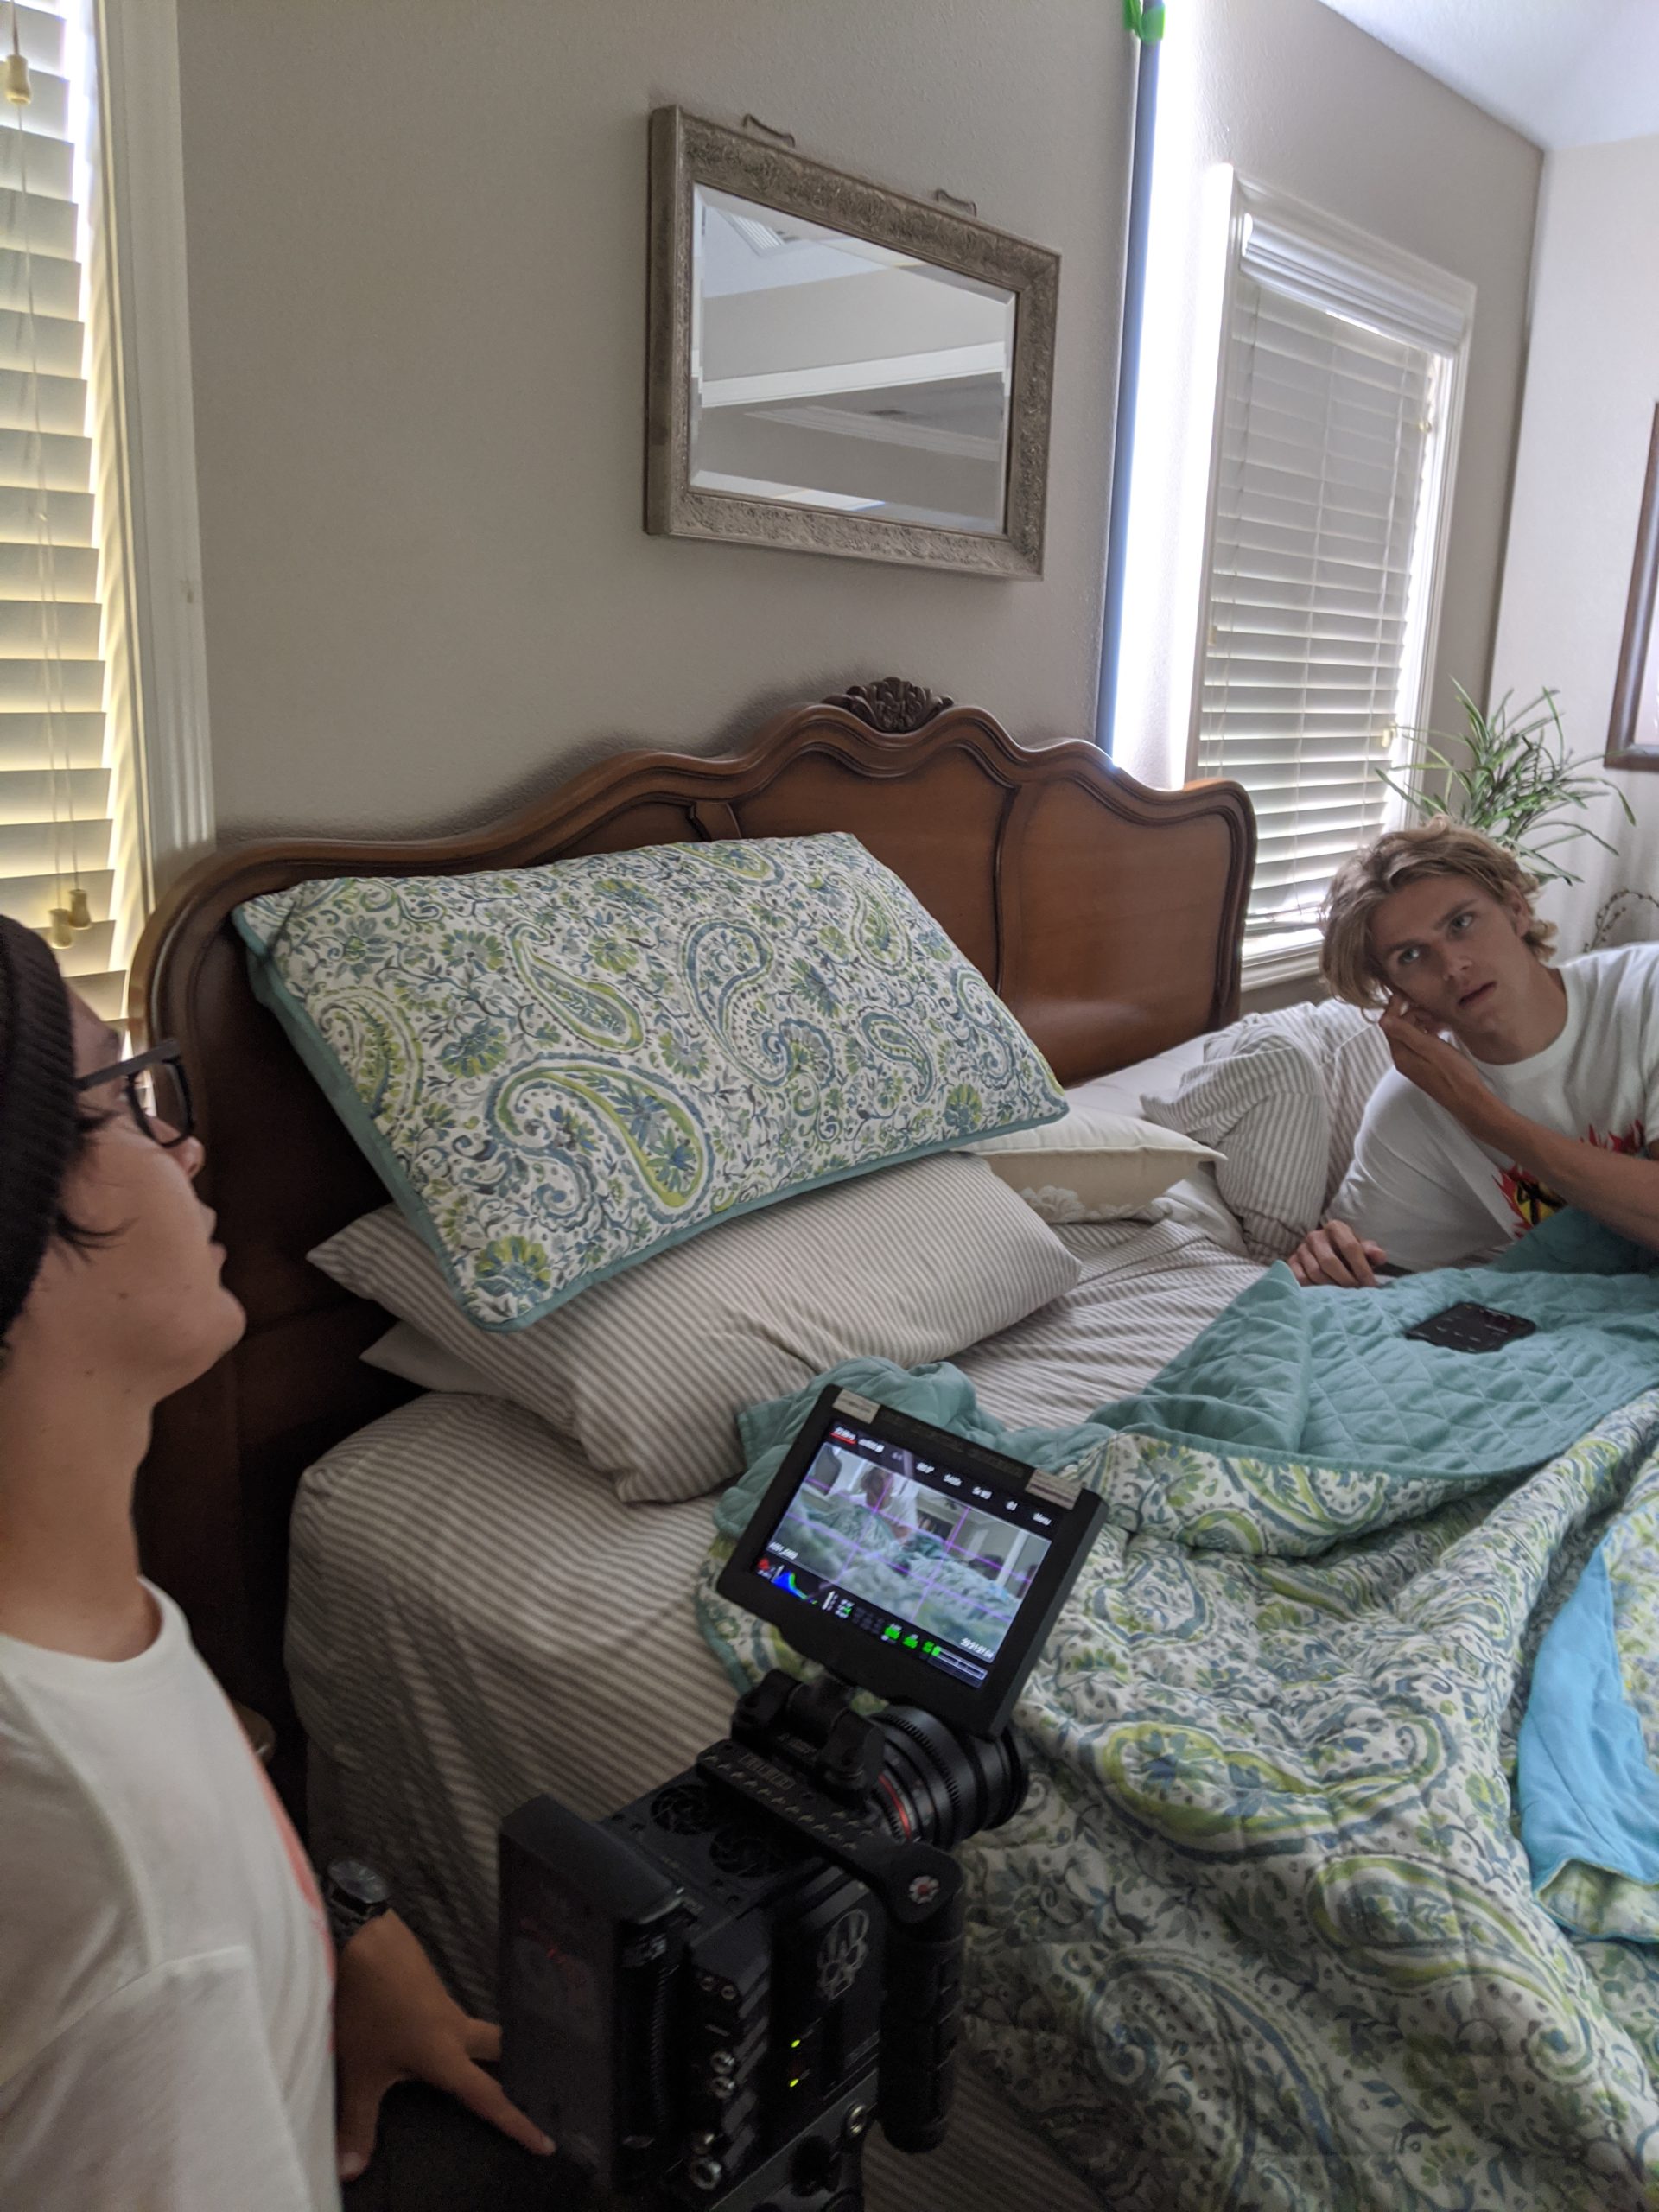
Upon arriving to Trevor’s house, we did a brief scout of the bedroom to lock in camera position and the blocking of Trevor. Once we had that in place, Brandon and I started flying in all of our lights, c-stands, dimmers, diffusions, flags, etc. to commence the build. This is for another blog, but I am an incredibly slow learner and have seriously slow comprehension skills (No lie. I spent my entire academic career in special ed classes because of this and because of the fact that I couldn’t read or write). I wanted to light from outside of the windows, but all we had was two 4’ Quasar Science LED X-Crossfade tubes and one 2’ Quasar Science LED X-Crossfade tube. For some reason, I thought those would be enough to push the amount of light I desired through the windows and compete with the morning sun. Well, after we rigged them in place, instantly, I realized that these tubes CANNOT COMPETE WITH DAYLIGHT. Looking back at this morning, all I can think is, “Yeah, no shit, dumbass.” So, having to quickly think of another strategy for lighting this sequence, the solution was obvious: light from inside. Annnnd, we did. Now, had I had some HMIs with me, we could’ve easily lit from outside the windows without issue. But, when it’s a passion project and your budget was just blown on two Mocha Frappes, HMIs are out of the question. So, I flew the lights back inside while I had Brandon get started on blacking out a bunch of windows in order to kill a decent amount of sun light. Below are some behind-the-scenes photos I snapped of how we blacked out the windows to kill light.
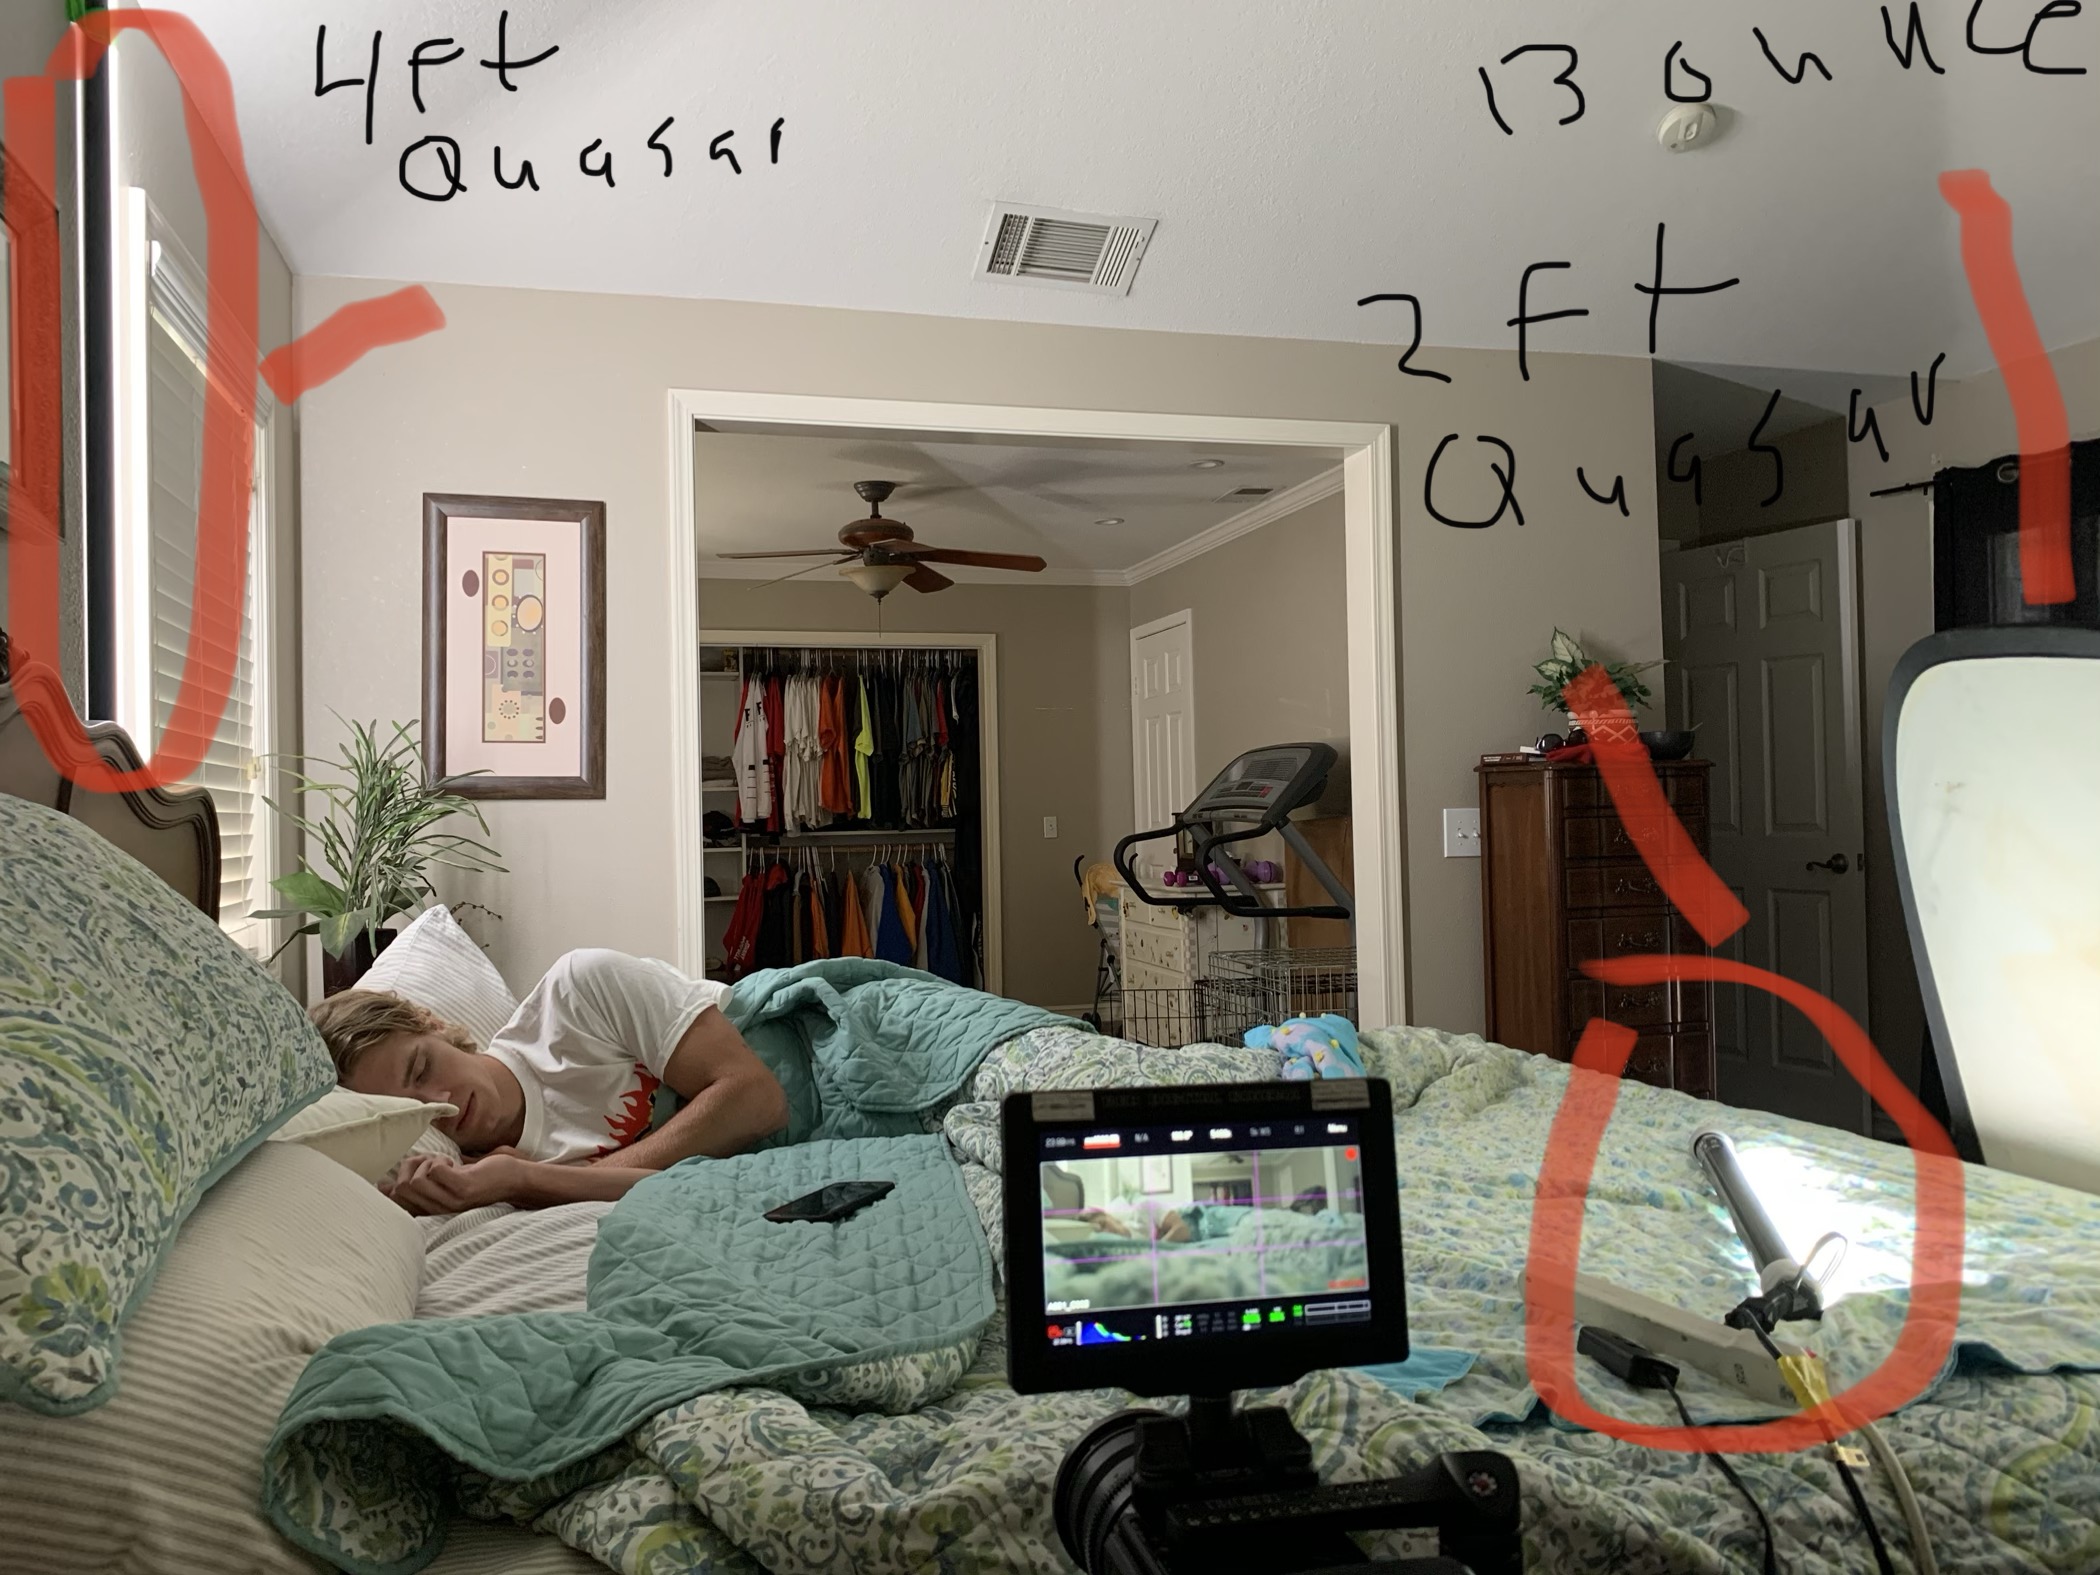
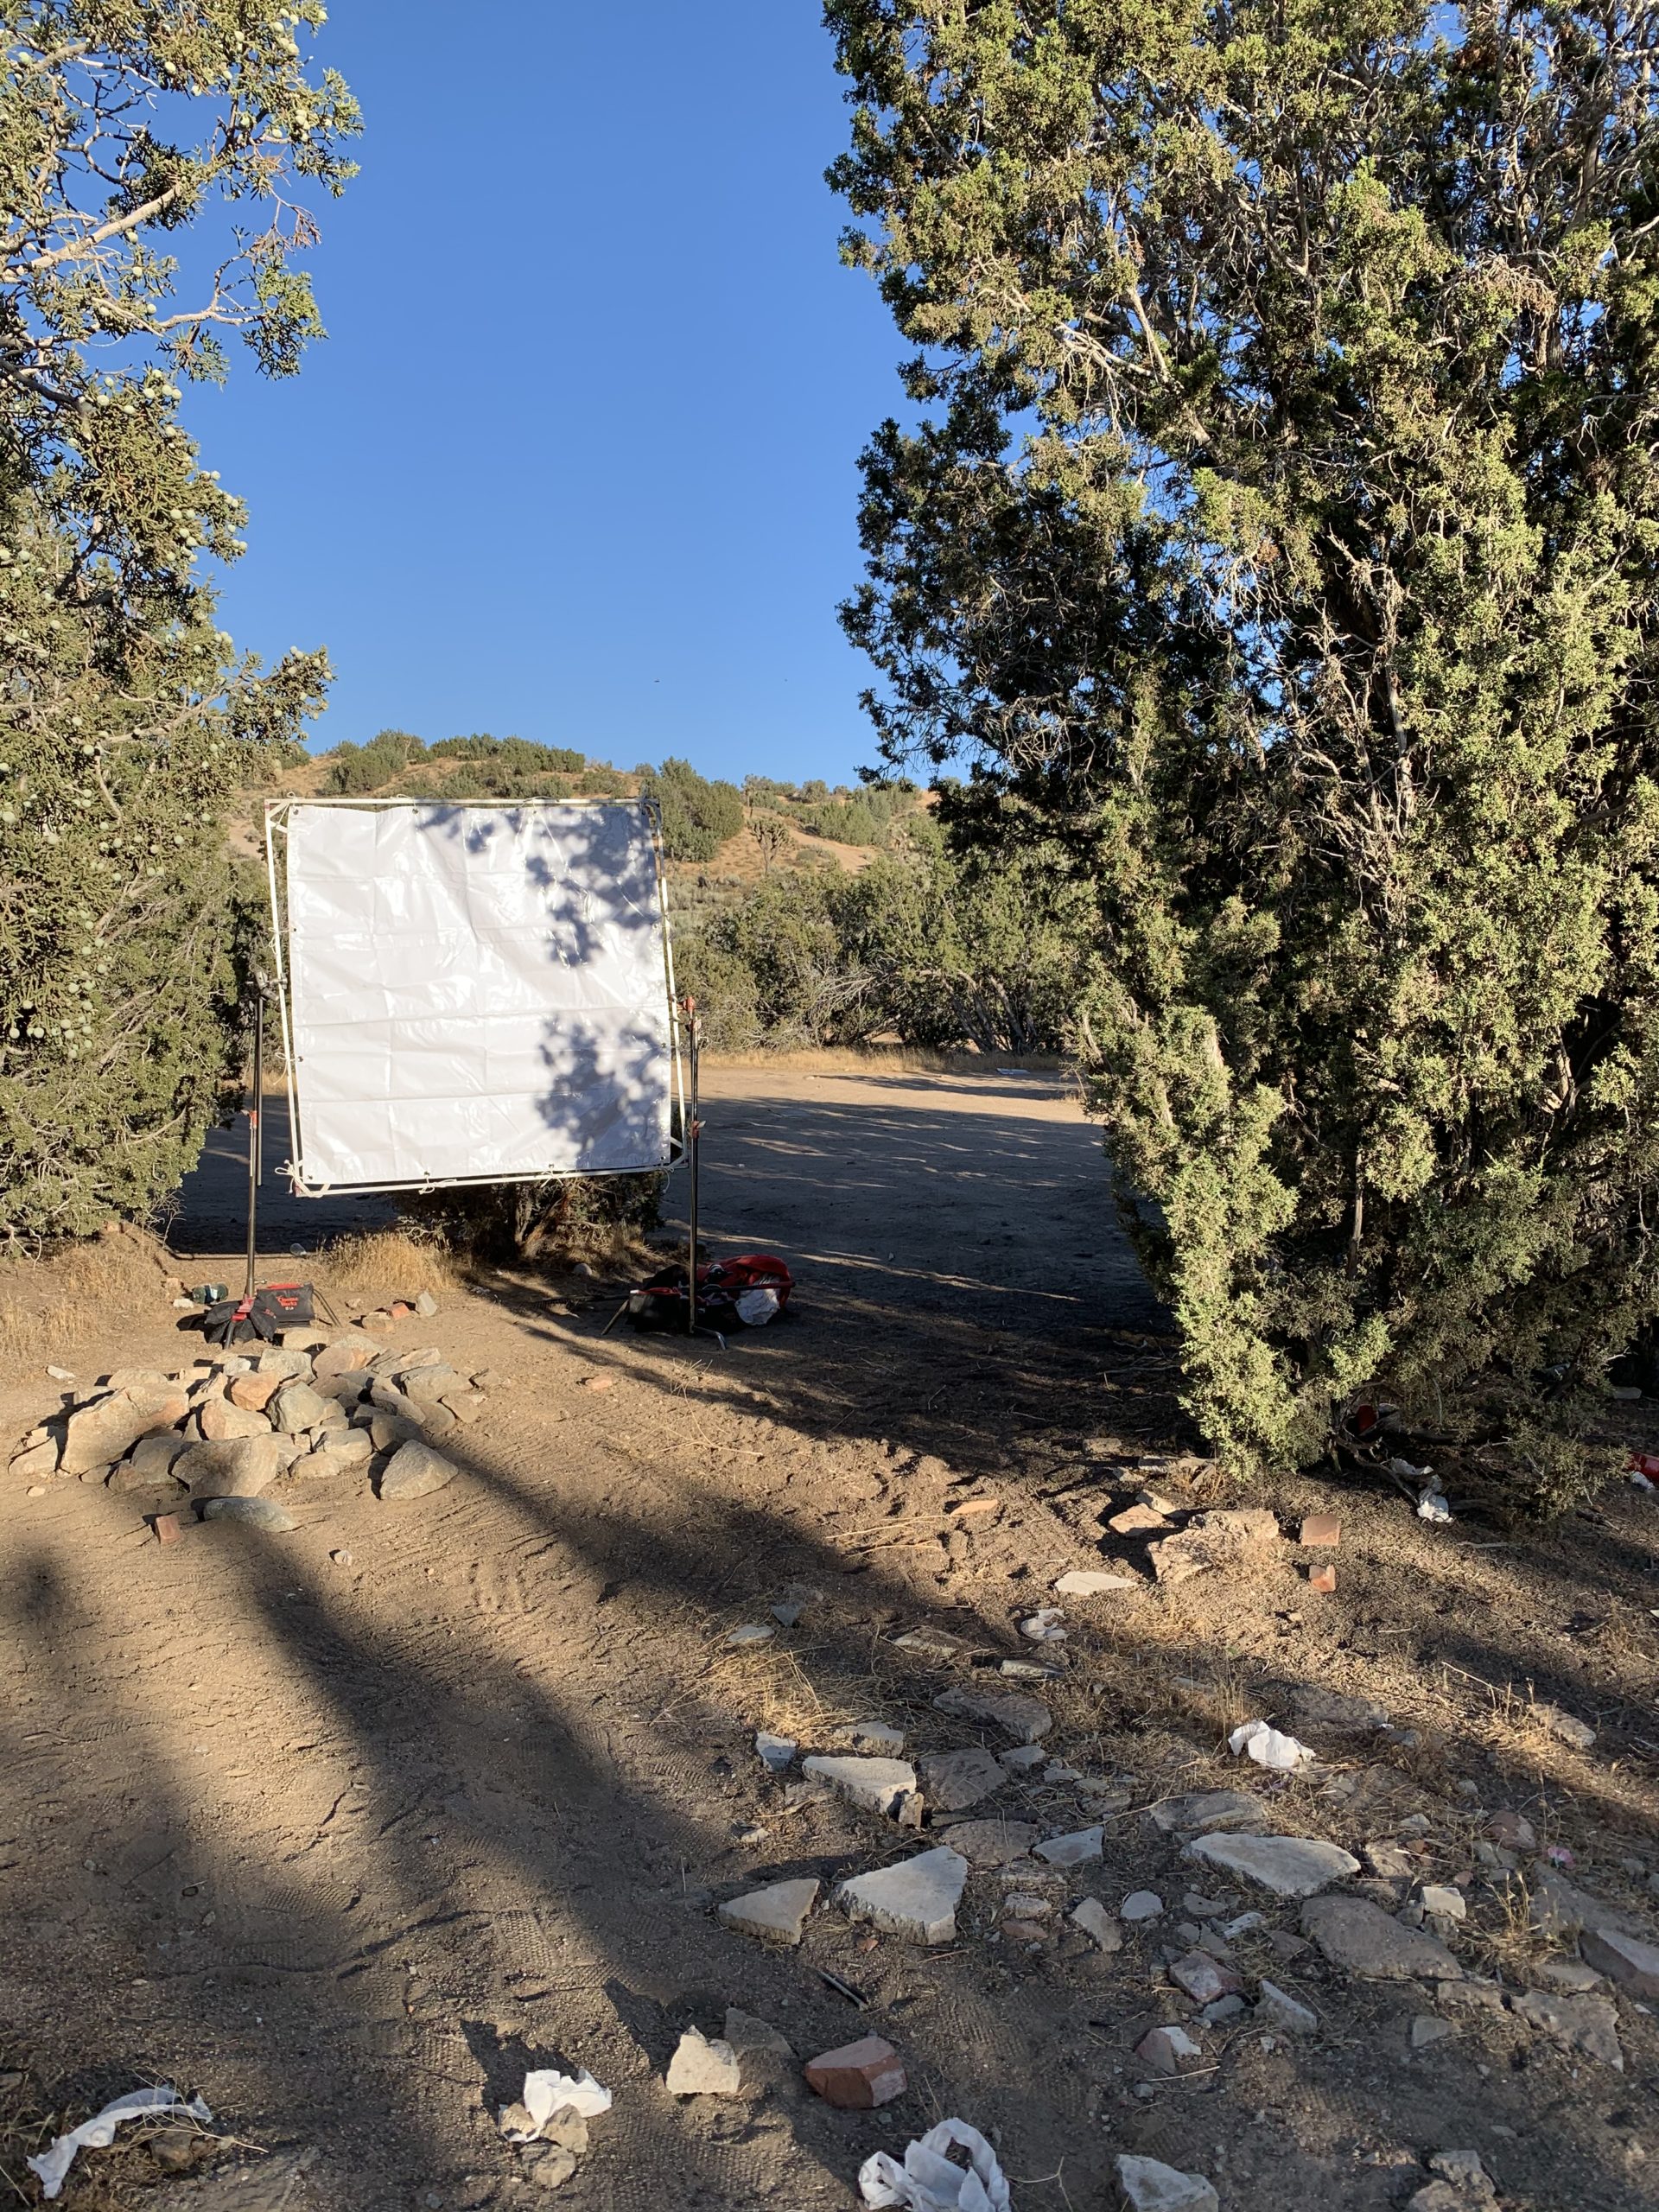
Our main window, where we placed our lights to further exaggerate sun pushing through the window, had the blinds closed almost all the way. However, the sun was still so powerful I was getting too much light coming in and spilling all over the white walls. So, what we did to address this solution was simple. We didn’t want to actually kill all of the natural sunlight, we just needed to slow it down, thus we placed two nets in front of the window (outside) to slow down the amount of ambient light coming into the bedroom window. We started with one net, but I could see it still wasn’t enough so we added a second net to create a double and that was exactly what I needed to slow it down and achieve the look I was chasing while coupled with one of our lamps.
Once we had our windows blacked out, flagged, and netted, it was time to start dialing in the interior lighting with our Quasar Science LED X-Crossfade tubes. I placed one 4’ Quasar just left of camera, gaff taped to the wall, pointing it directly at the window and wall in front of it. This helped to elevate the ambient light pushing through the window perfectly and, having it pointing at the white wall made it bounce off that and back on to Trevor to help give him a little bit of backlight as if it was coming from the sun. The name of the game here was making it look as natural and grounded in reality as possible. Now, it did take some time as our key light was reflecting off of the picture fame in the background quite a lot and giving us a mean glare. We spent a little while moving the placement of the picture frame until we killed the reflection/glare. Once we got that out of the way, I could see that we didn’t have enough light on Trevor’s face. Again, the name of the game is “natural,” so I knew I needed to bring up the level on Trevor’s face so we had a bit of detail there without actually blasting him with a light. The answer to this solution was to place our 2’ Quasar LED X-Crossfade tube on the foot of the bed, pointing away from Trevor, and shooting into a white bounce board that would then reflect that light back onto Trevor’s face. Doing this lifted the level on Trevor’s face just enough to give us the detail we wanted without feeling like we were blatantly blasting a light on him. Both of our Quasars were on dimmers so we could control the intensity of the light and we balanced our lights more so on the daylight/cool side as I knew when I got into the grade, I would want this to feel cooler and more on the cold side. For camera, I balanced at 4700k to further help with that colder feeling I was after.
For our second shot within this sequence, we placed the camera at the foot of the bed, looking toward our windows and up at Trevor. Our fill light that was on the foot of the bed bouncing into white bounce stayed put. However, we needed to move our key light off the wall as it was in frame. So, all we had to do was simply pull it from the wall, place it on a c-stand on camera right, and blast it into the white wall with the picture frame on it so that it was bouncing of that and back onto Trevor. White walls are typical the devil, but in situations like this, I did what I could to use them to my advantage and have them help me instead of hinder me.
The next setup I’ll breakdown from this sequence is the shot of Trevor walking down the hallway and to the bathroom. We killed all of our lights in the bedroom and then opened up the blinds on camera left (this was our main window that had the sun pushing through it) and placed a 4’ Quasar in the laundry room down the hall on the right-hand side. This room already had a big glass door allowing a bunch of natural light in; however, it wasn’t quite enough and I wanted to bring up that level even more. So, I placed the 4’ Quasar in that room at 100% power and blasted it into a white wall so it would bounce off that and go back into the hallway to help exaggerate the already moody shadows we were getting here. I knew that we would have some color contrast between the day light of the laundry room and the tungsten balanced practicals in the bathroom, which was going to be great. However, the practicals in the bathroom didn’t have enough output to provide that pop I was hoping to get. The solution? I had Brandon in the bathroom holding a 2’ Quasar, balanced to match the light of the tungsten practicals already in there. When Trevor walks into the bathroom and flicks on the bathroom lights, Brandon is also striking our Quasar tube at the same time. It took a few tries to get the timing right, but once we did, it looked great. Again, we are subtly exaggerating the light that is already there to achieve the look we are after, which is natural and grounded in reality.


PRODUCTION – DAY 04 – EXT – THE LAKEBED
Assemble all friends who want to do something cool and believe in the project and the people involved. That was the motto for this project. Especially day four at the lakebed. This was/is a passion project. That means no money, no budget, no nothing. It means we can’t rent fun gear, we can’t hire a full crew. But, the more people support vurbmoto by purchasing a t-shirt or a hat and watching our Vurb Originals (like this one), it means we can create films like this with an actual budget and even better production value. Why am I telling you this? Because this day was a literal calling of friends that understand this!
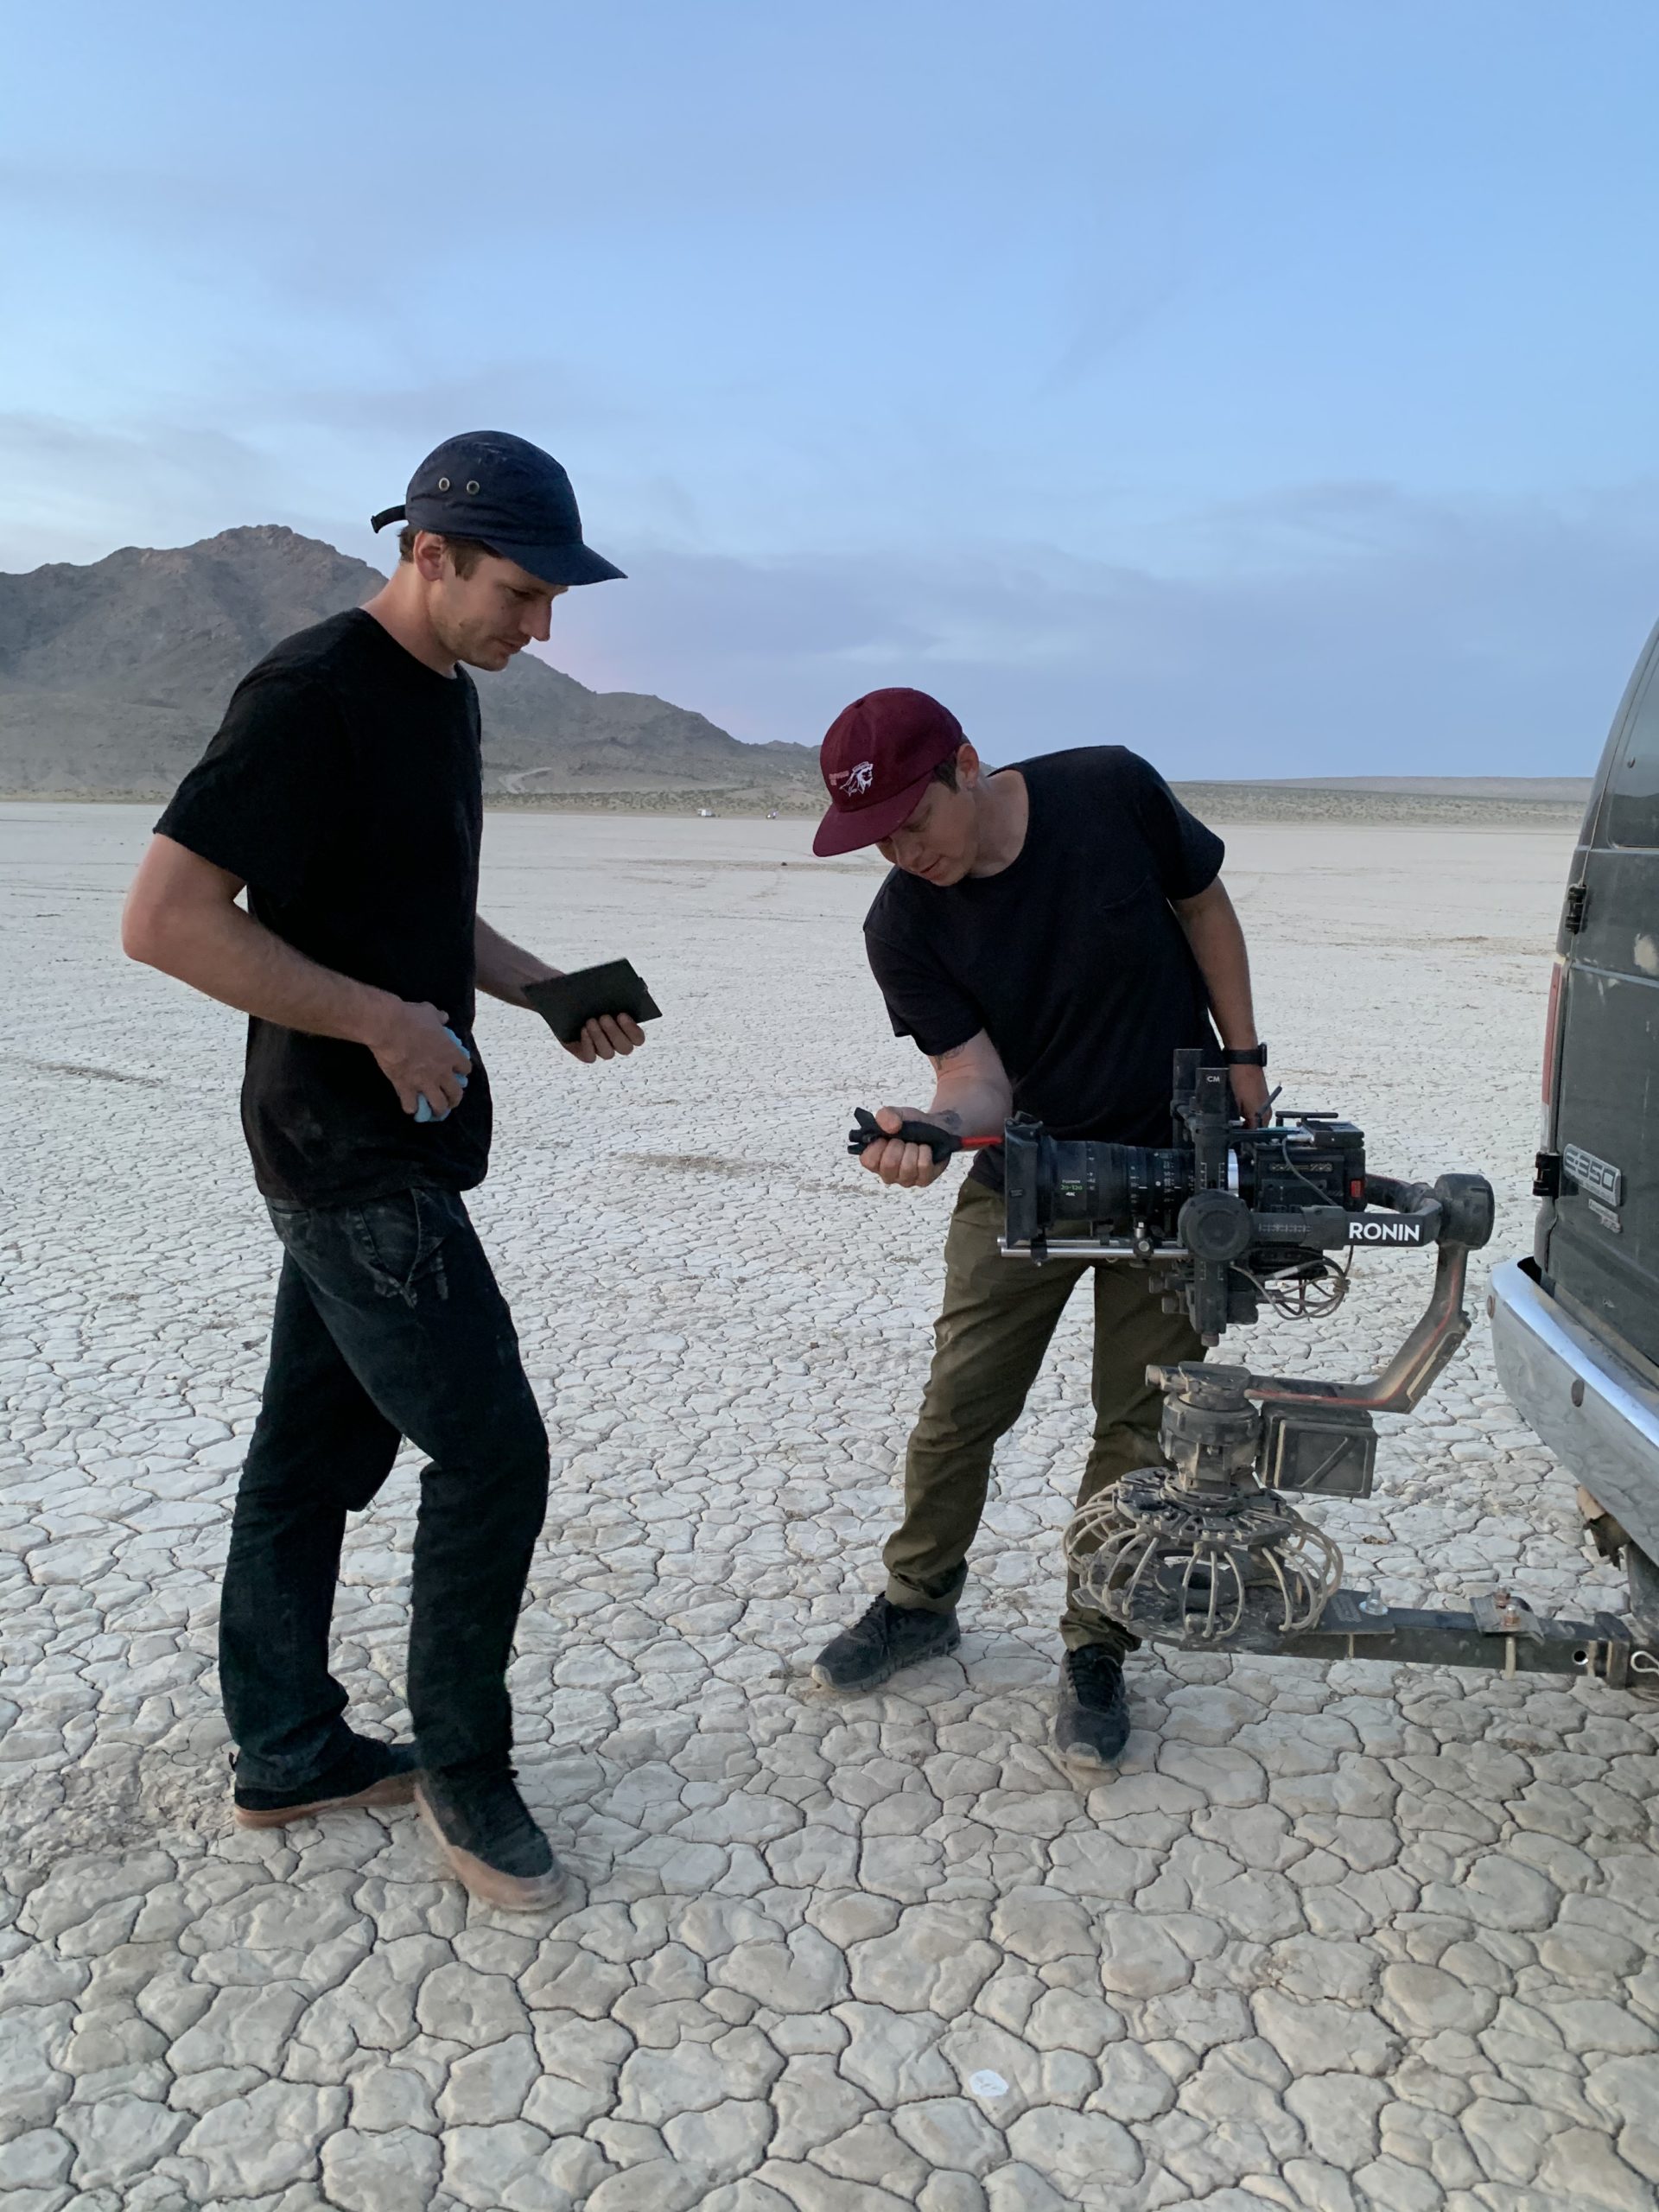
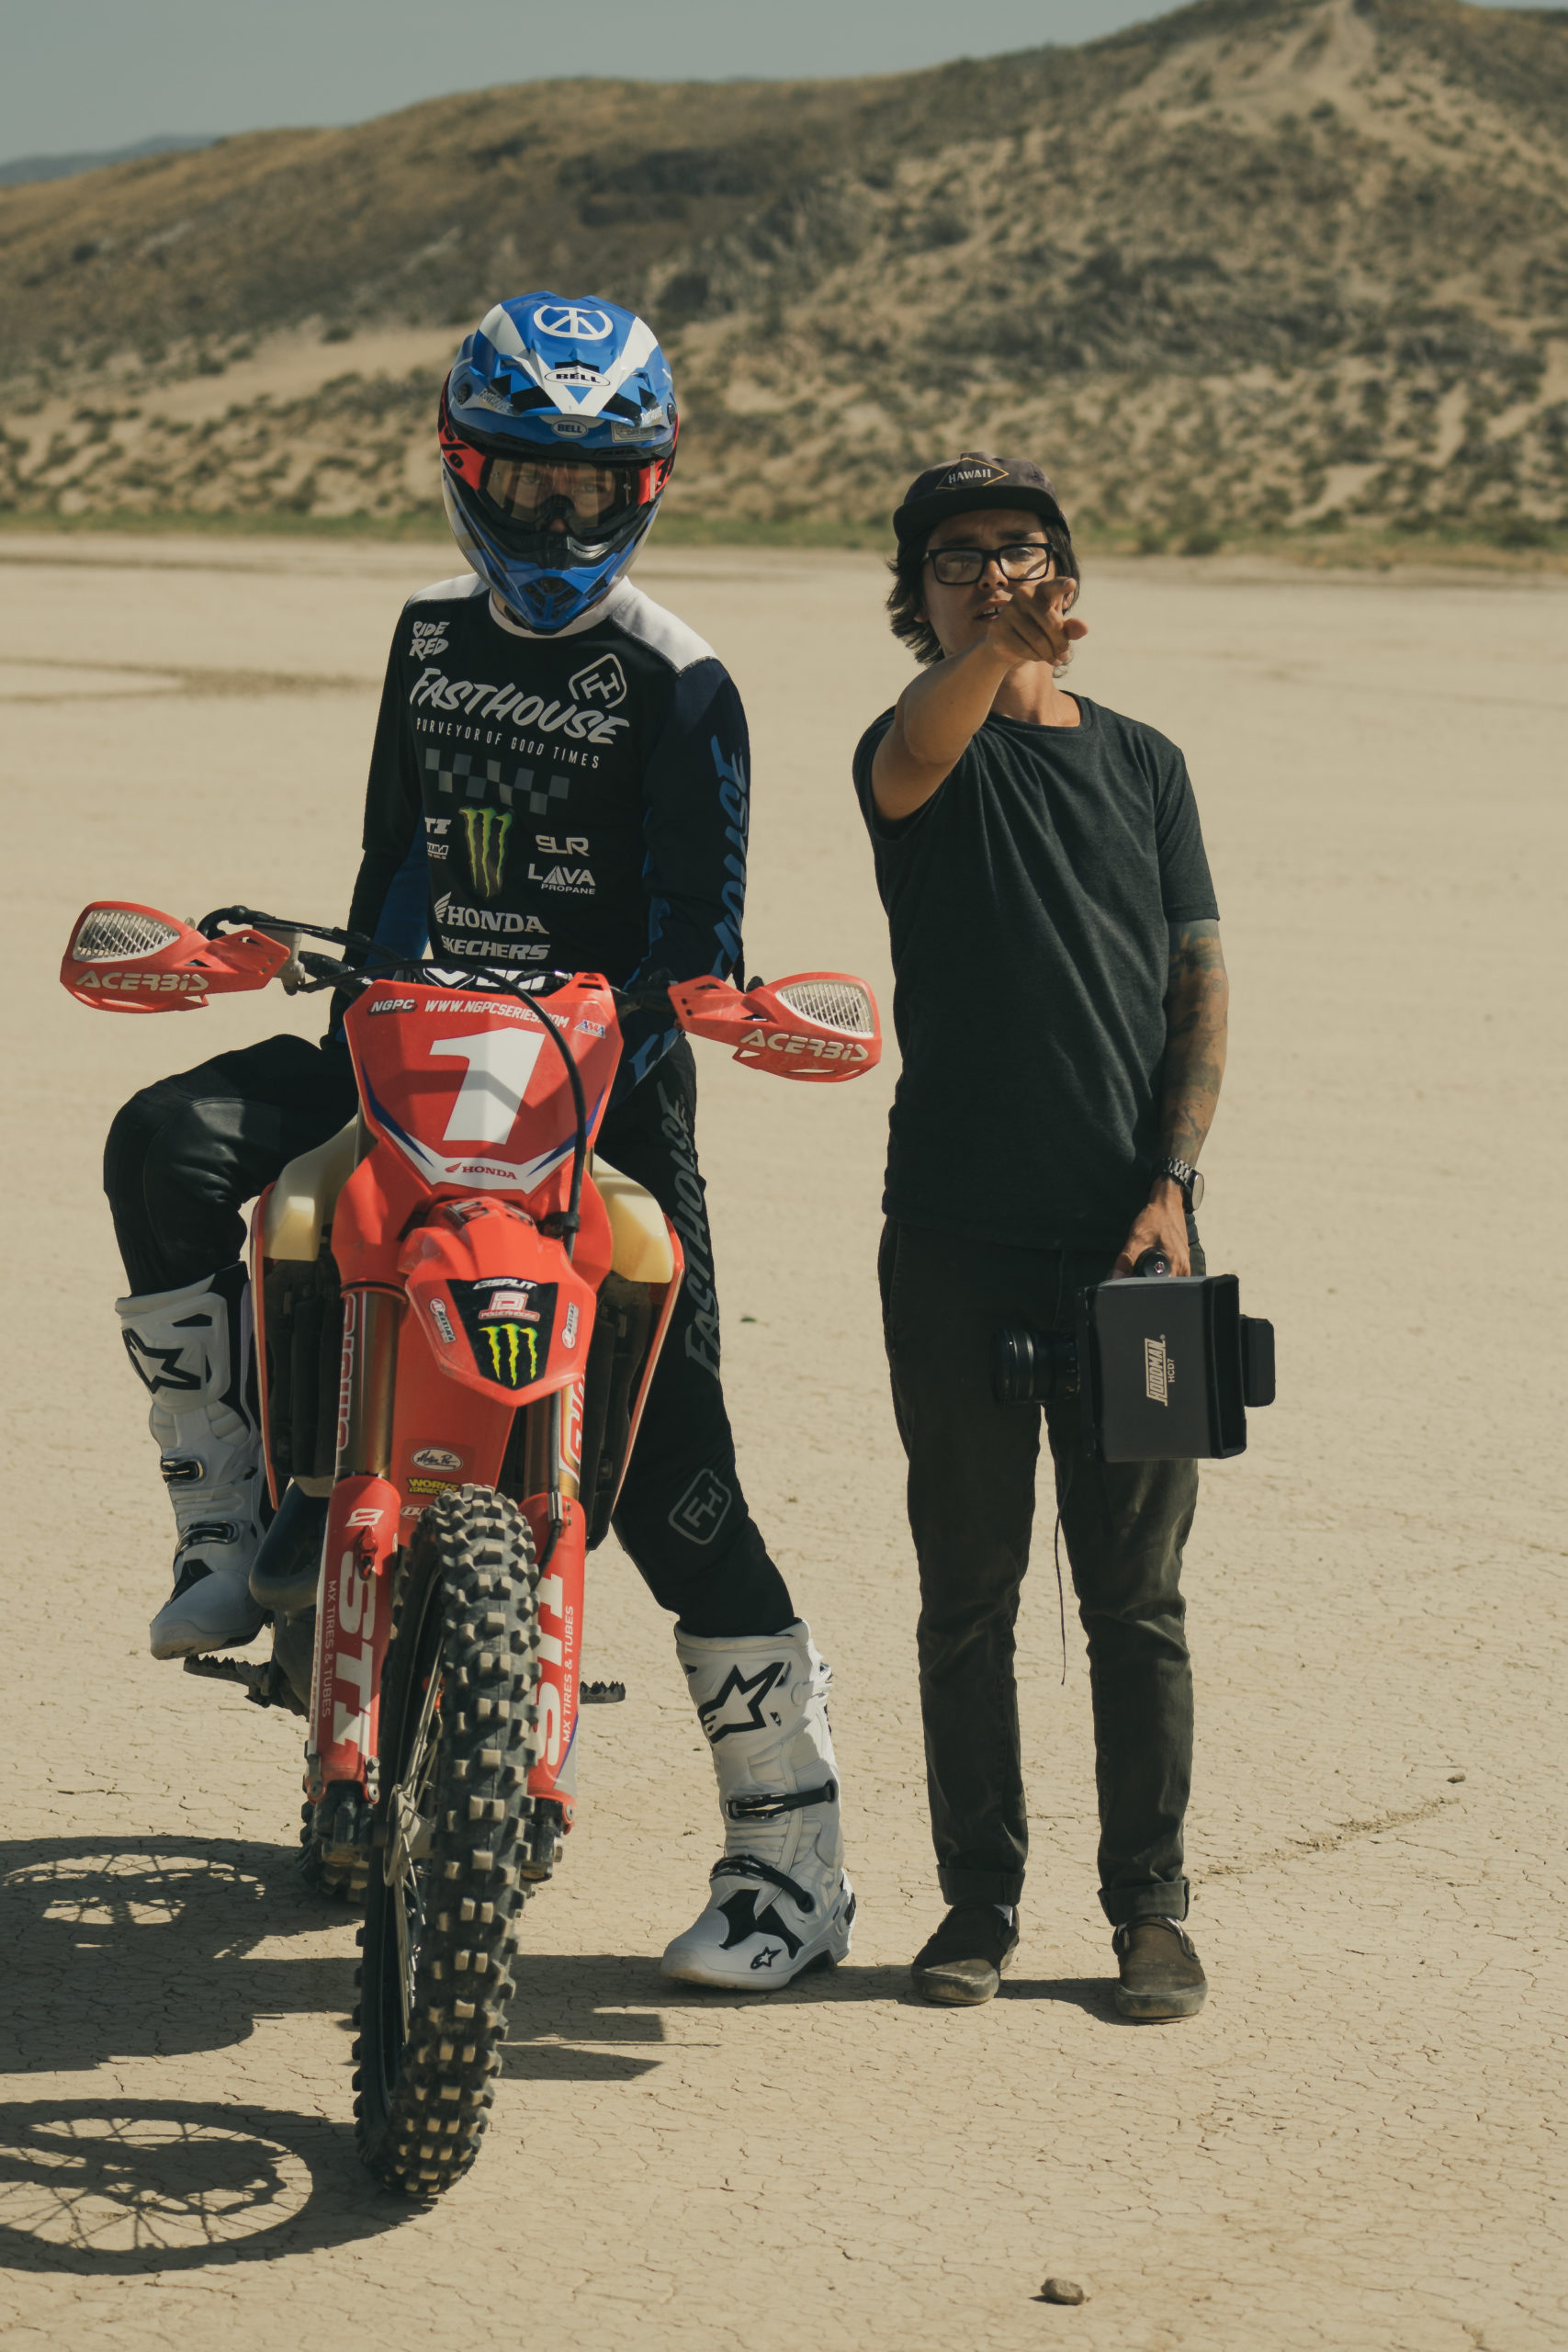
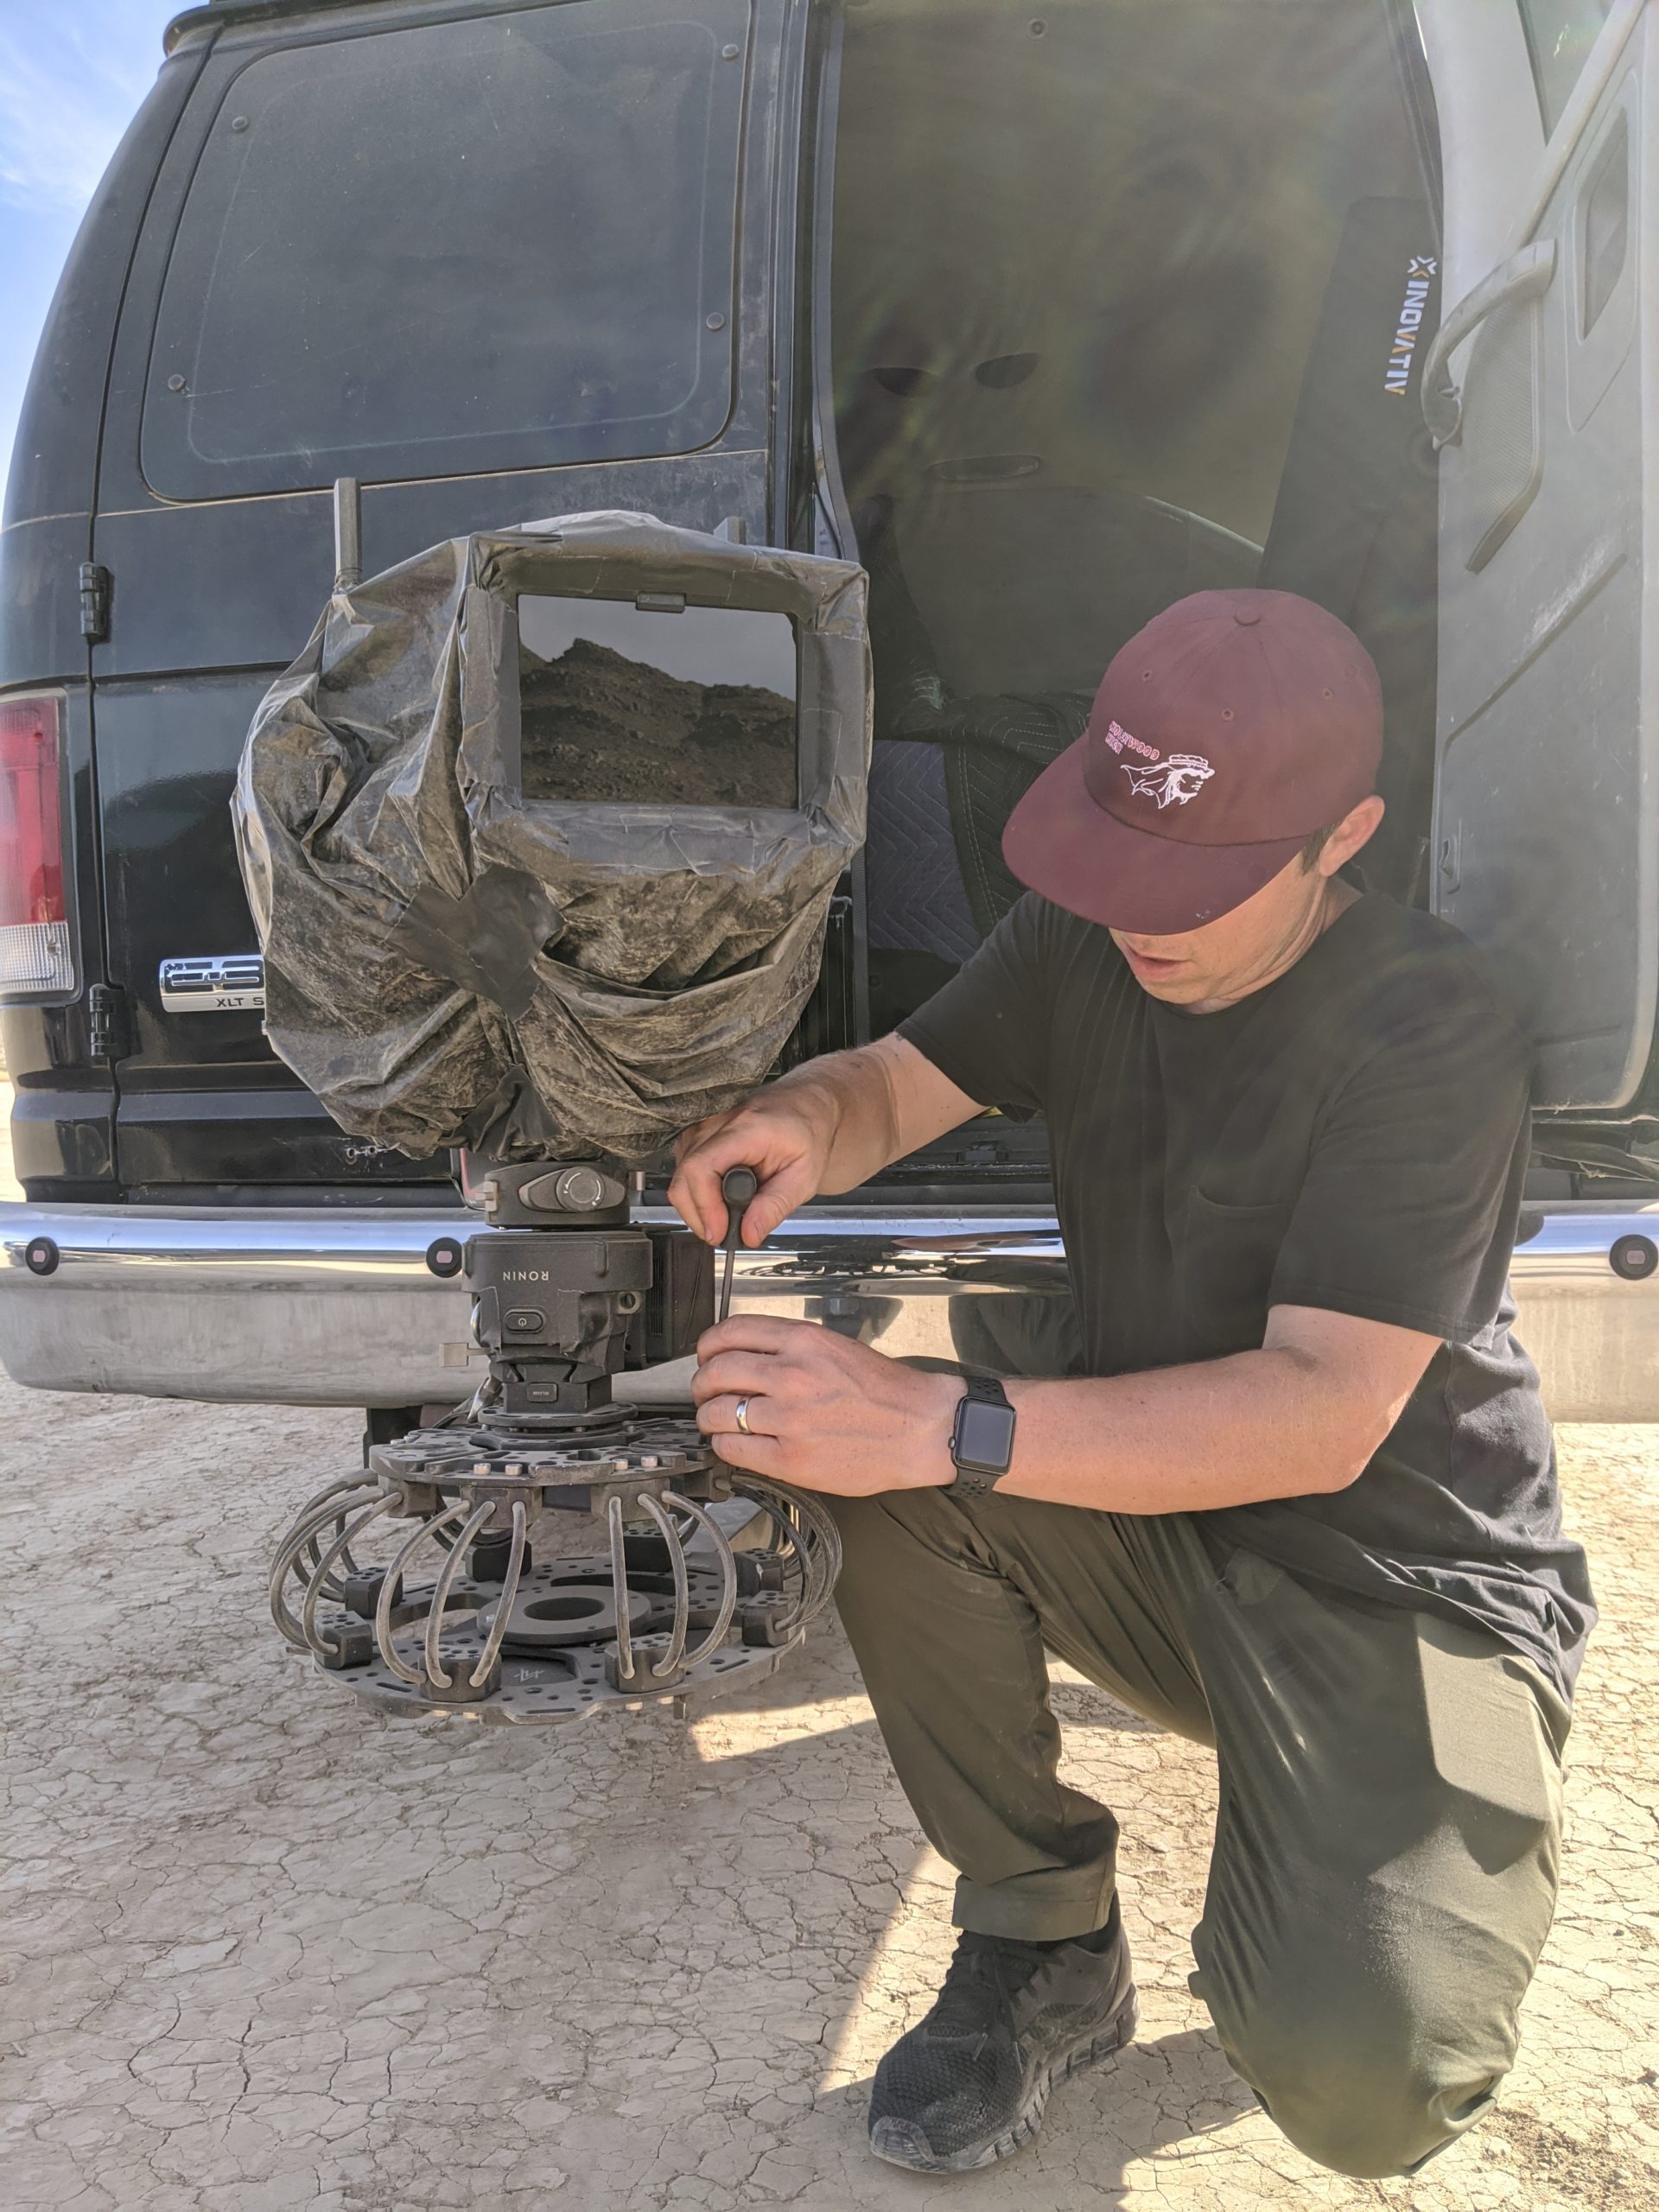
From day one, I knew this lakebed sequence needed to be a tracking shot. I also knew I didn’t have a gimbal or a drone. So, how the hell am I going to execute this shot? I HATE doing this, but I decided to take a chance and reach out to fellow cinematographer and good friend of Martin Fobes (in-house filmmaker at DC Shoes. He’s kind of a badass) to see what kind of deal we could potentially work out for me to rent his Ronin 2 gimbal for this specific shot. I explained to him the project and situation and also that I would completely understand if we could not work out any type of deal to utilize the Ronin 2. No feelings hurt, I get it! Well, Martin ended up suggesting something that I never even would’ve asked to begin with. He asked if instead of renting the gimbal, if instead he could come out to the shoot with his partner, Chris Ray (Uh, kind of also a total badass filmmaker who won X Games Real Skate gold this year) and utilize their new stabilizing camera car system called The Ray Rig. And, in return, asked if they could use some of the footage for their reel and promo material for The Ray Rig. And, uh, the biggest HELL YES was the answer to that.
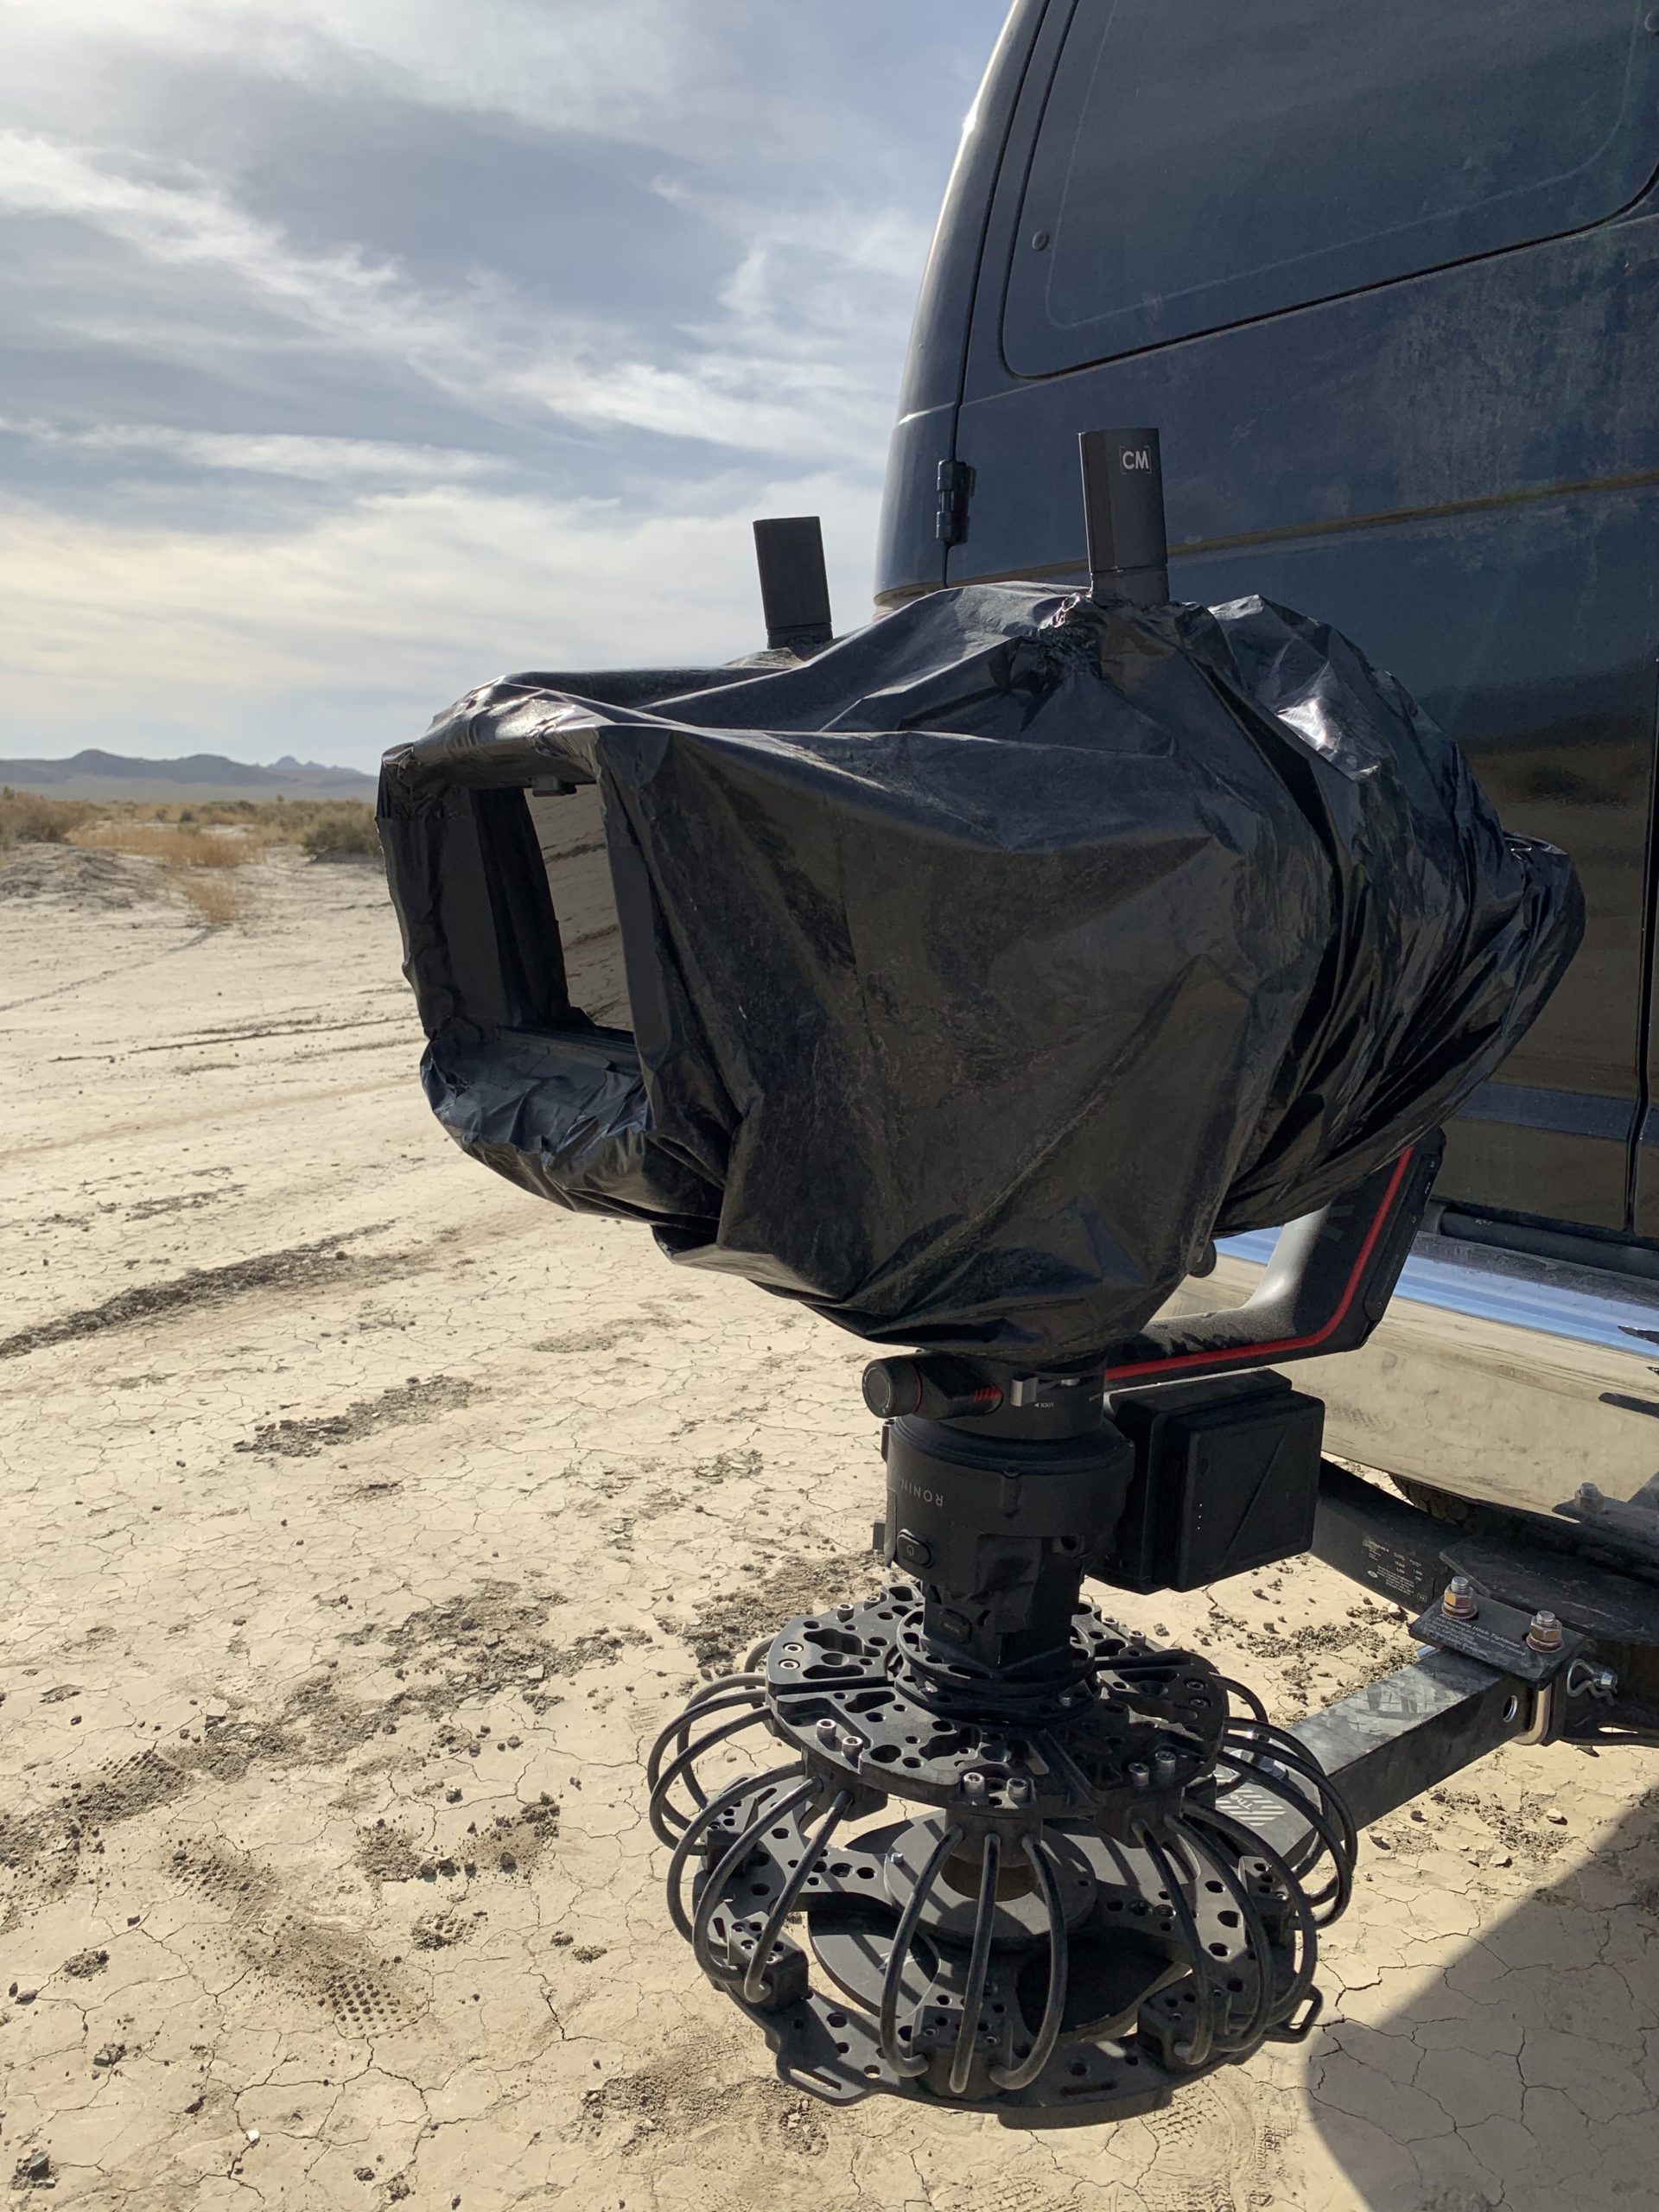
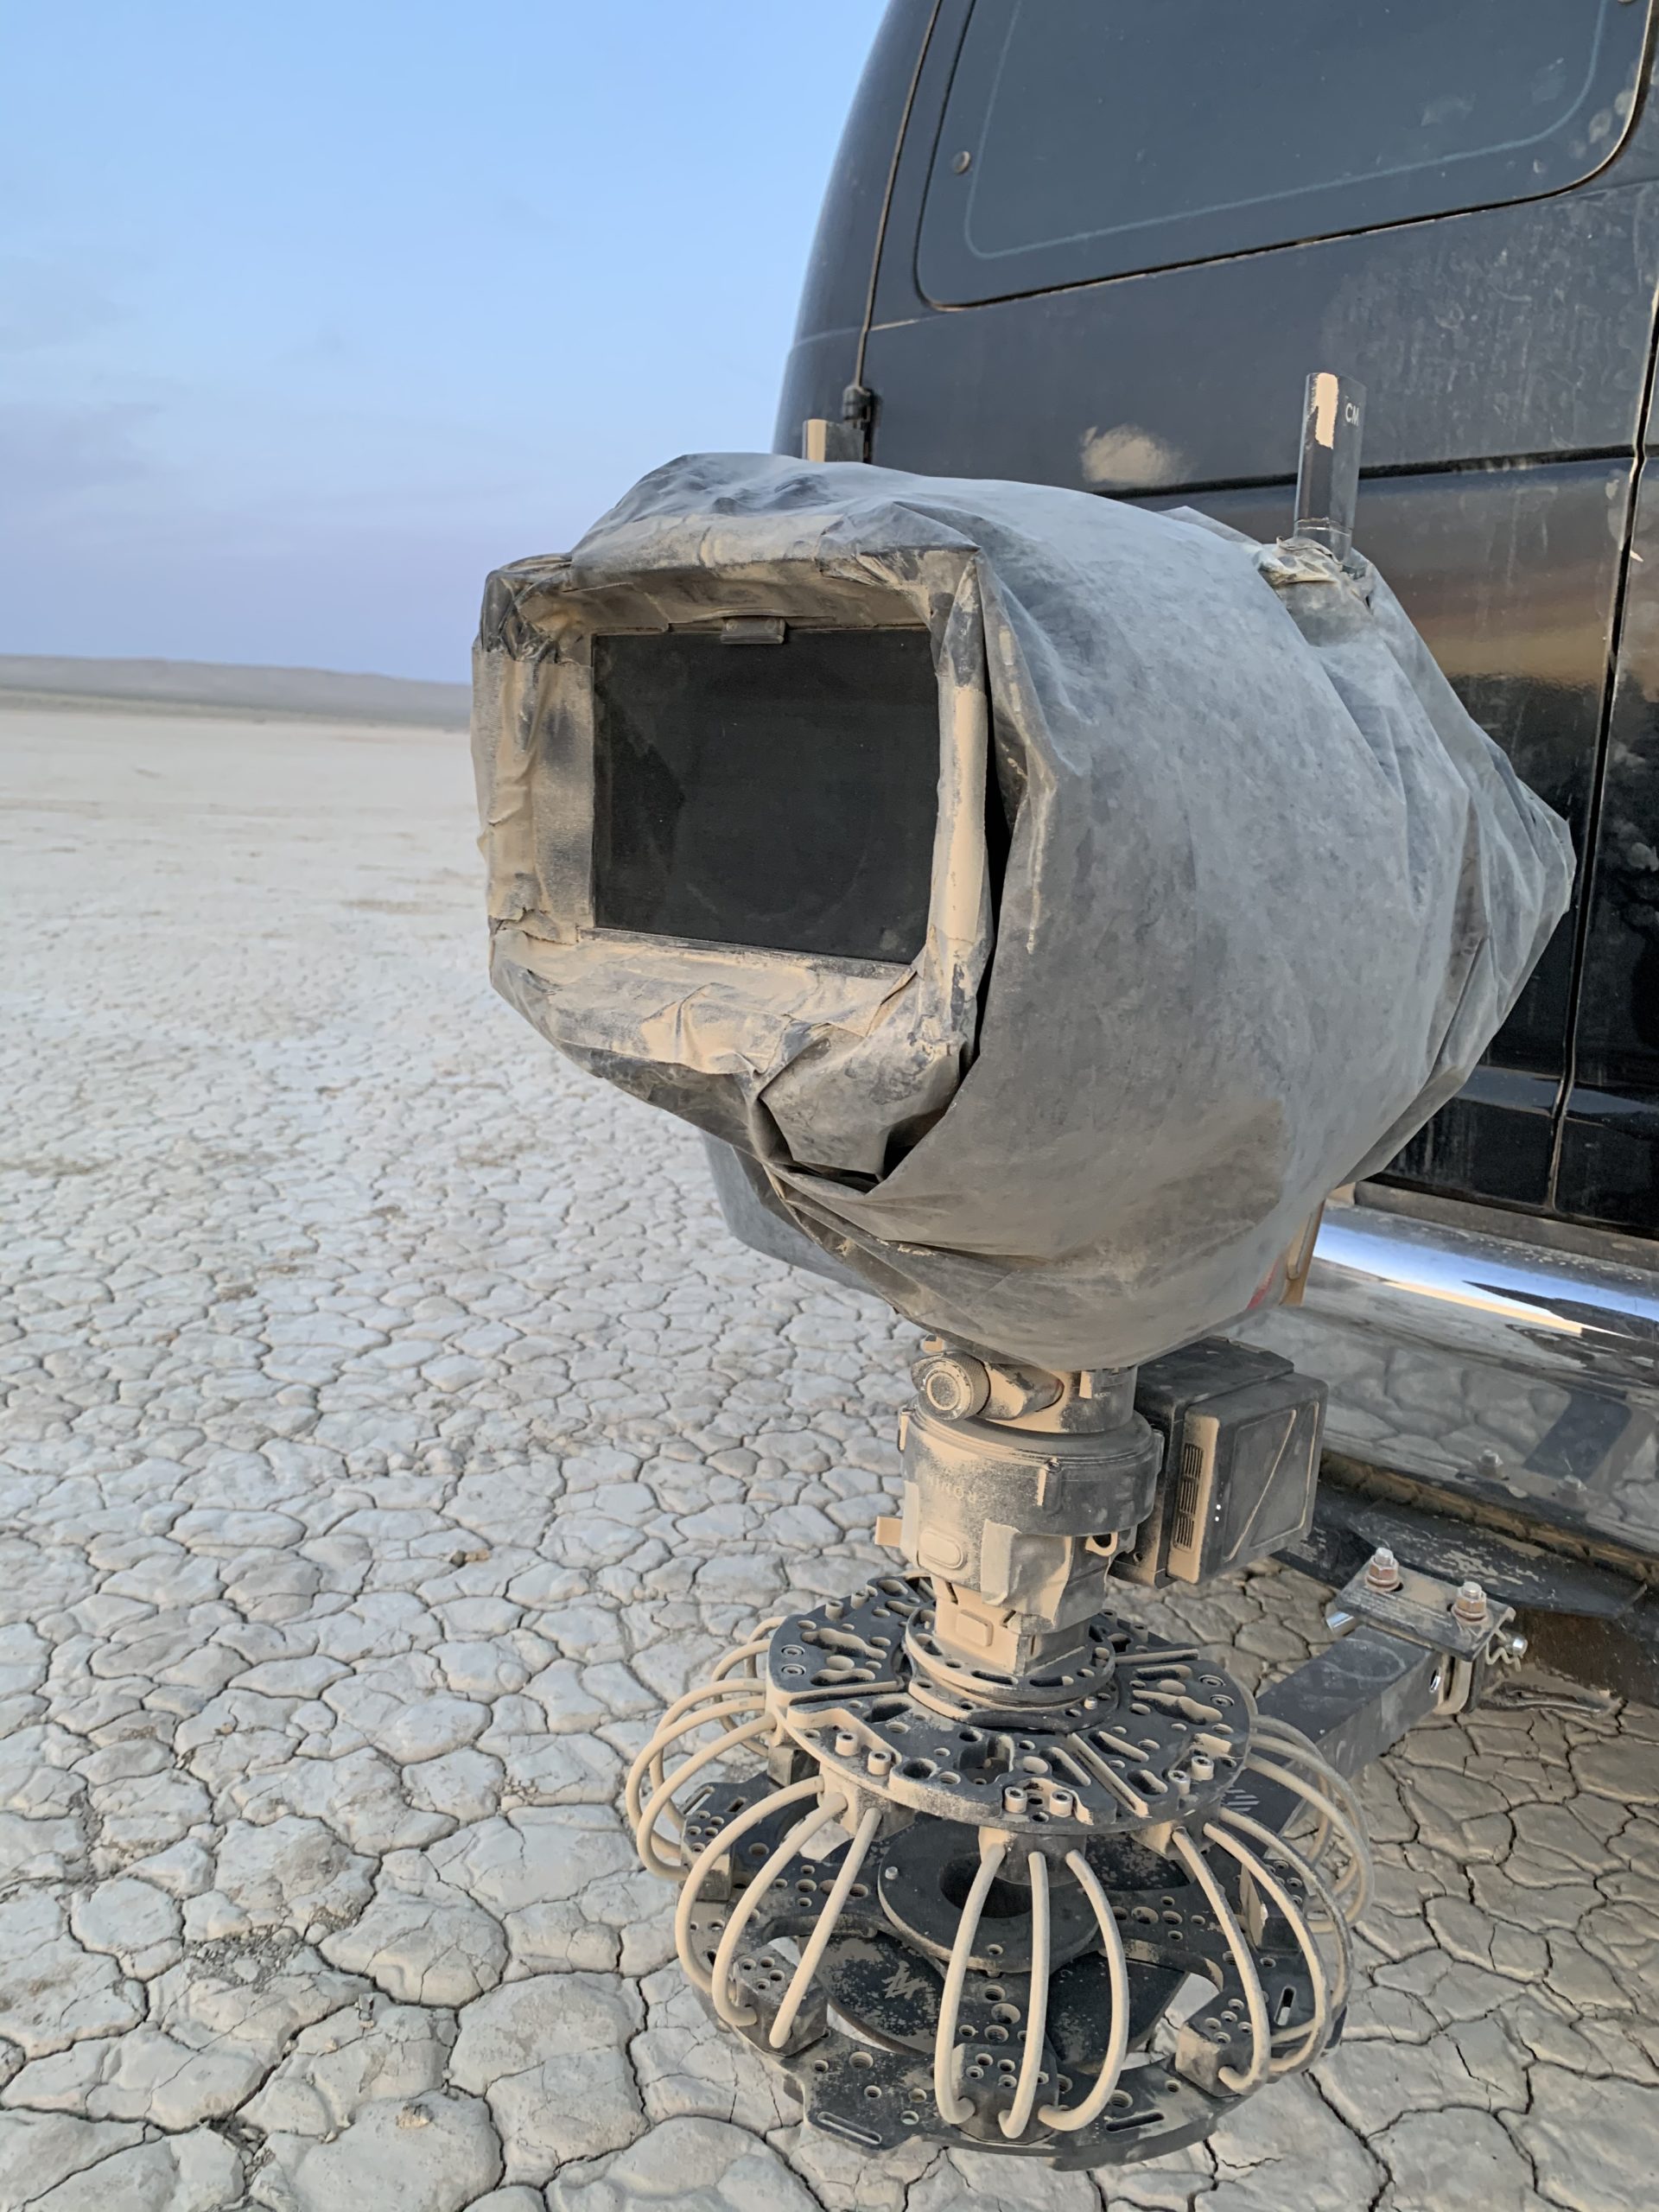
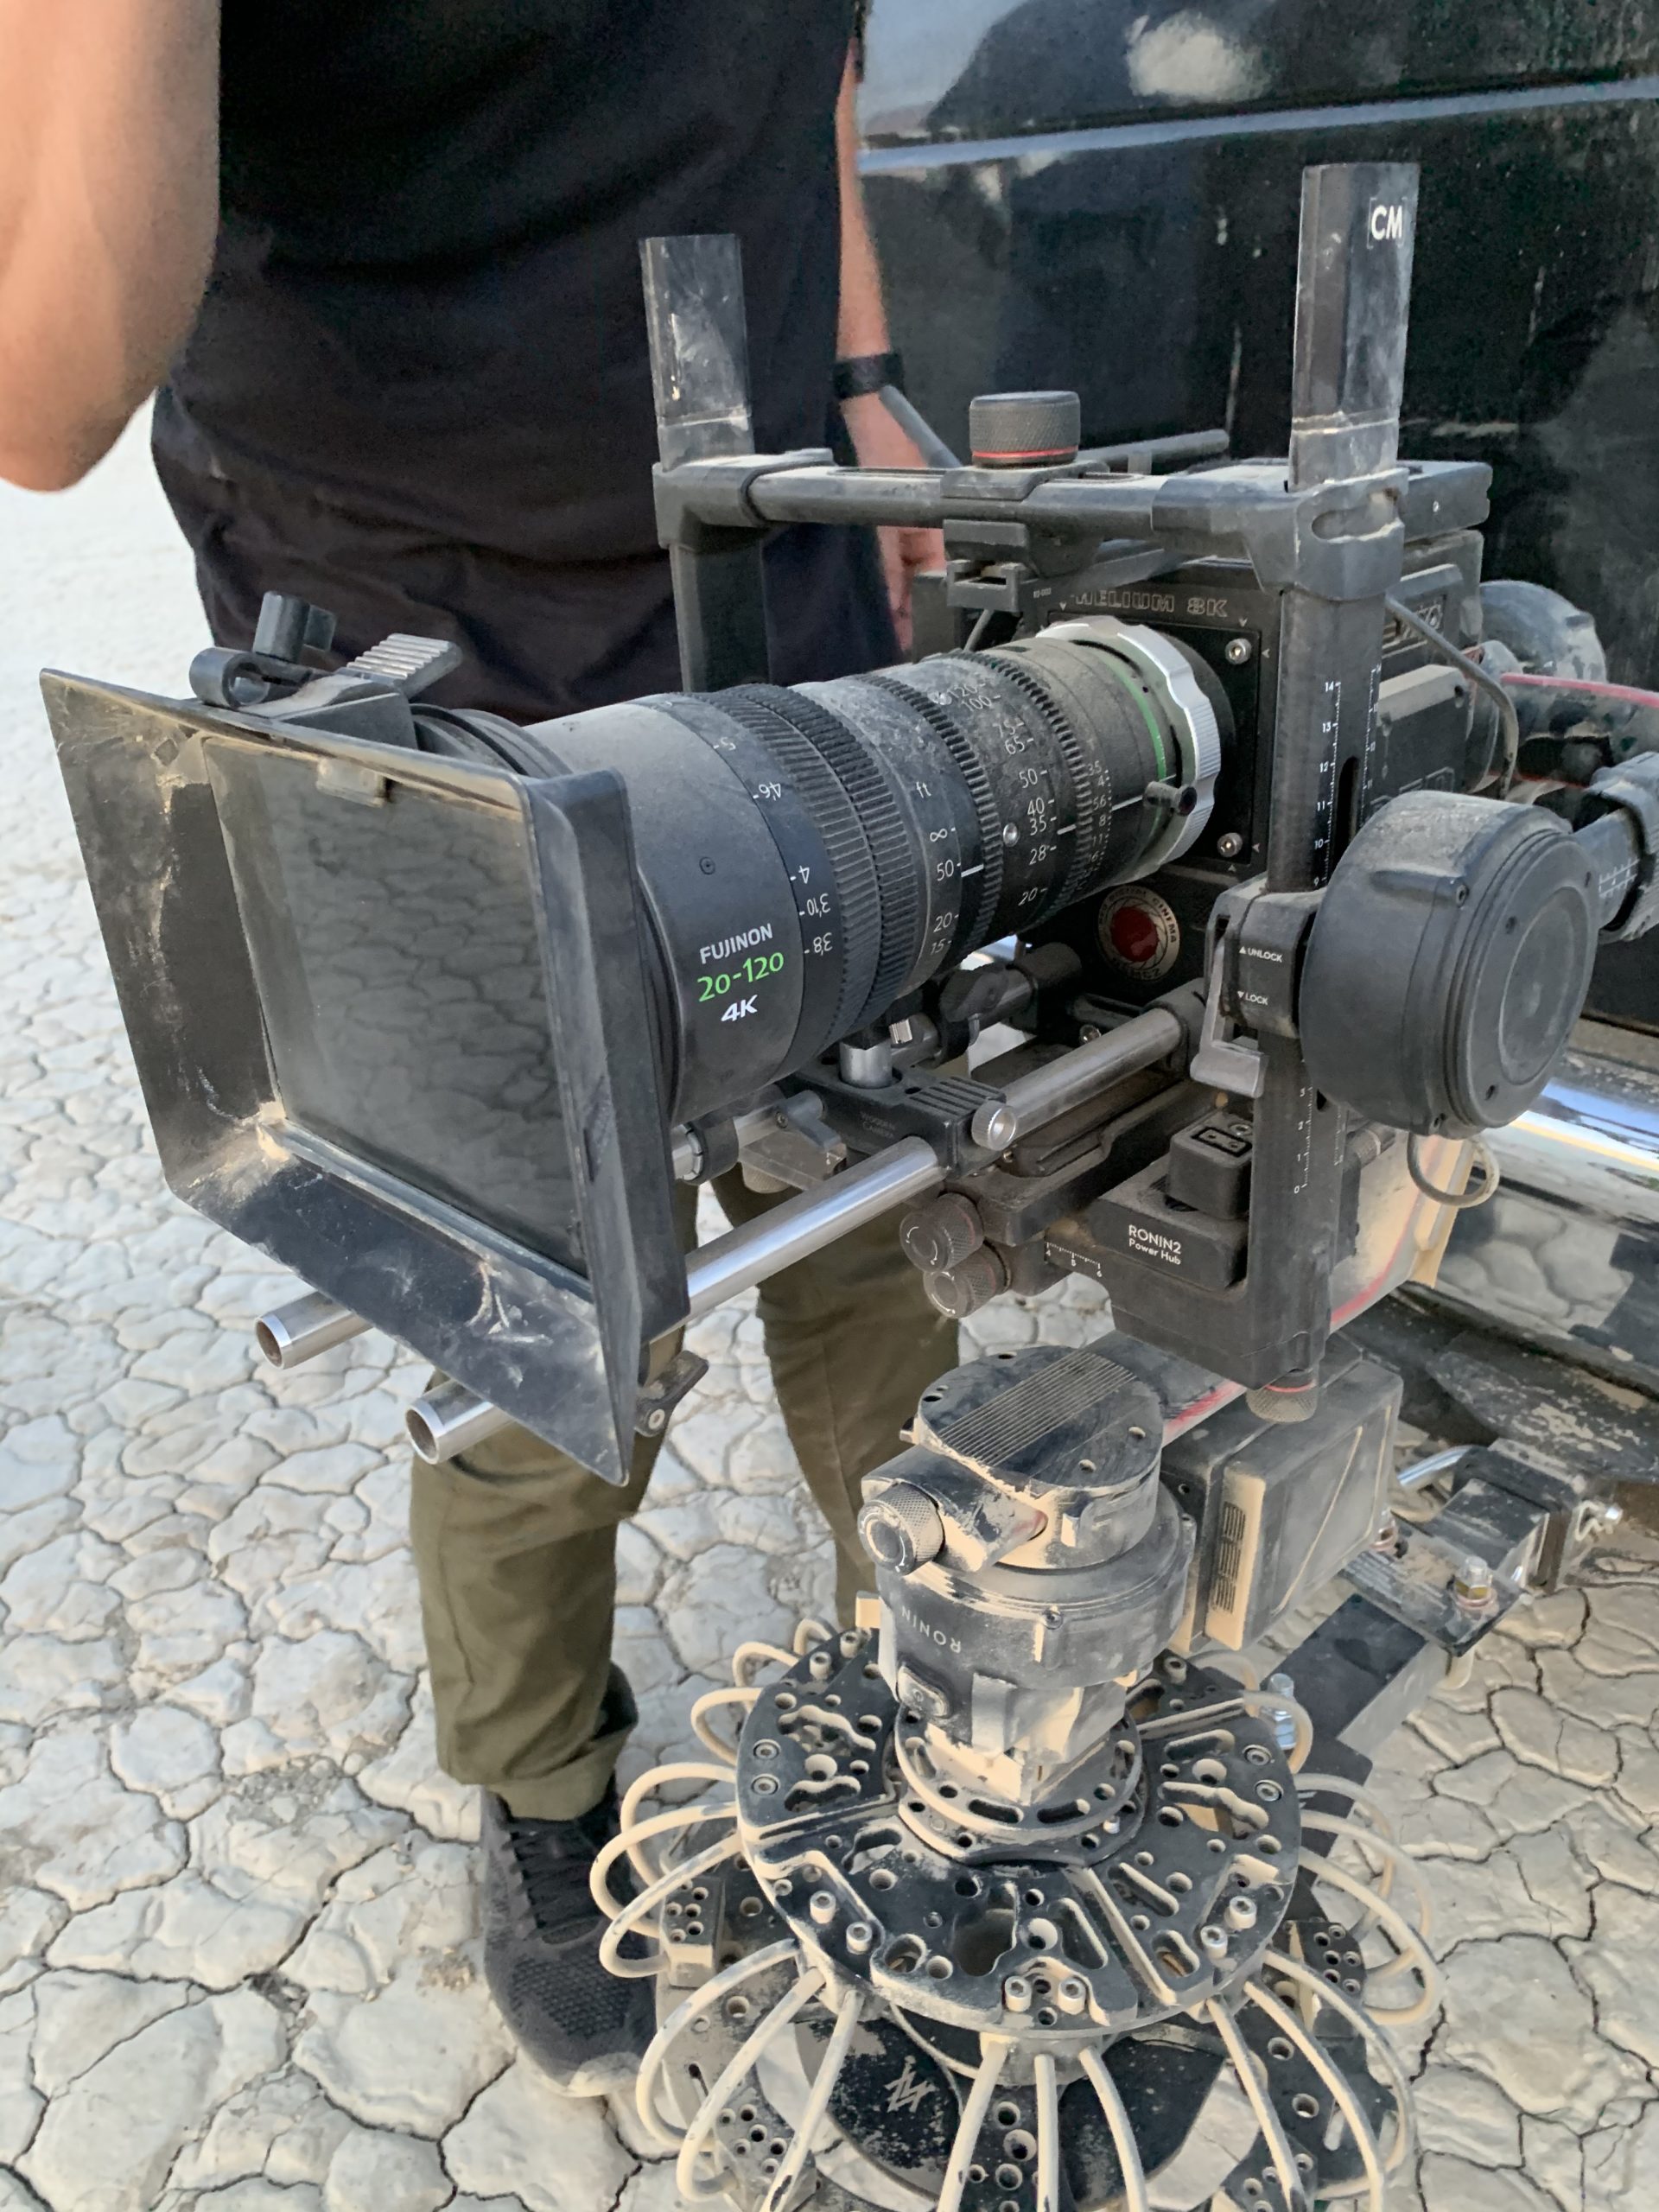
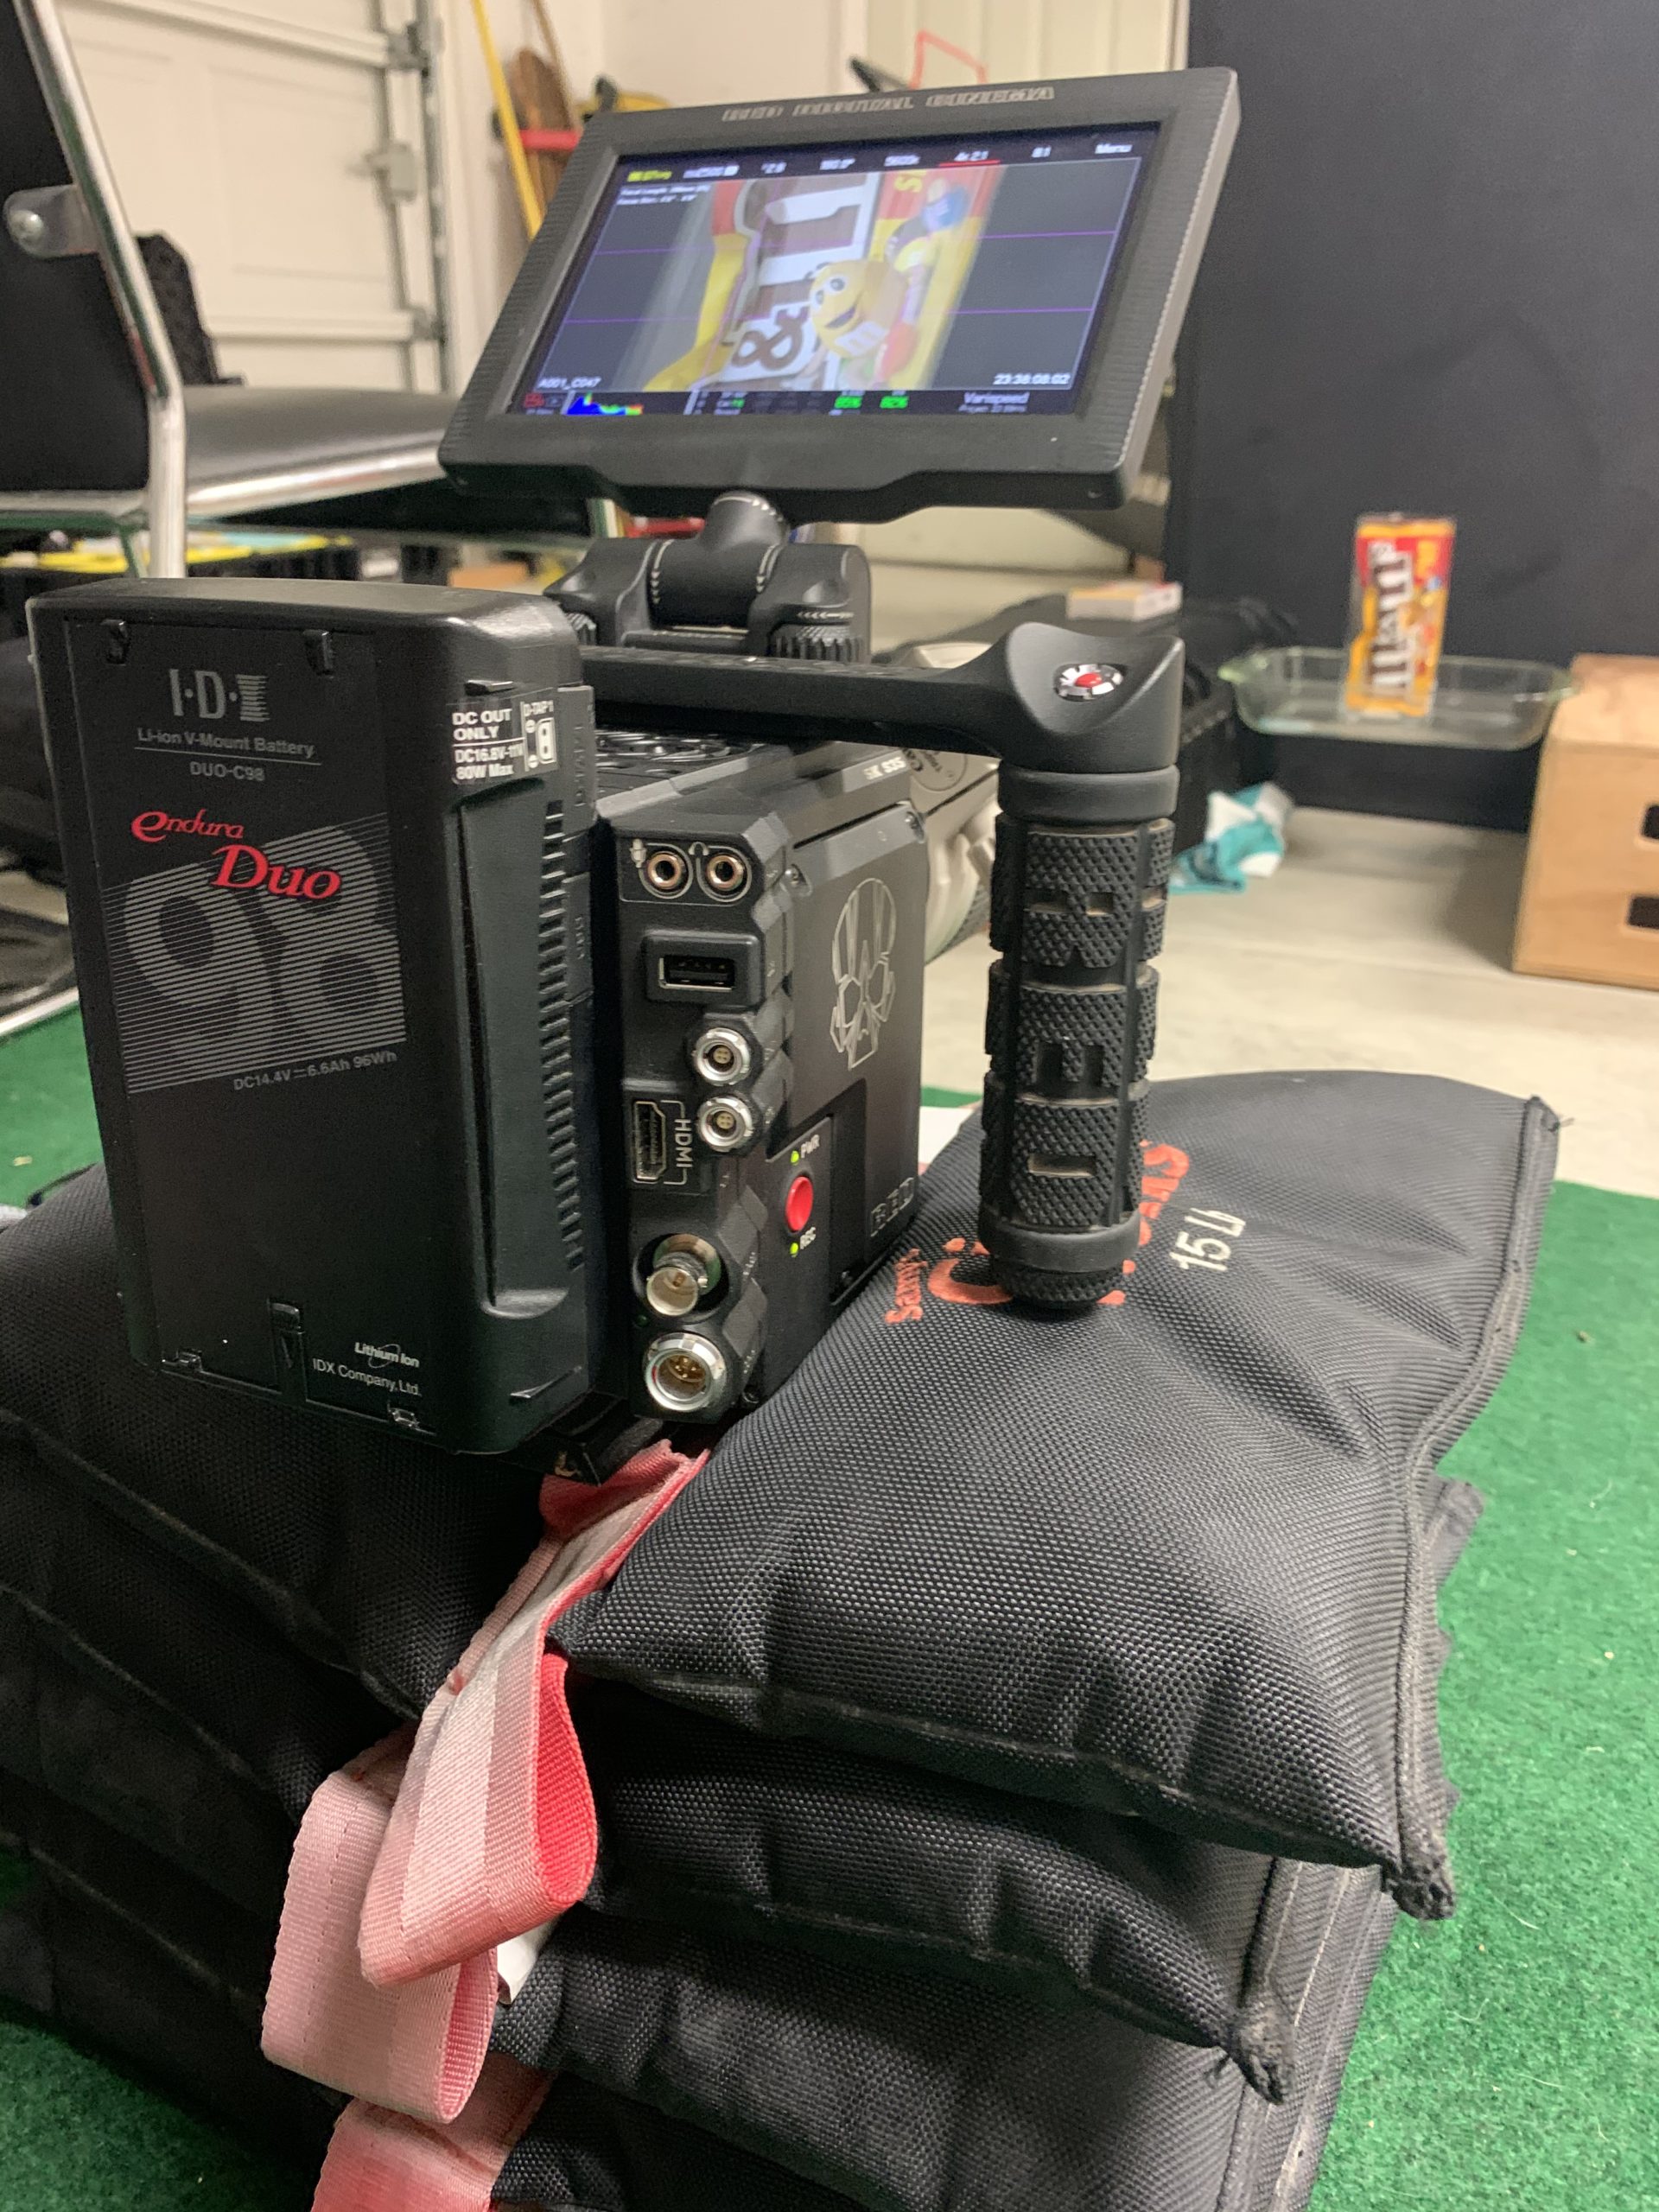
On a warm Saturday over the summer, myself, Brandon, and Stu Alfano piled into my vehicle (again loaded up with all the camera and grip and electric equipment I own) and drove the two or three hours out to the lakebed to meet Martin, Chris and Sam Sosnowski (Sam was shooting a BTS video of the day) and knock out this lakebed sequence with Trevor. Now, for this Ray Rig setup, it was badass to say the least. We had The Ray Rig setup on the back of Chris Ray’s van, mounted to that was the Ronin 2 and Martin’s RED Weapon Helium with a Fujinon T3.5 20-120mm, teredek system and follow focus that all sent a signal into the van where we had our directors monitor and the SmallHD monitor. Here’s how this worked…
Chris was in charge of driving the van and utilizing the SmallHD monitor on his dash to maintain eyes on Trevor at all times (he has the same signal as we do from camera so he is seeing exactly what camera is seeing). Martin and myself sat in the back seat of the van with the big directors monitor pulling signal from the camera. I was in charge of controlling camera zoom and camera focus while Martin was in charge of camera panning and tilting. What is so great about working with a crew like this is that there are no egos, no attitude, no nothing. It was simply about working together as a team and doing everything we could to capture the images needed. Why I am telling you this is because it made communication between the three of us while in the van so easy and simple. And, to get the shots we needed, communication was imperative.
We took several passes to get the timing, speed, and framing correct for this ending shot, but once we did, I think we got two passes in the light that I wanted before the sun was behind the mountains. It was definitely a make or break because it was so much about the right light and, thankfully, we got exactly what I was after to close out what will be the last shot of Trevor in the actual film. I can’t begin to thank Martin, Chris, and Sam enough. That such an incredible experience with a wonderful group of humans. I realize I keep saying this, but it is so much about your crew and everybody being on the same page creatively and not having an ego. If you’re interested, I suggest checking out The Ray Rig right here, available for purchase now.

PRODUCTION – DAY 05 – INT – NOT OF THIS WORLD
I’m not going to go into what this shot means. Most of this stuff is all open to interpretation. But, as I said in my last installment of Frame of Mind, everything in this film was 100% intentional and with purpose. I didn’t shoot a single frame based on the idea of, “Oh, that’s cool.” It is all about intention and meaning and serving the story. As I just mentioned, I am not going to explain the meaning of everything, that’s for you to decode for yourself and see what it feels and means to you. However, I will explain how we executed this fun shot, which thanks to my lovely wife who has her degree is biological chemistry, was done very easily. Yes, she is the smart one in this relationship.
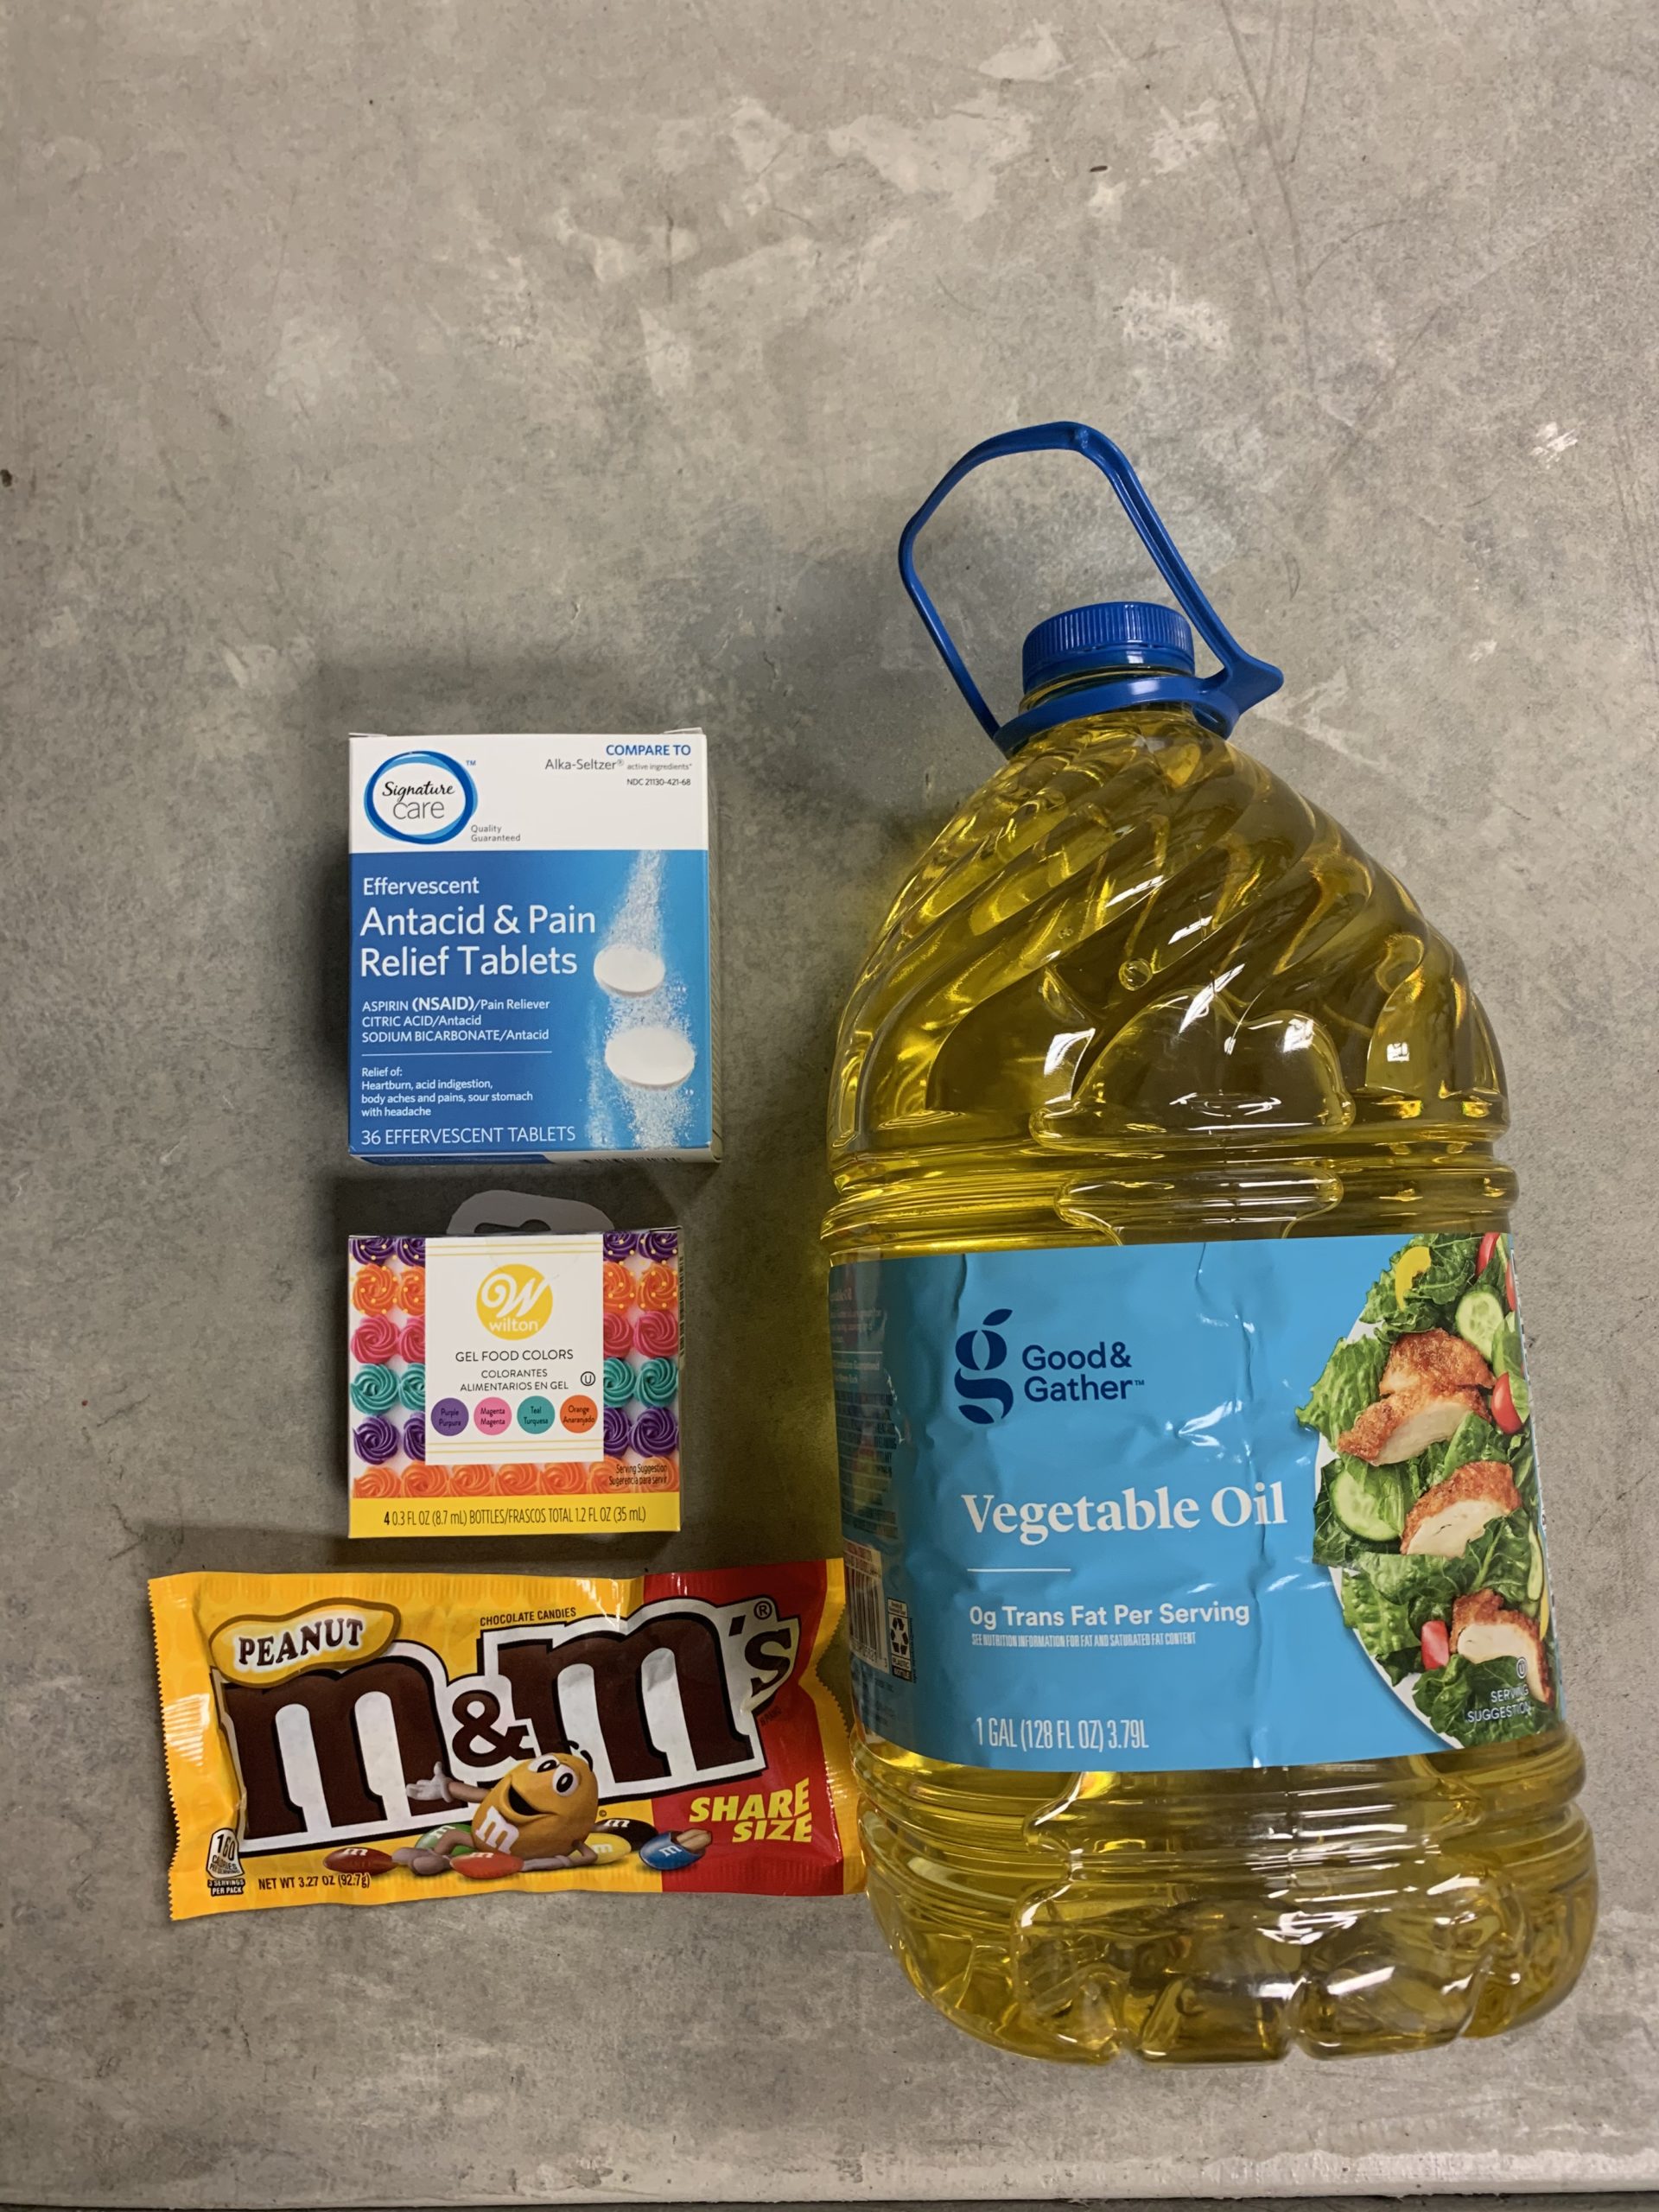
For this opening shot of the film, I knew what I was after, but I also knew I’d need help in executing the shot. I showed a reference photo of what I had in mind to my wife and, instantly, she said that was simple and knew exactly what we needed to purchase to make it happen. So, after a quick trip to our local Target, we came back with the following:
-Vegetable Oil
-Antiacid & Pain Relief Tablets
-Gel Food Coloring
-M&Ms
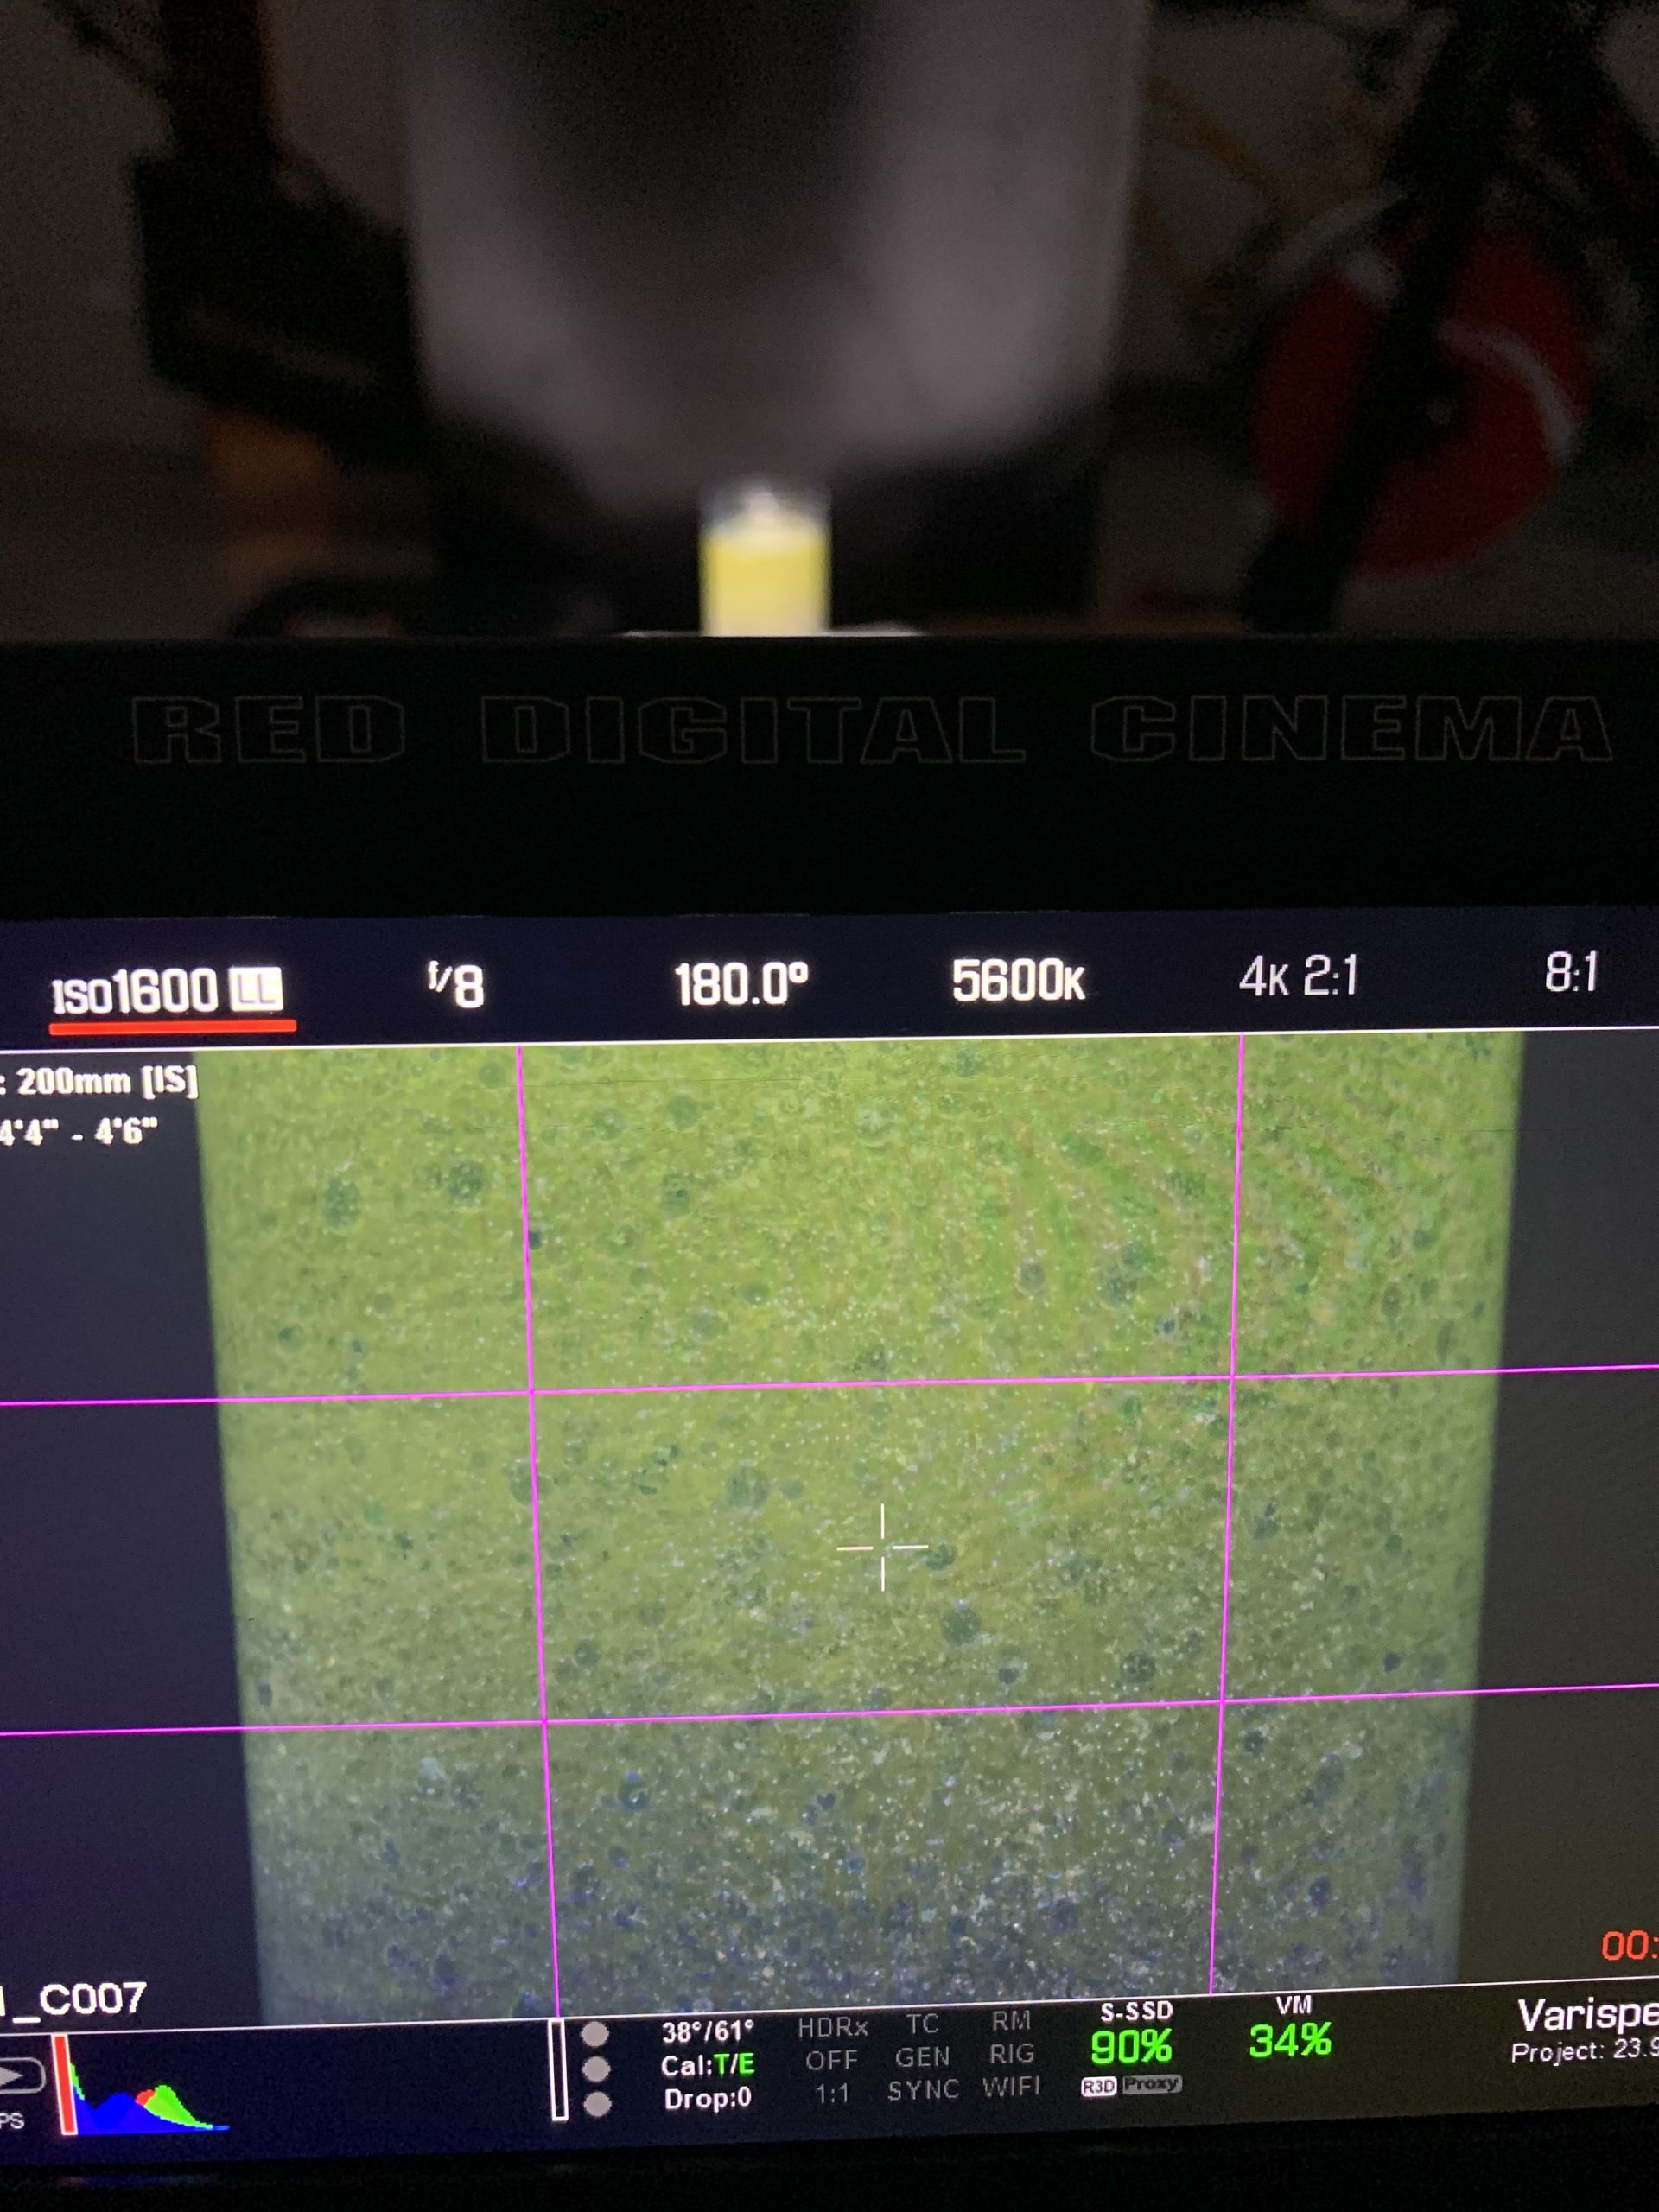
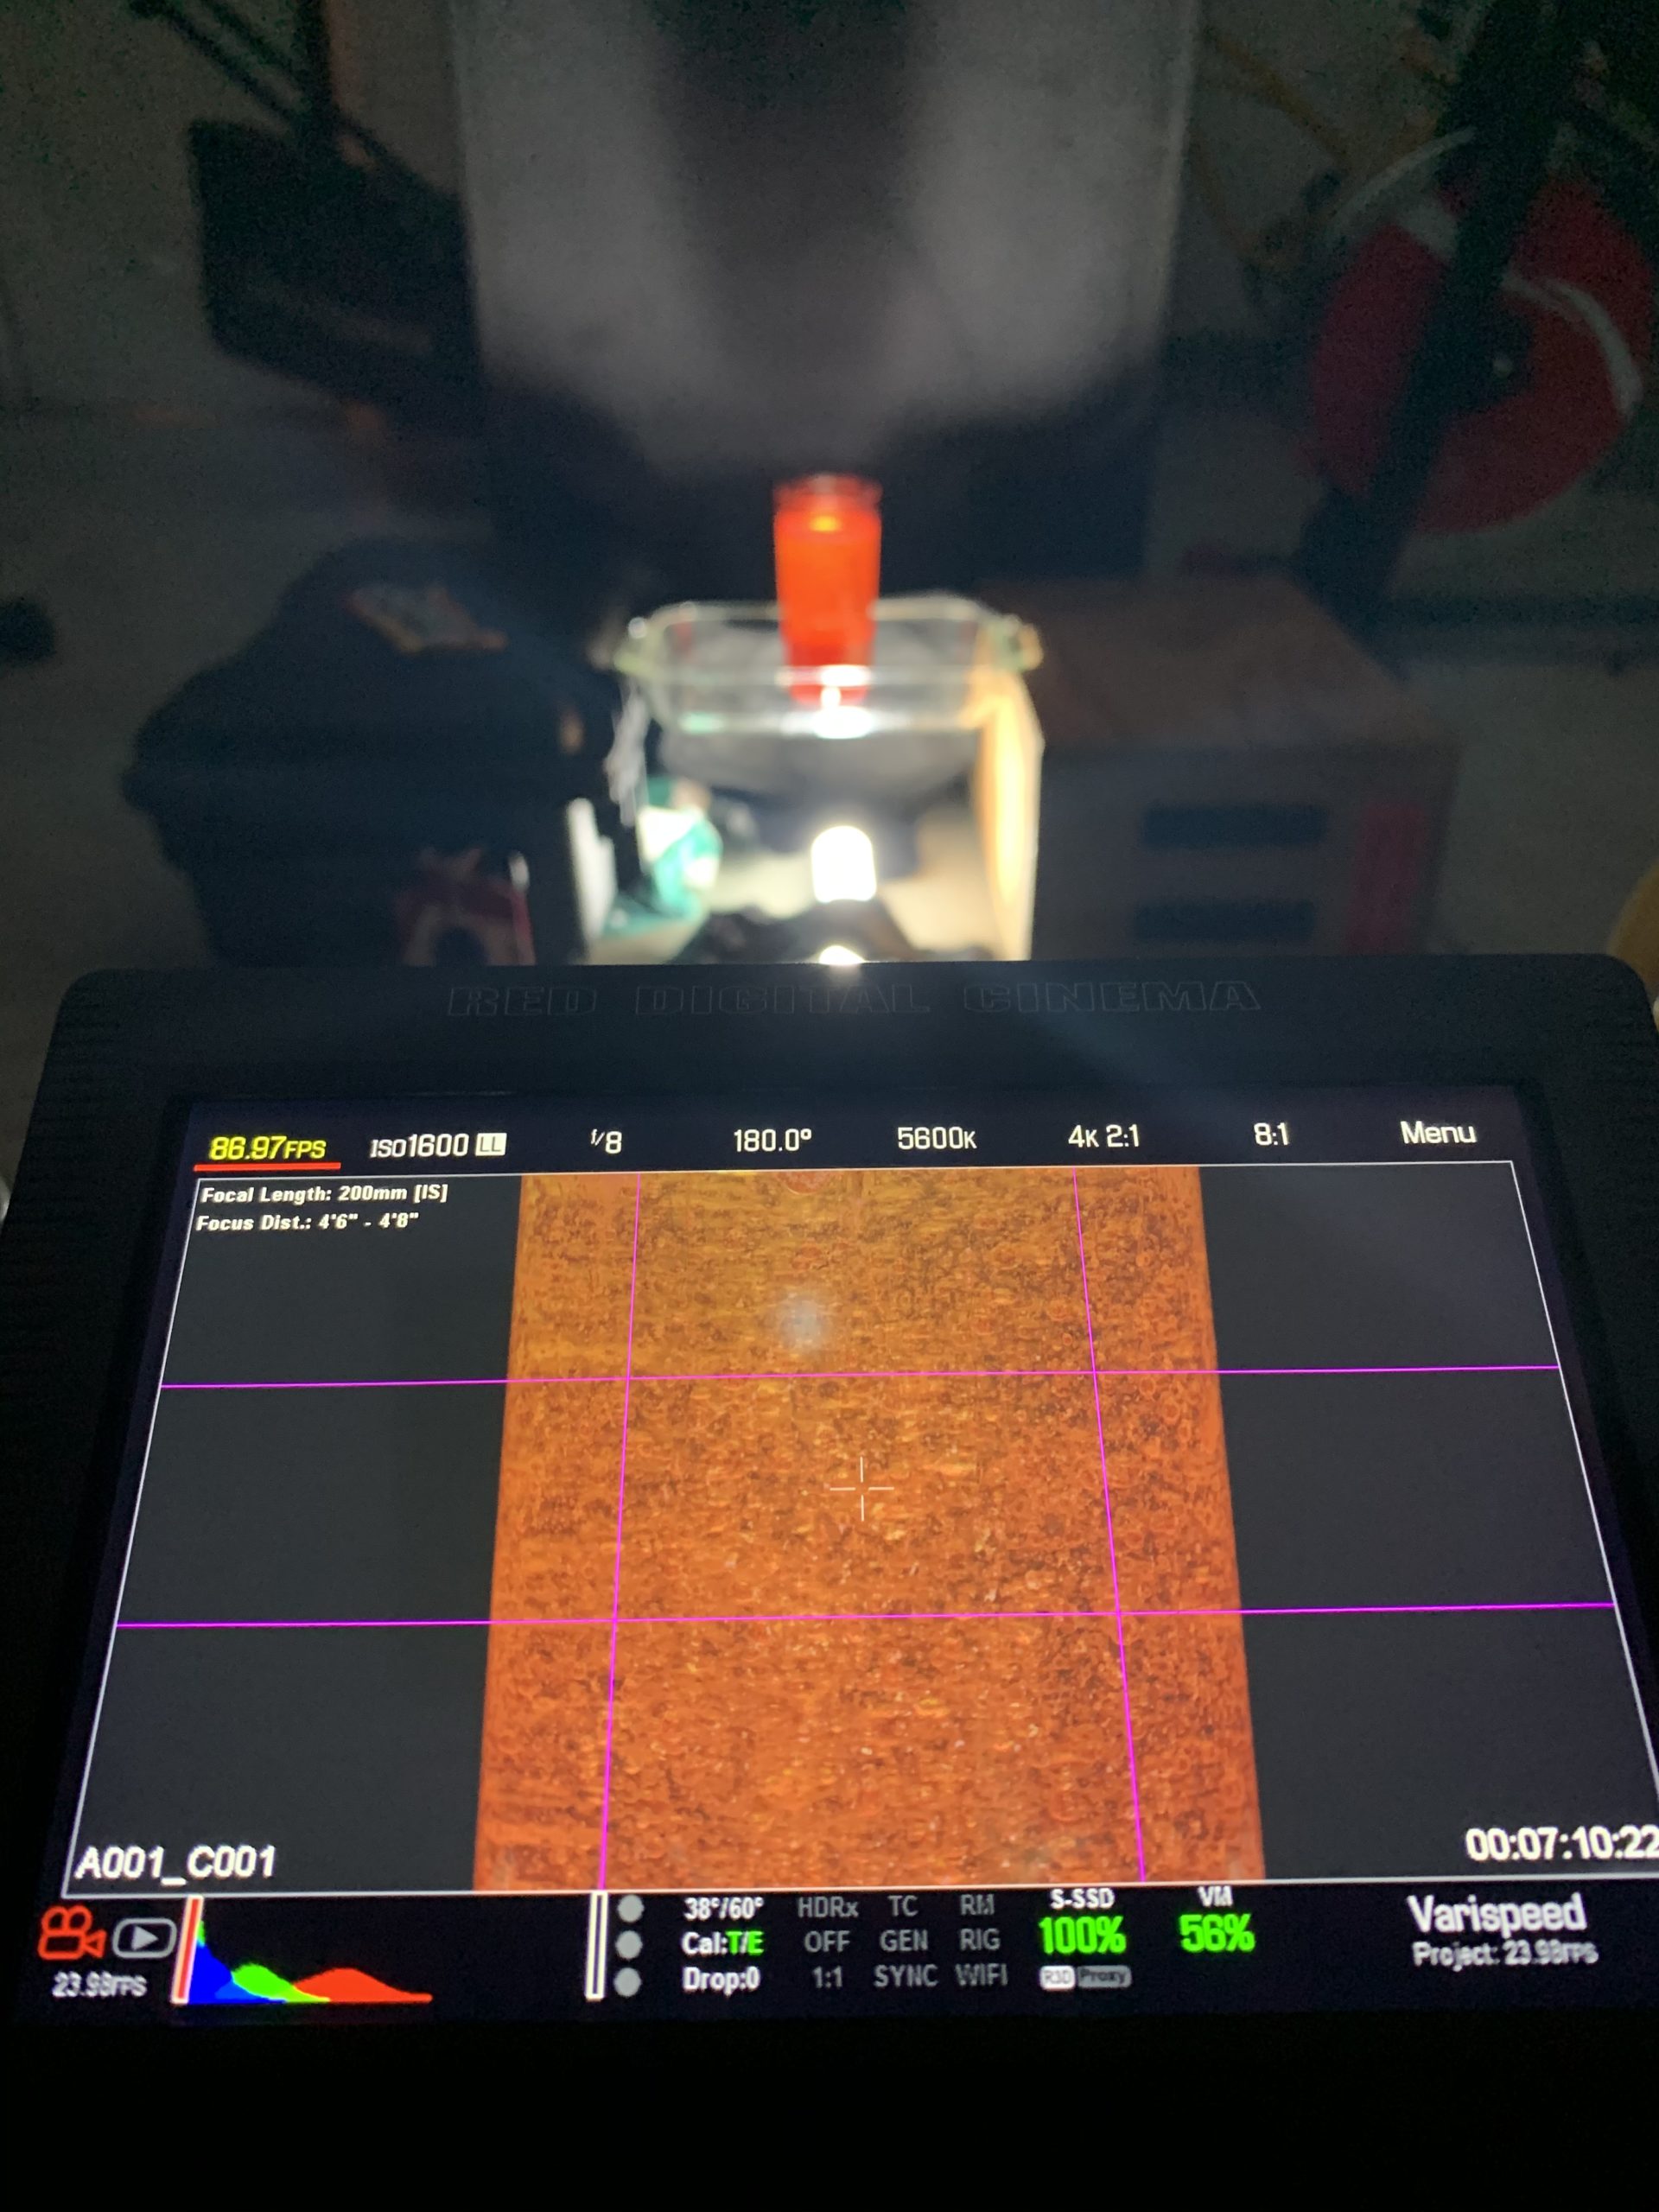
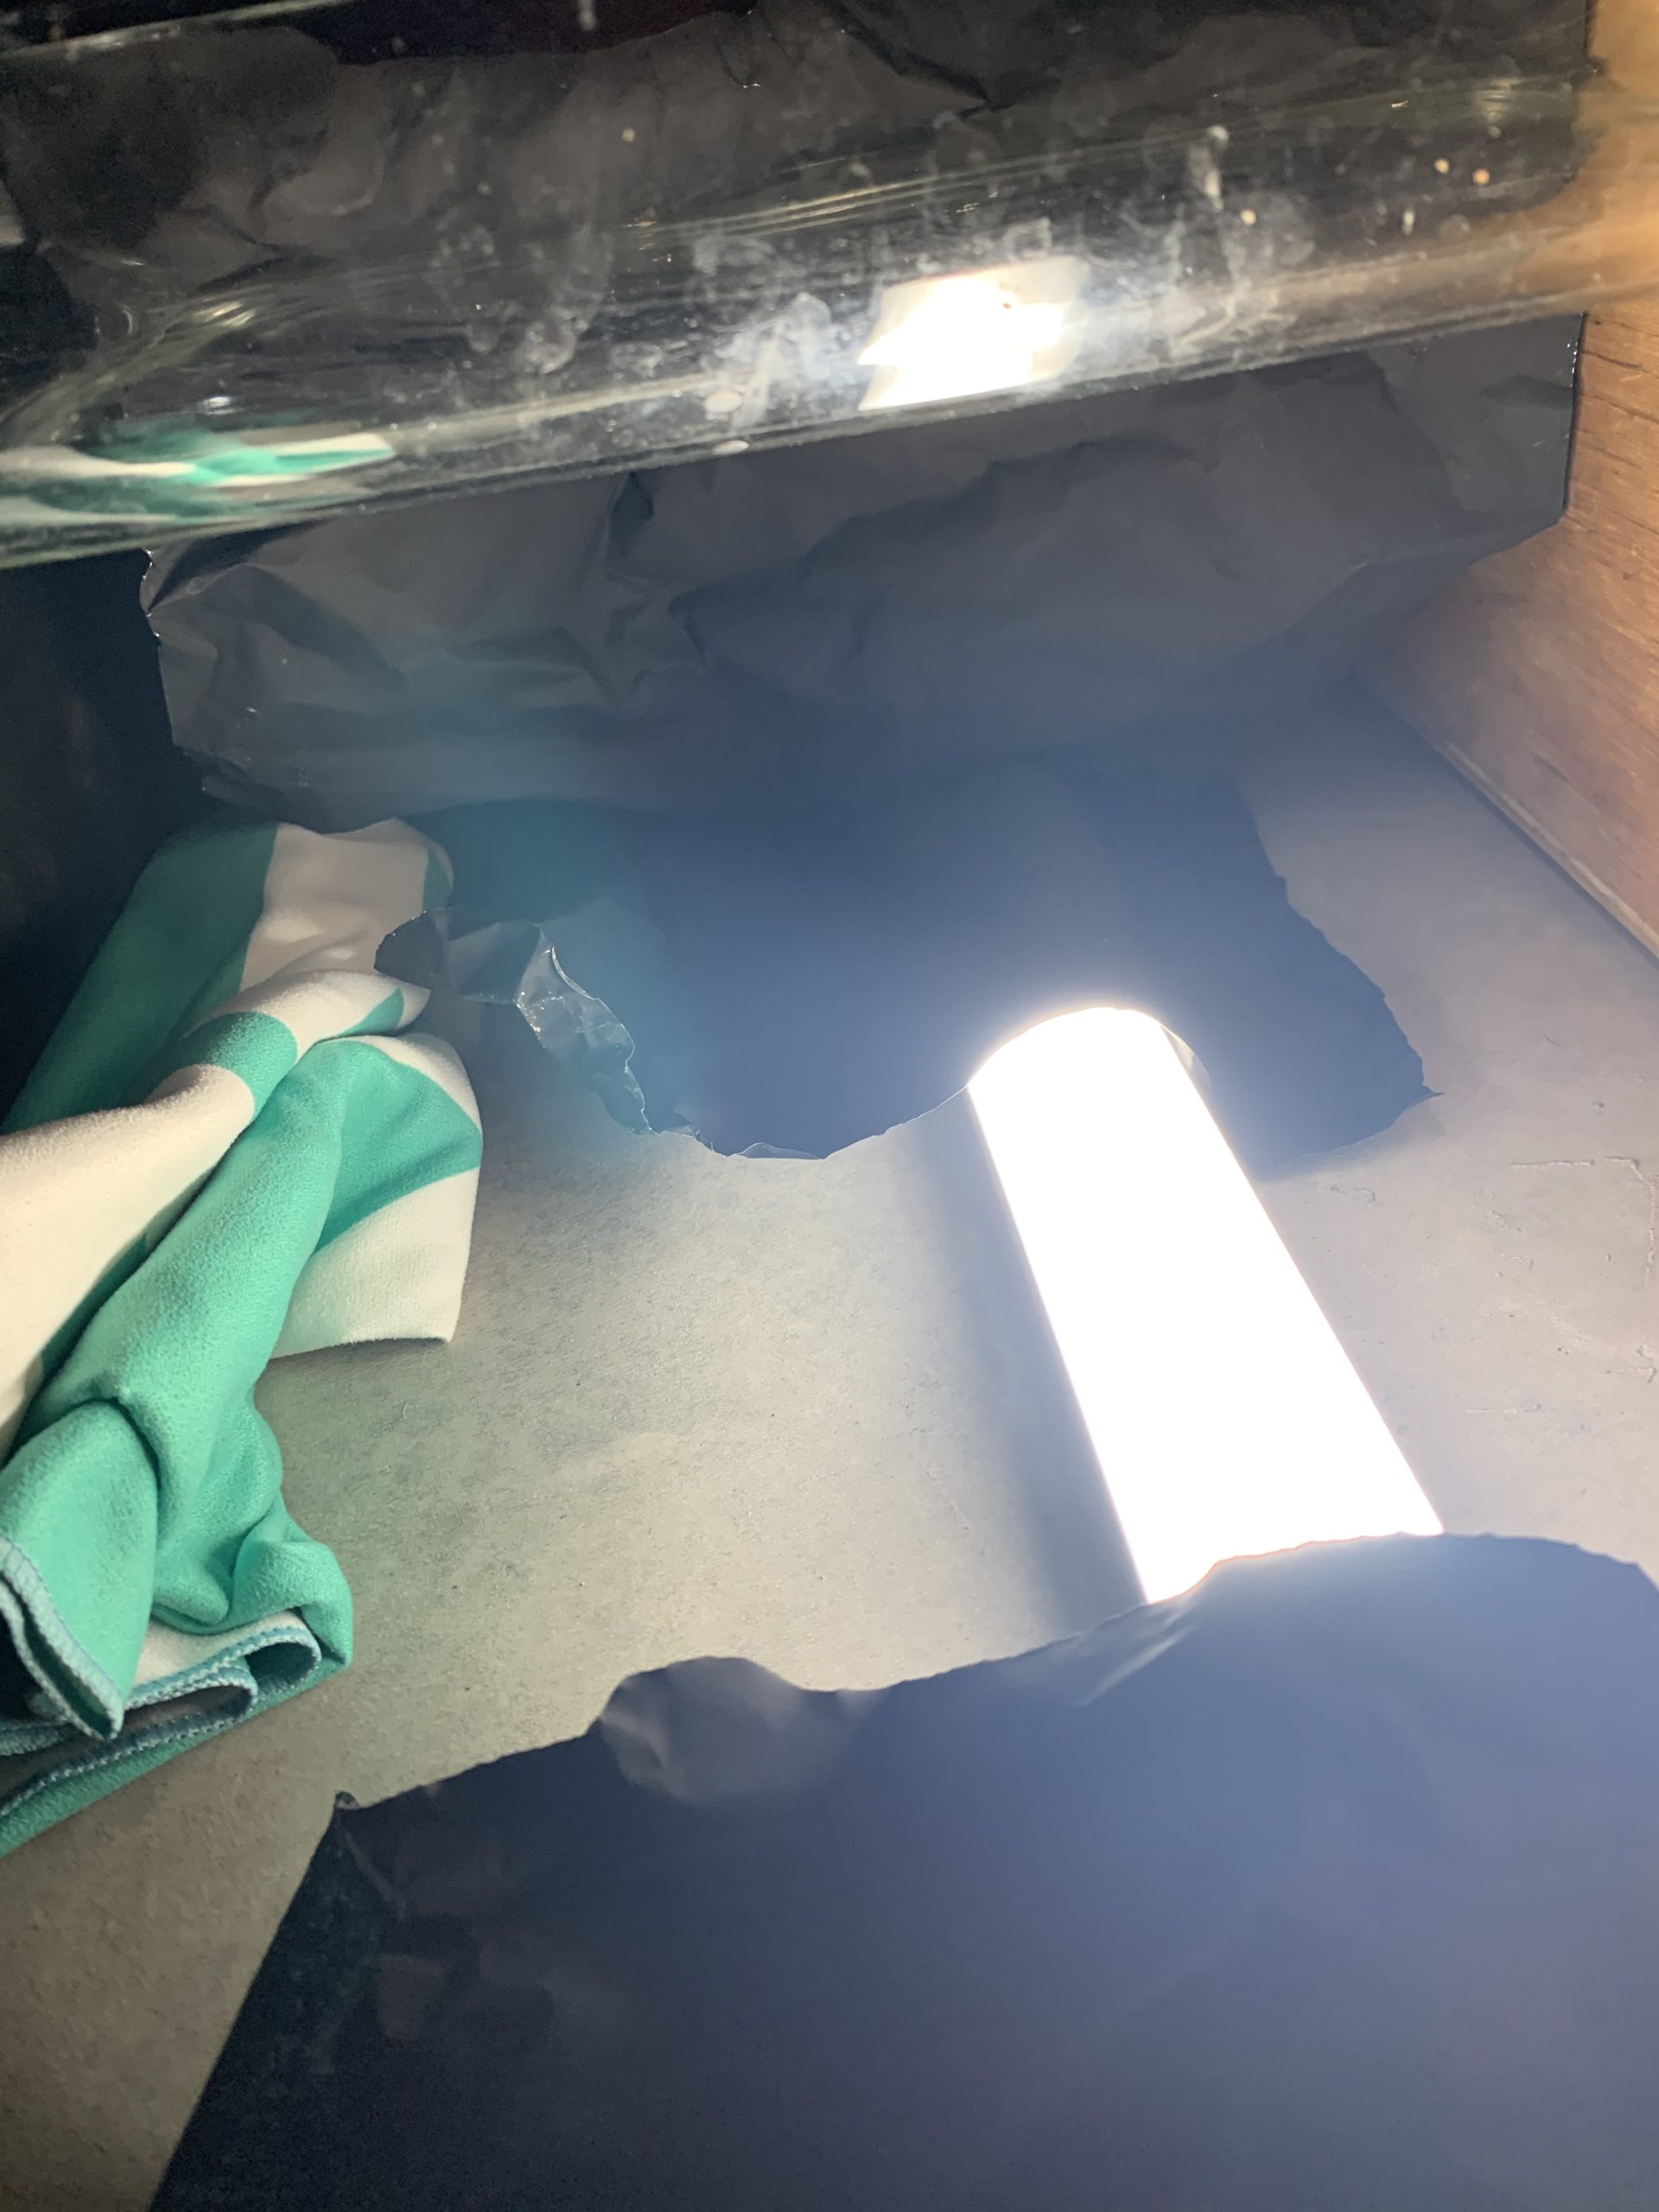
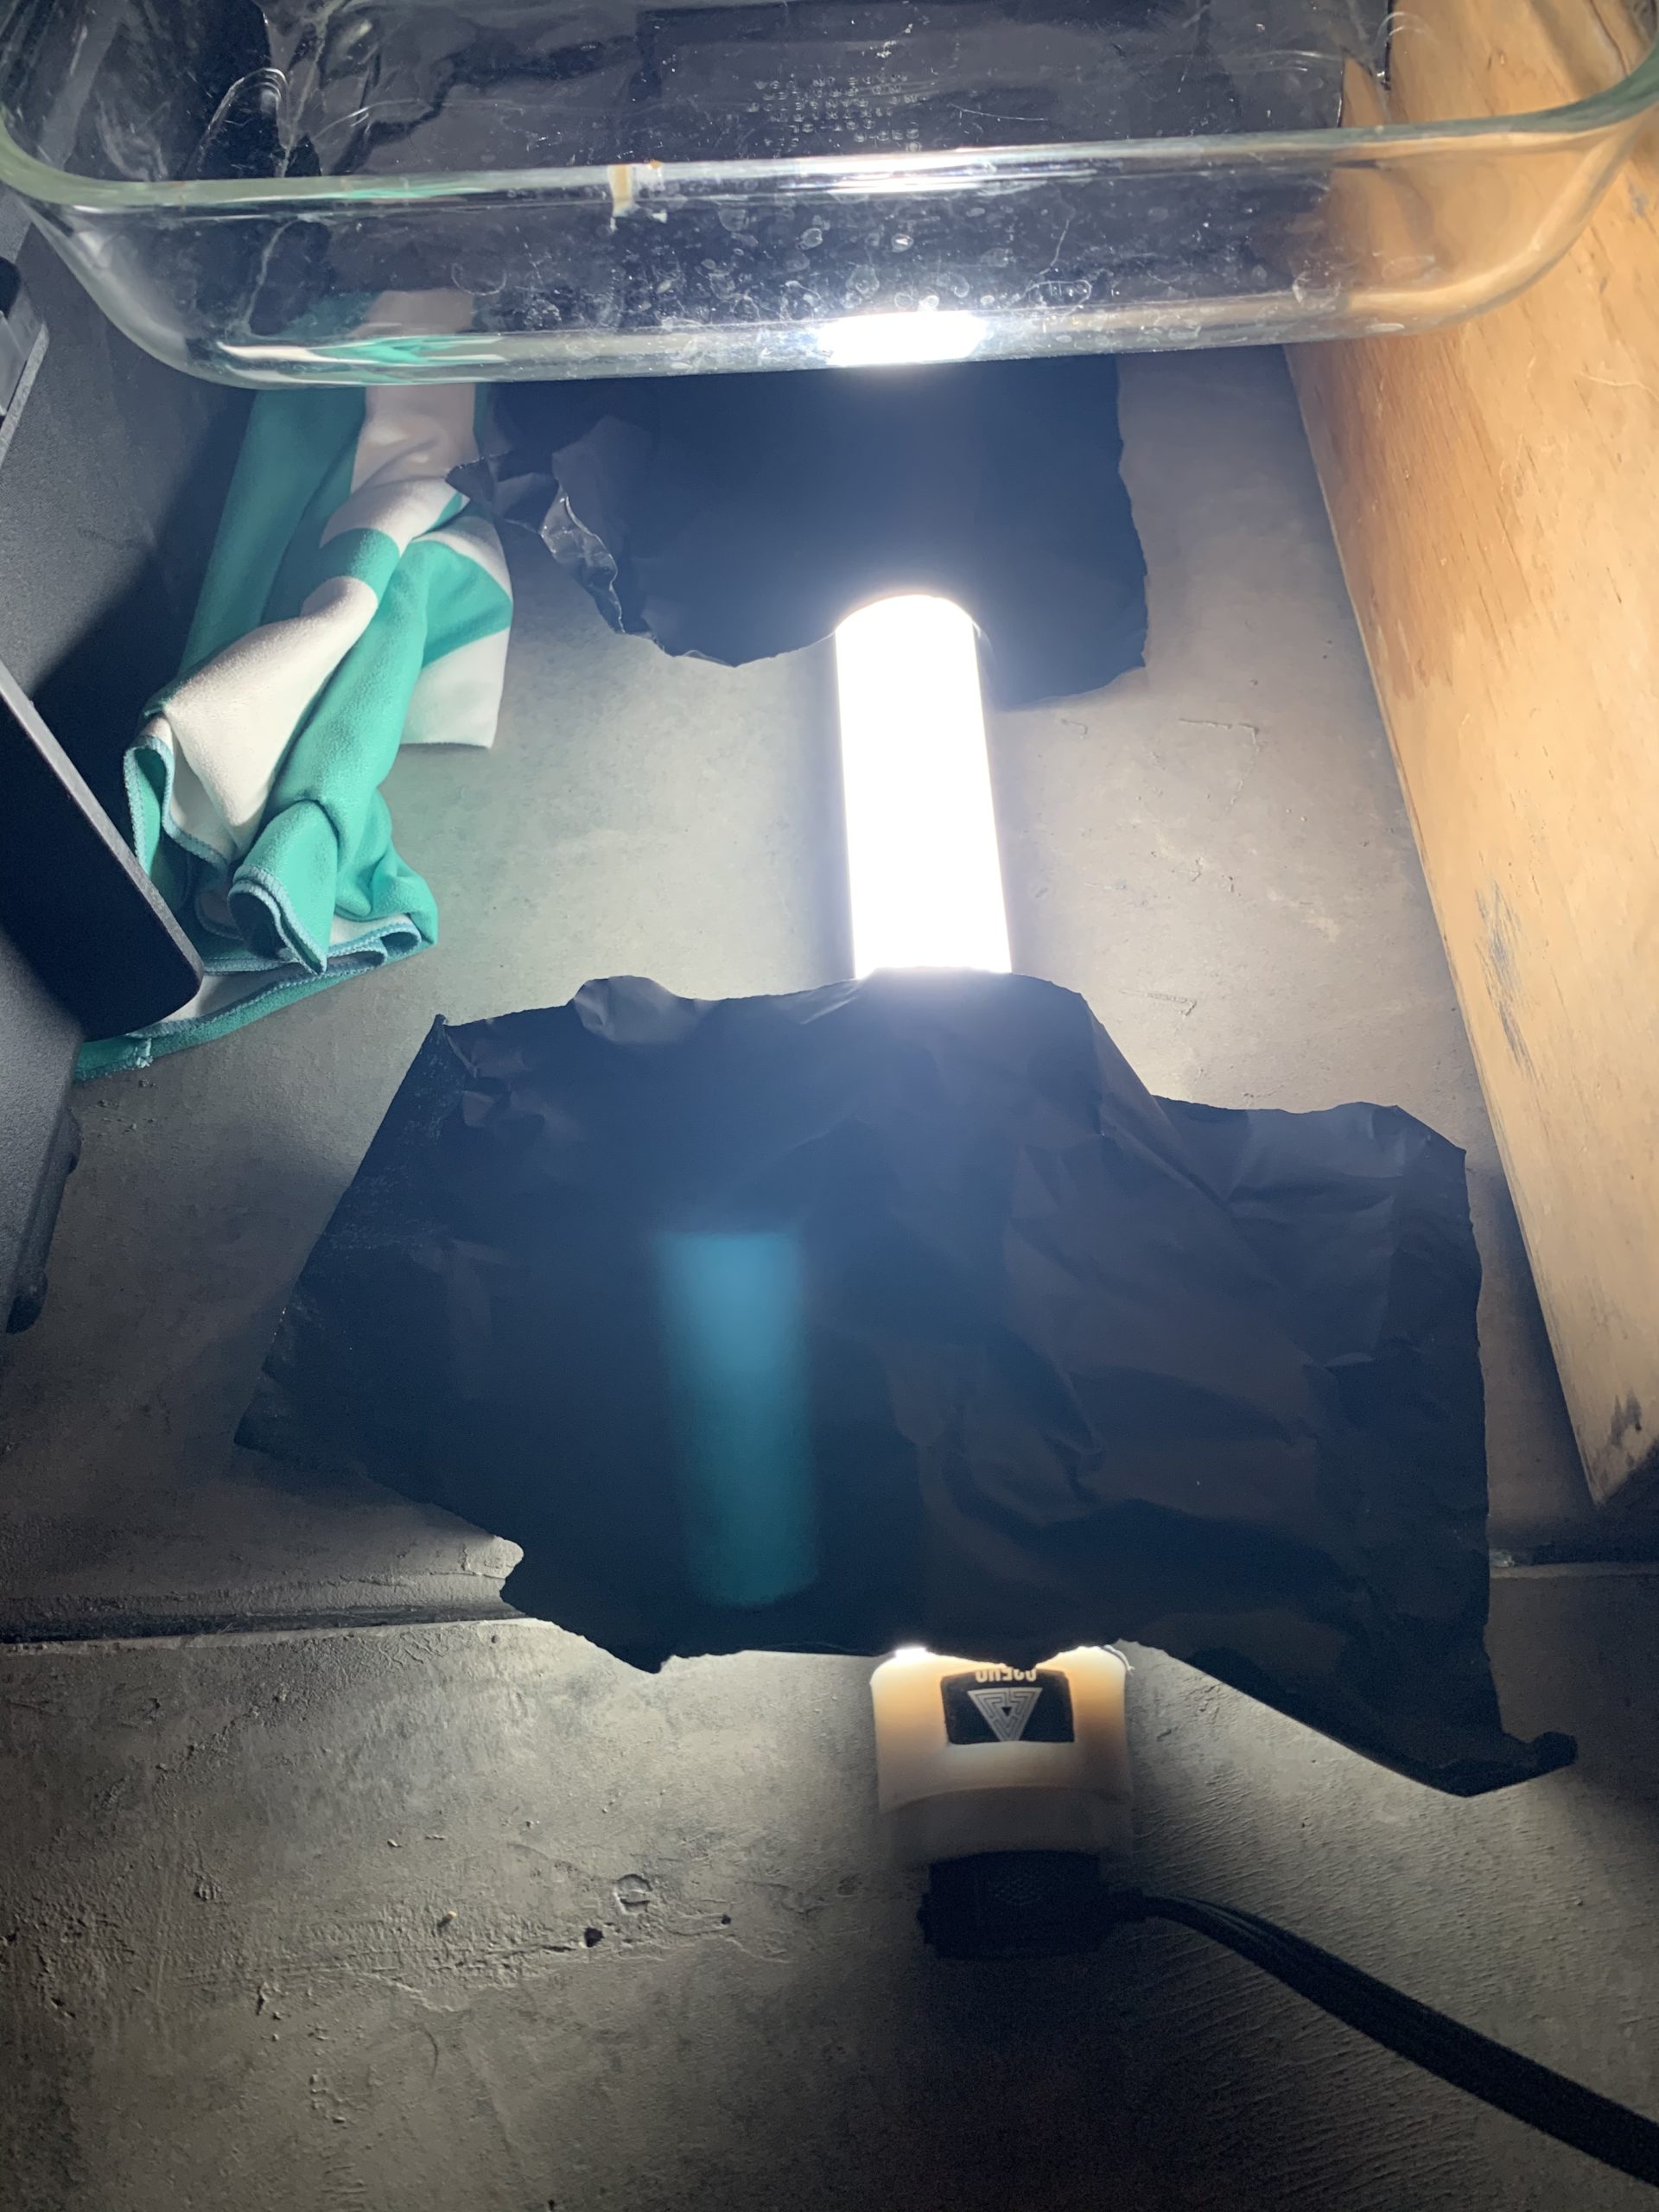
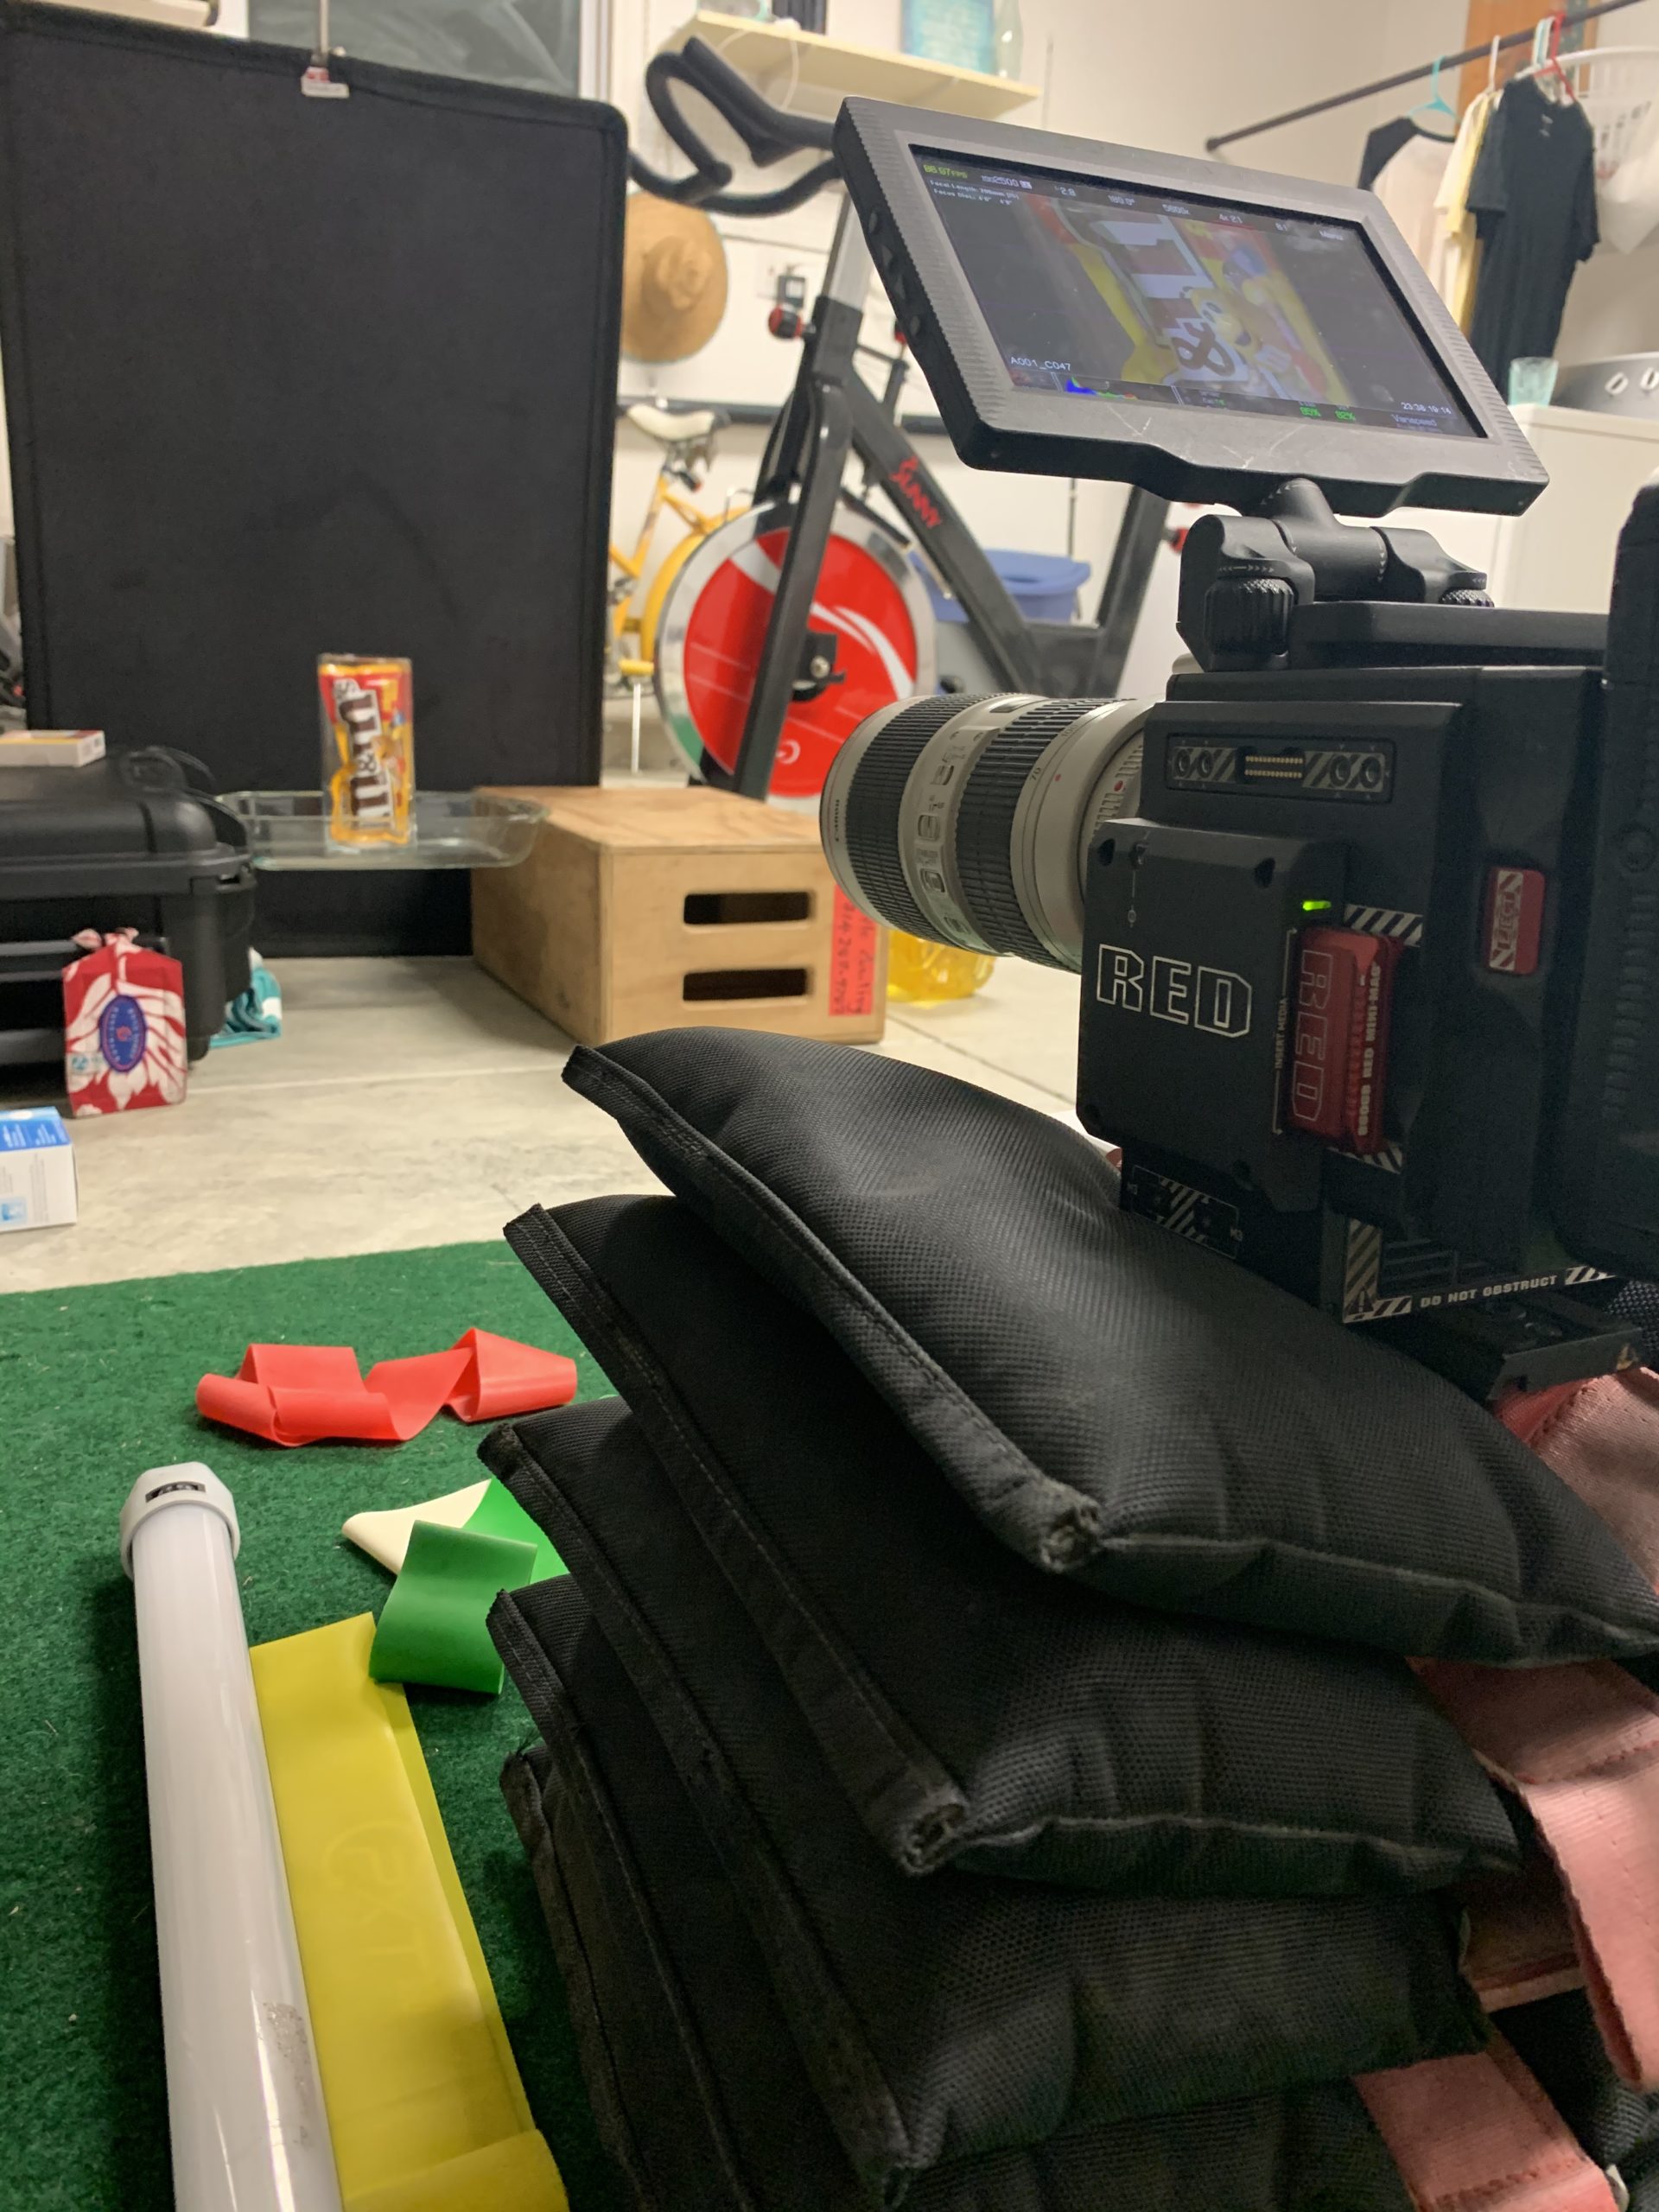
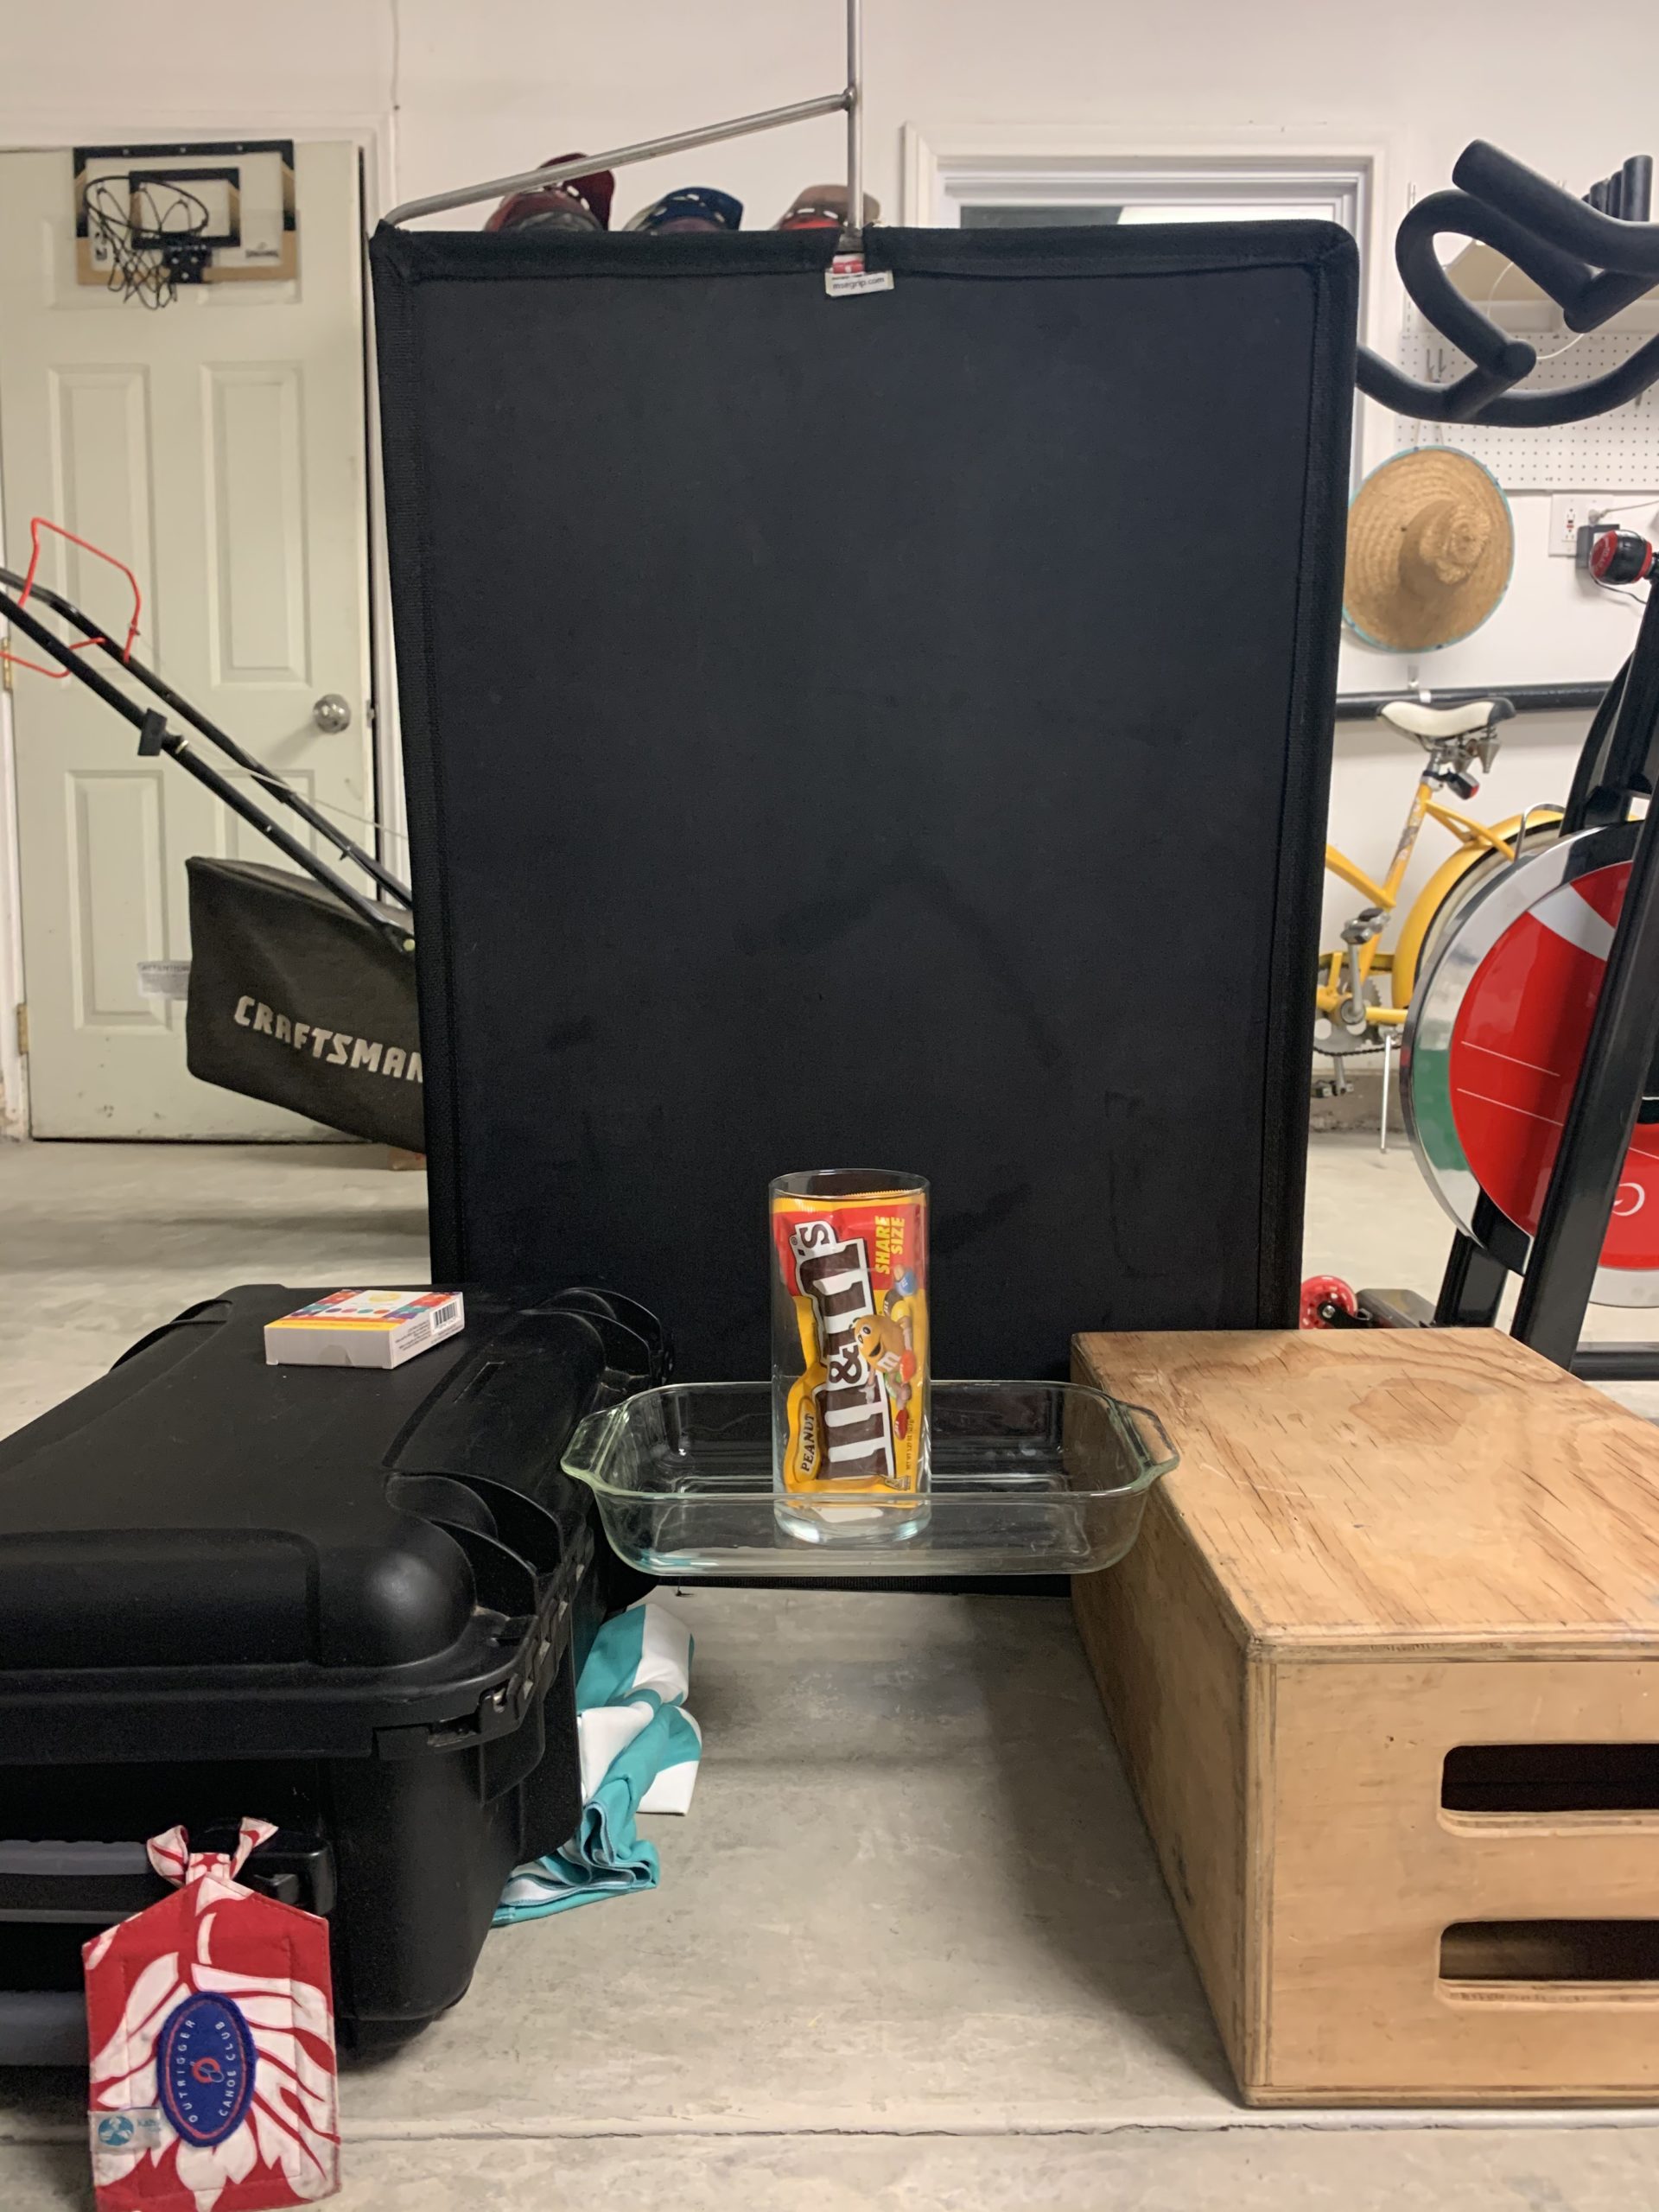
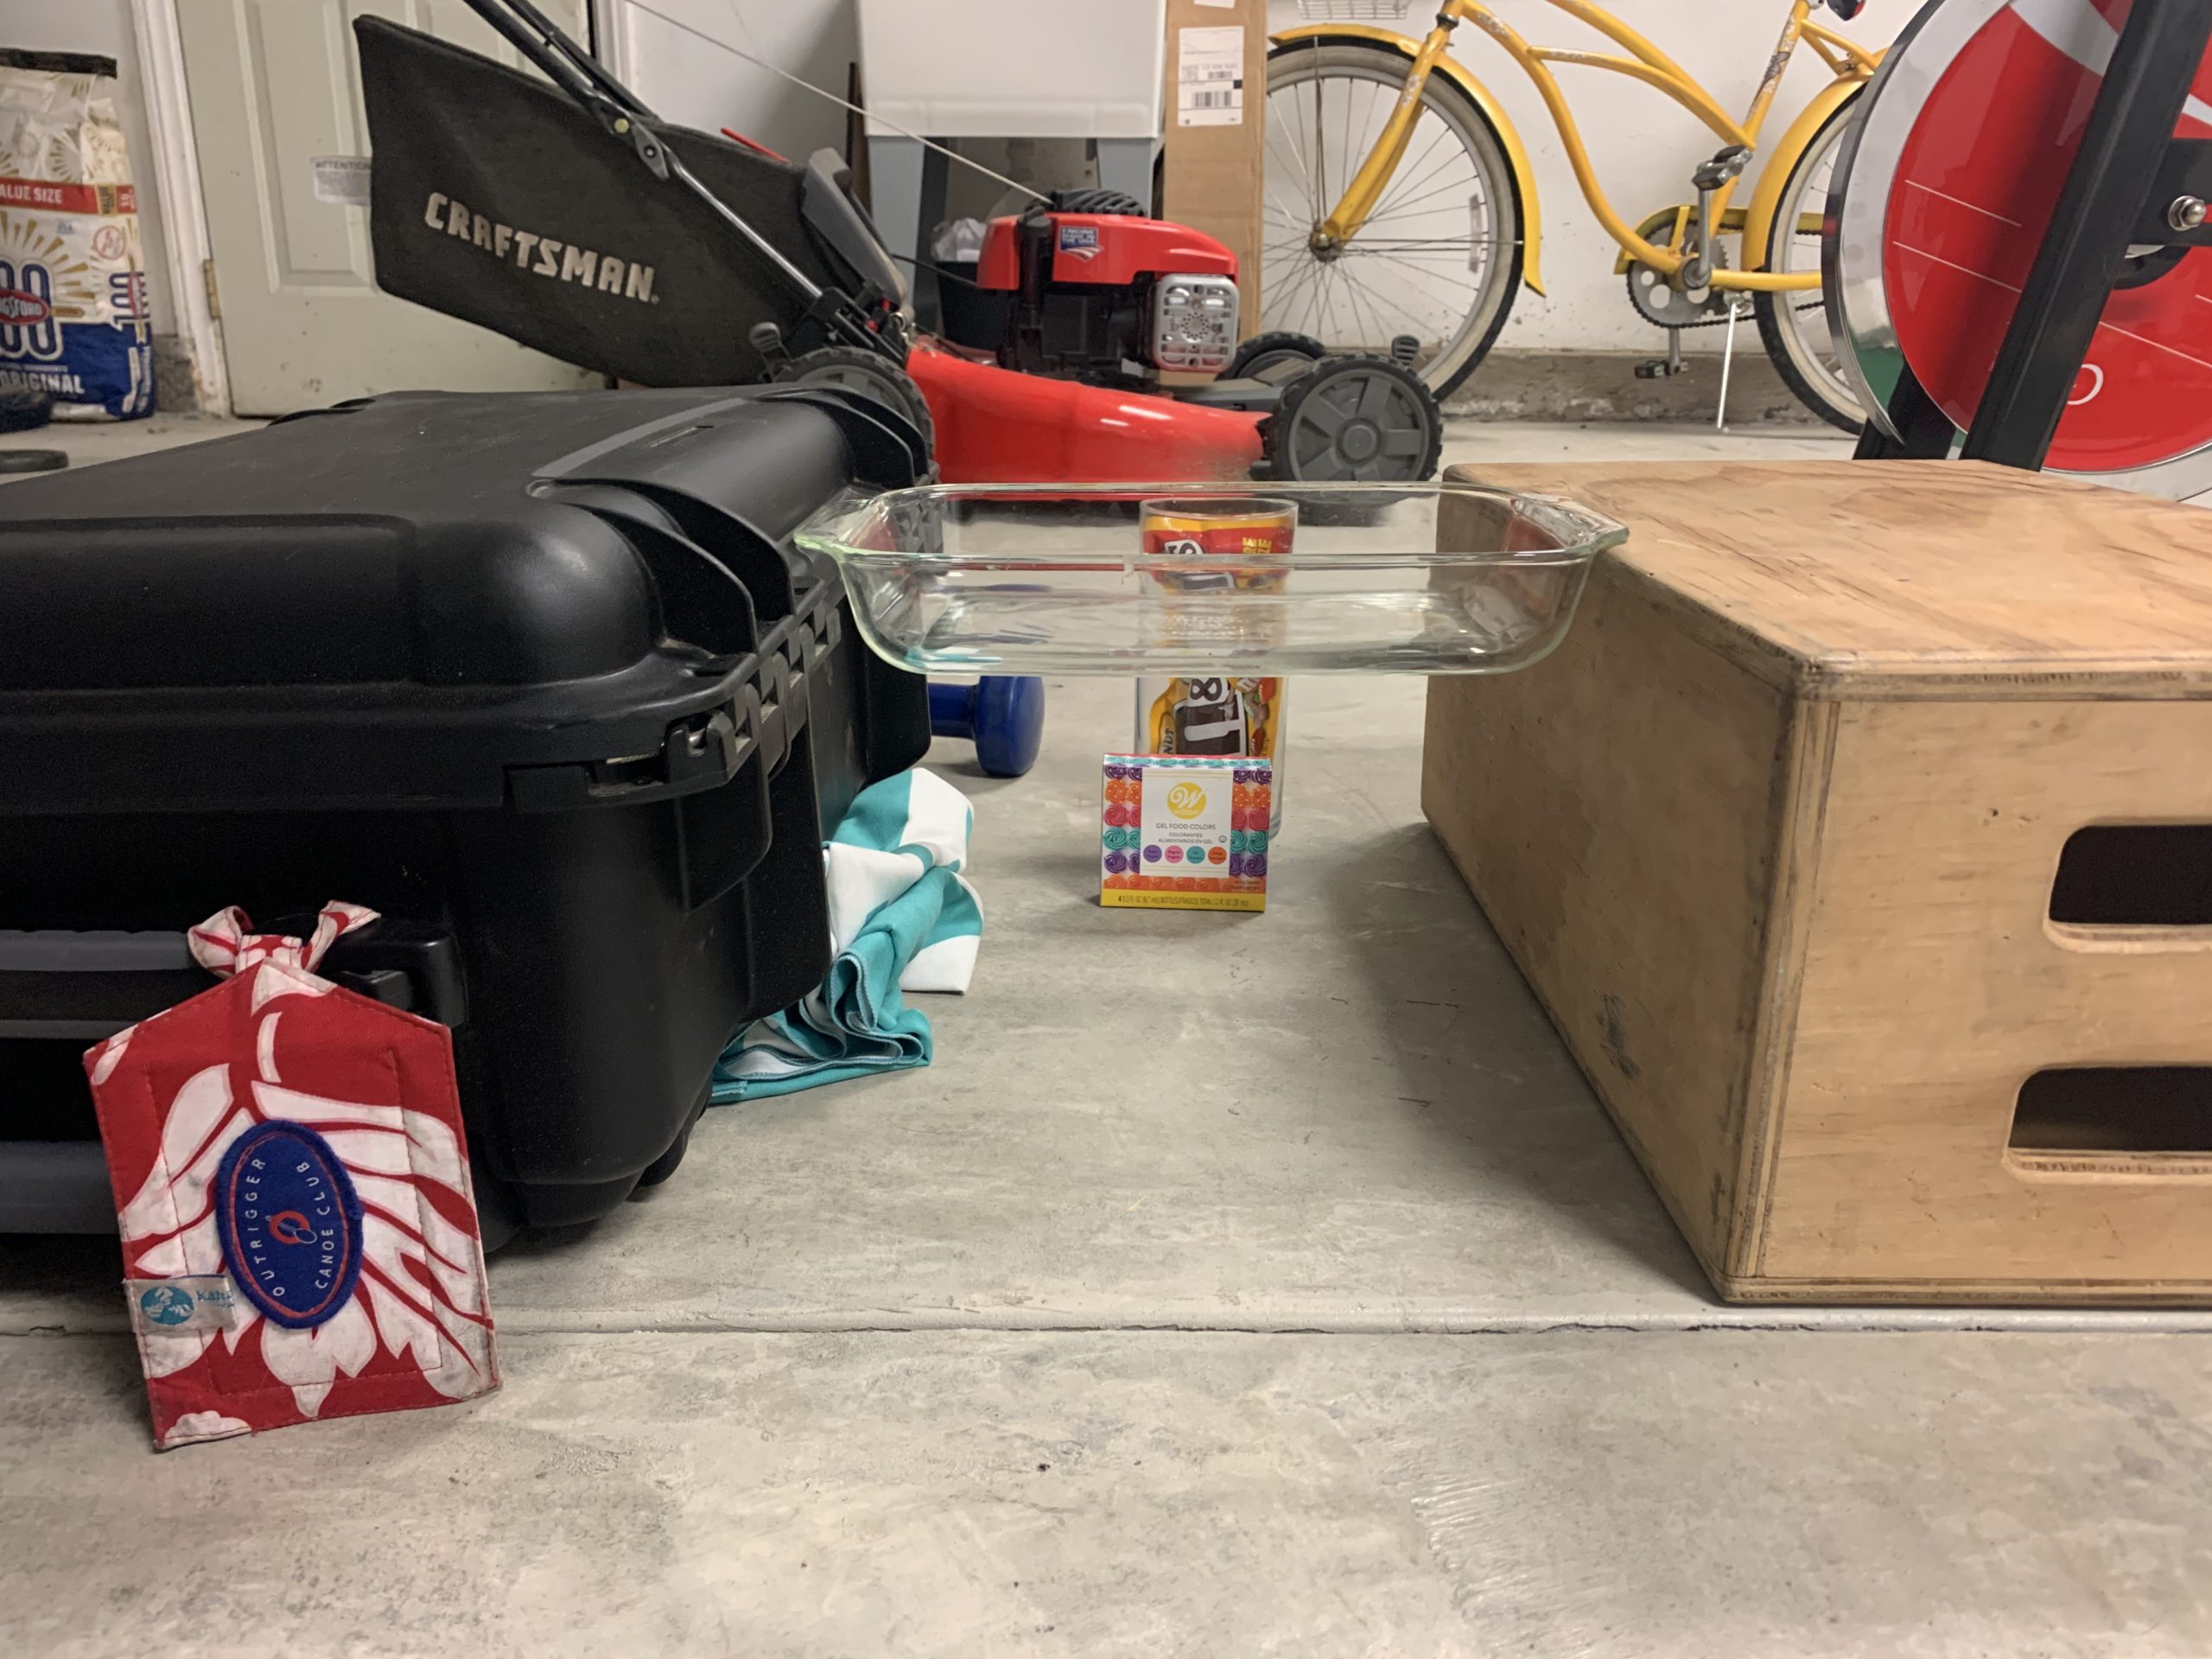
After our quick run to Target, I setup shop in our garage to build out our setup while my wife organized the aforementioned products and prepped them for camera. For this setup, I went to my trusty Canon 70-200mm IS f/2.8 and then dropped down from 5k to 4k 2:1 in camera to have that extra crop factor (as I’ve mentioned in the past, I like doing as much as possible in camera to limit the need for added work in post). I then grabbed my apple box, camera case, and a glass cooking pan and placed them in front of camera at my desired height. From there I placed a black flag directly behind it to give us the black background. Once I had this in place, I utilized my Quasar Science 2’ LED X-Crossfade tube and placed it under the cooking dish so that the light would be looking up at where we would place each individual glass with our concoction.
I needed a bit of height for camera to be level with our subject and my sticks were too low, even when spidered out. Thus, I took five sandbags and stacked them on top of each other and then placed camera directly onto of them to achieve the height I was after. From there, we killed the house lights, and went to work. Really, this was a very simple setup. I did use some black wrap on our Quasar to kill and control some of the light as it was spilling all over the place. Since we had multiple food coloring dye to work with, my wife would get one color in place and, while I shot that, she would prep the following color, etc. The end result is really quite funky and wild looking, yet it was an incredibly simple and fun setup. Check out the behind-the-scenes photos and video our process.


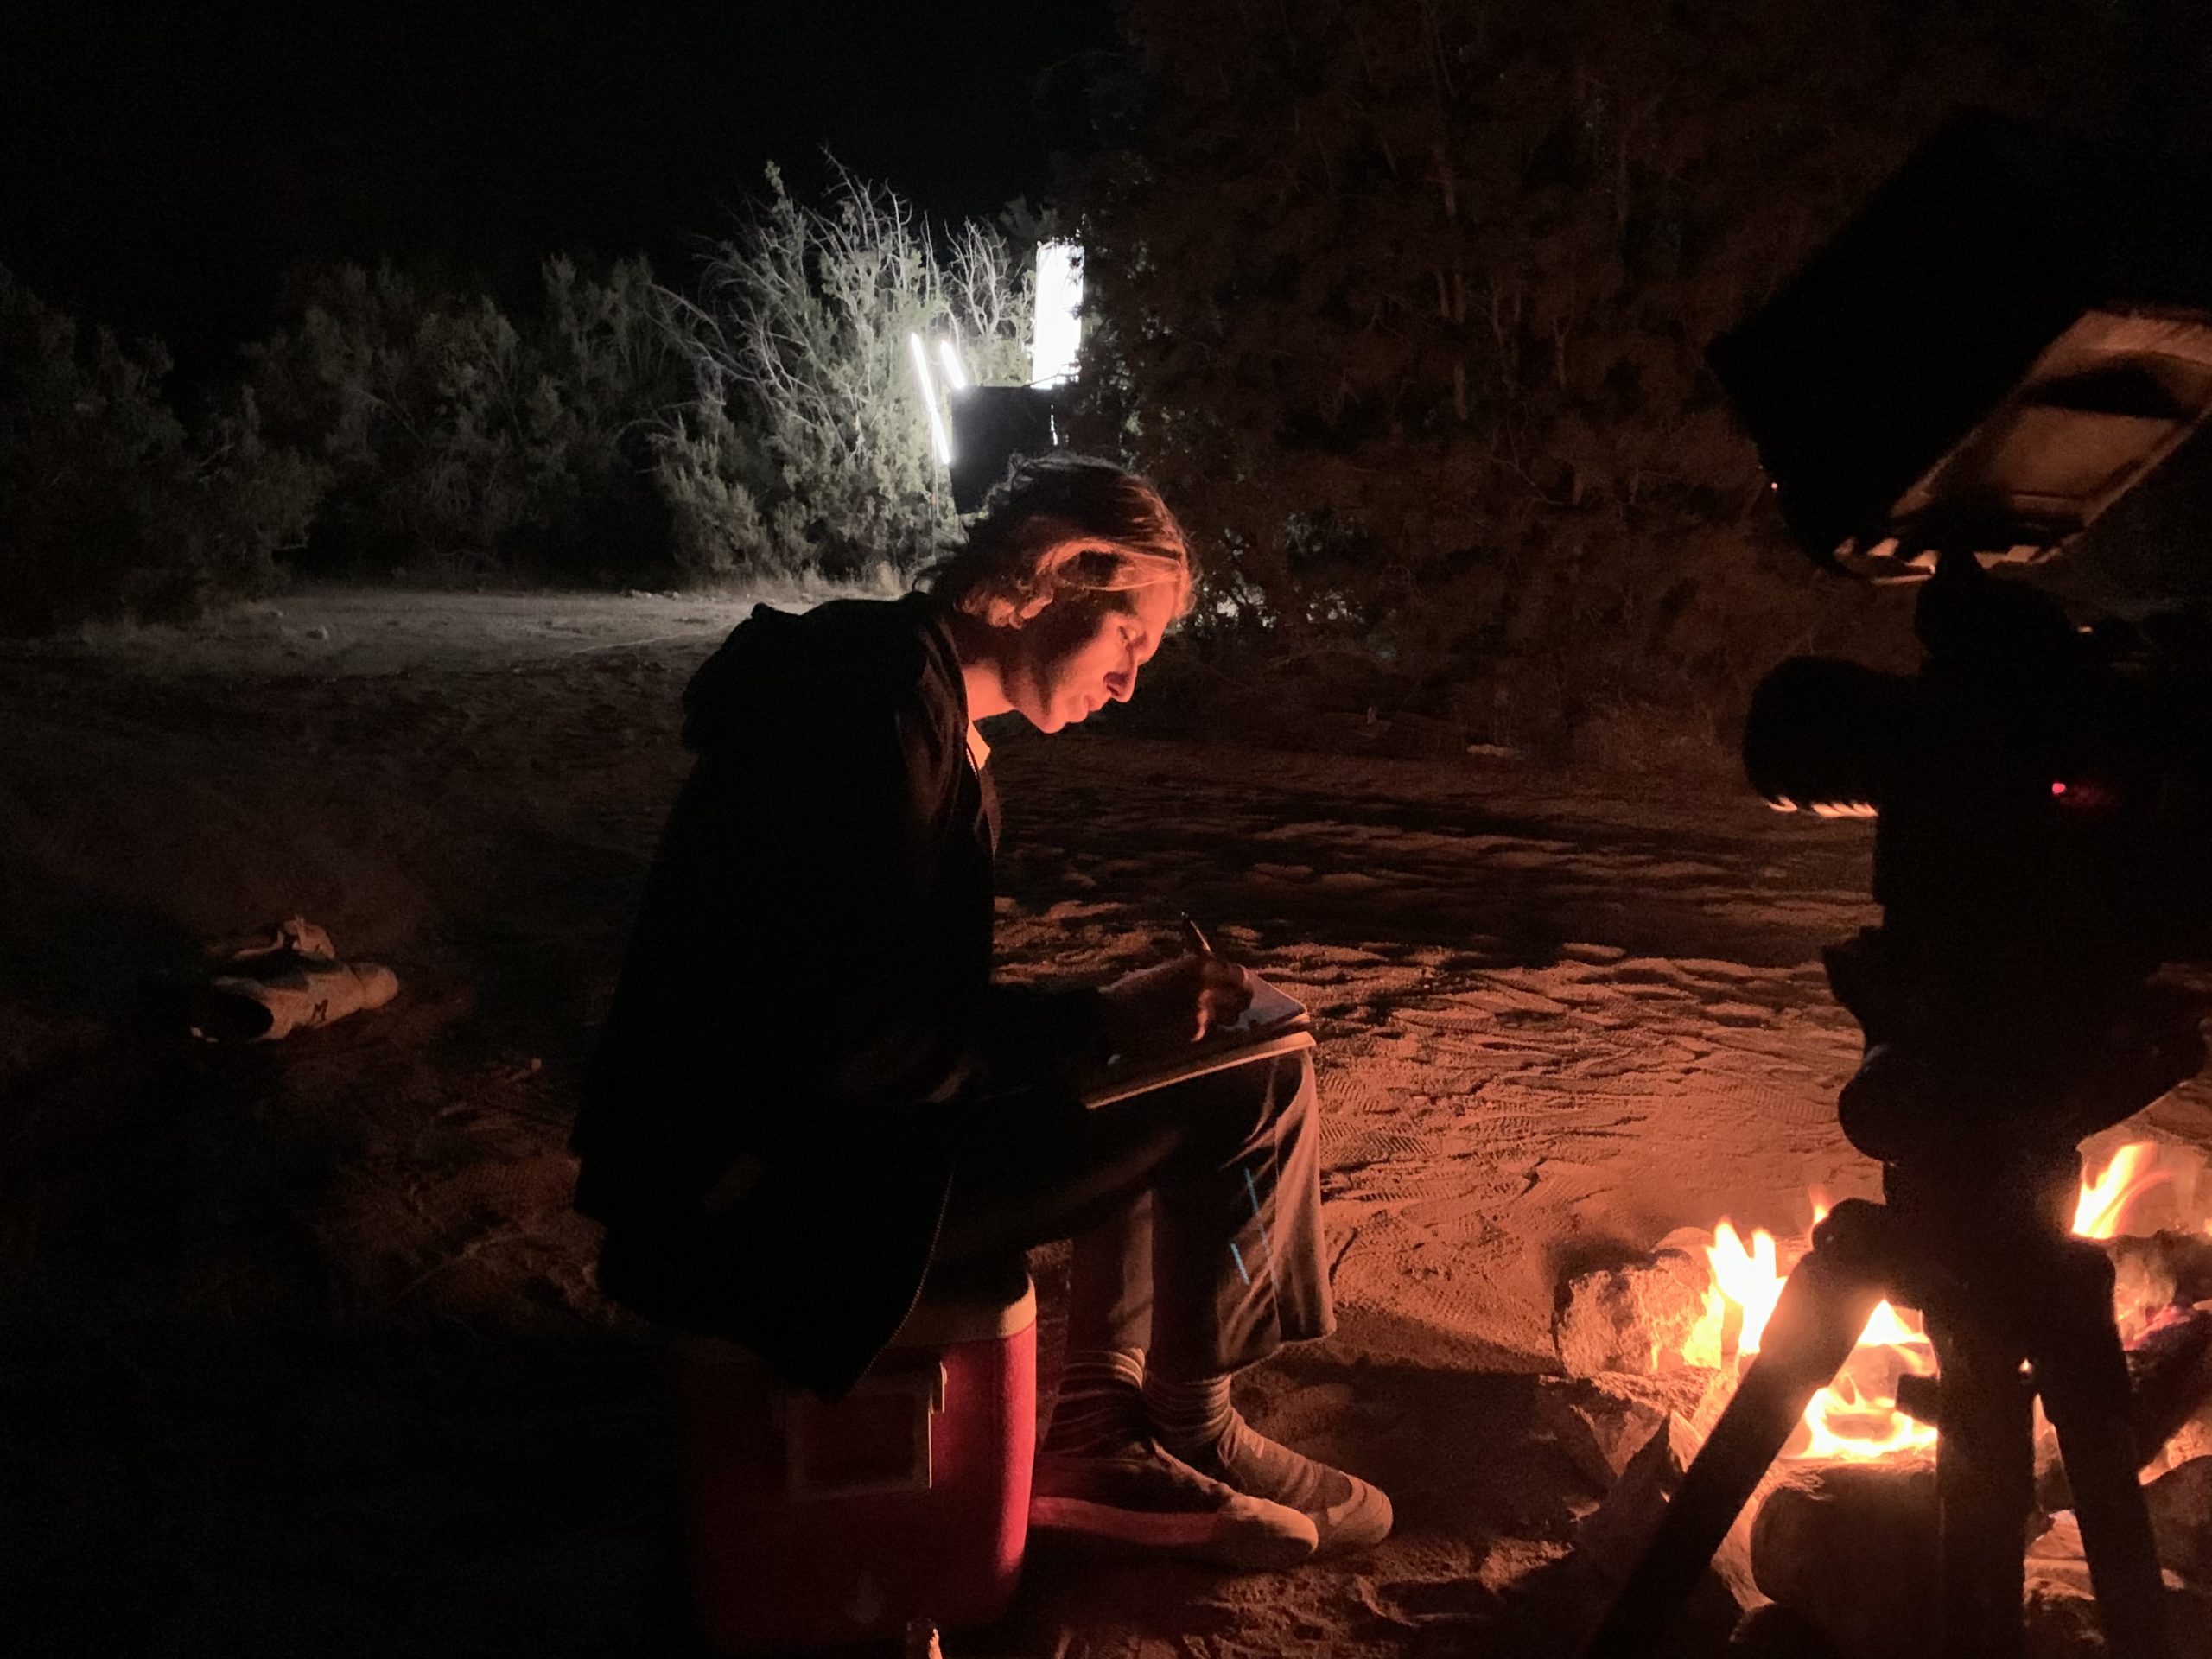
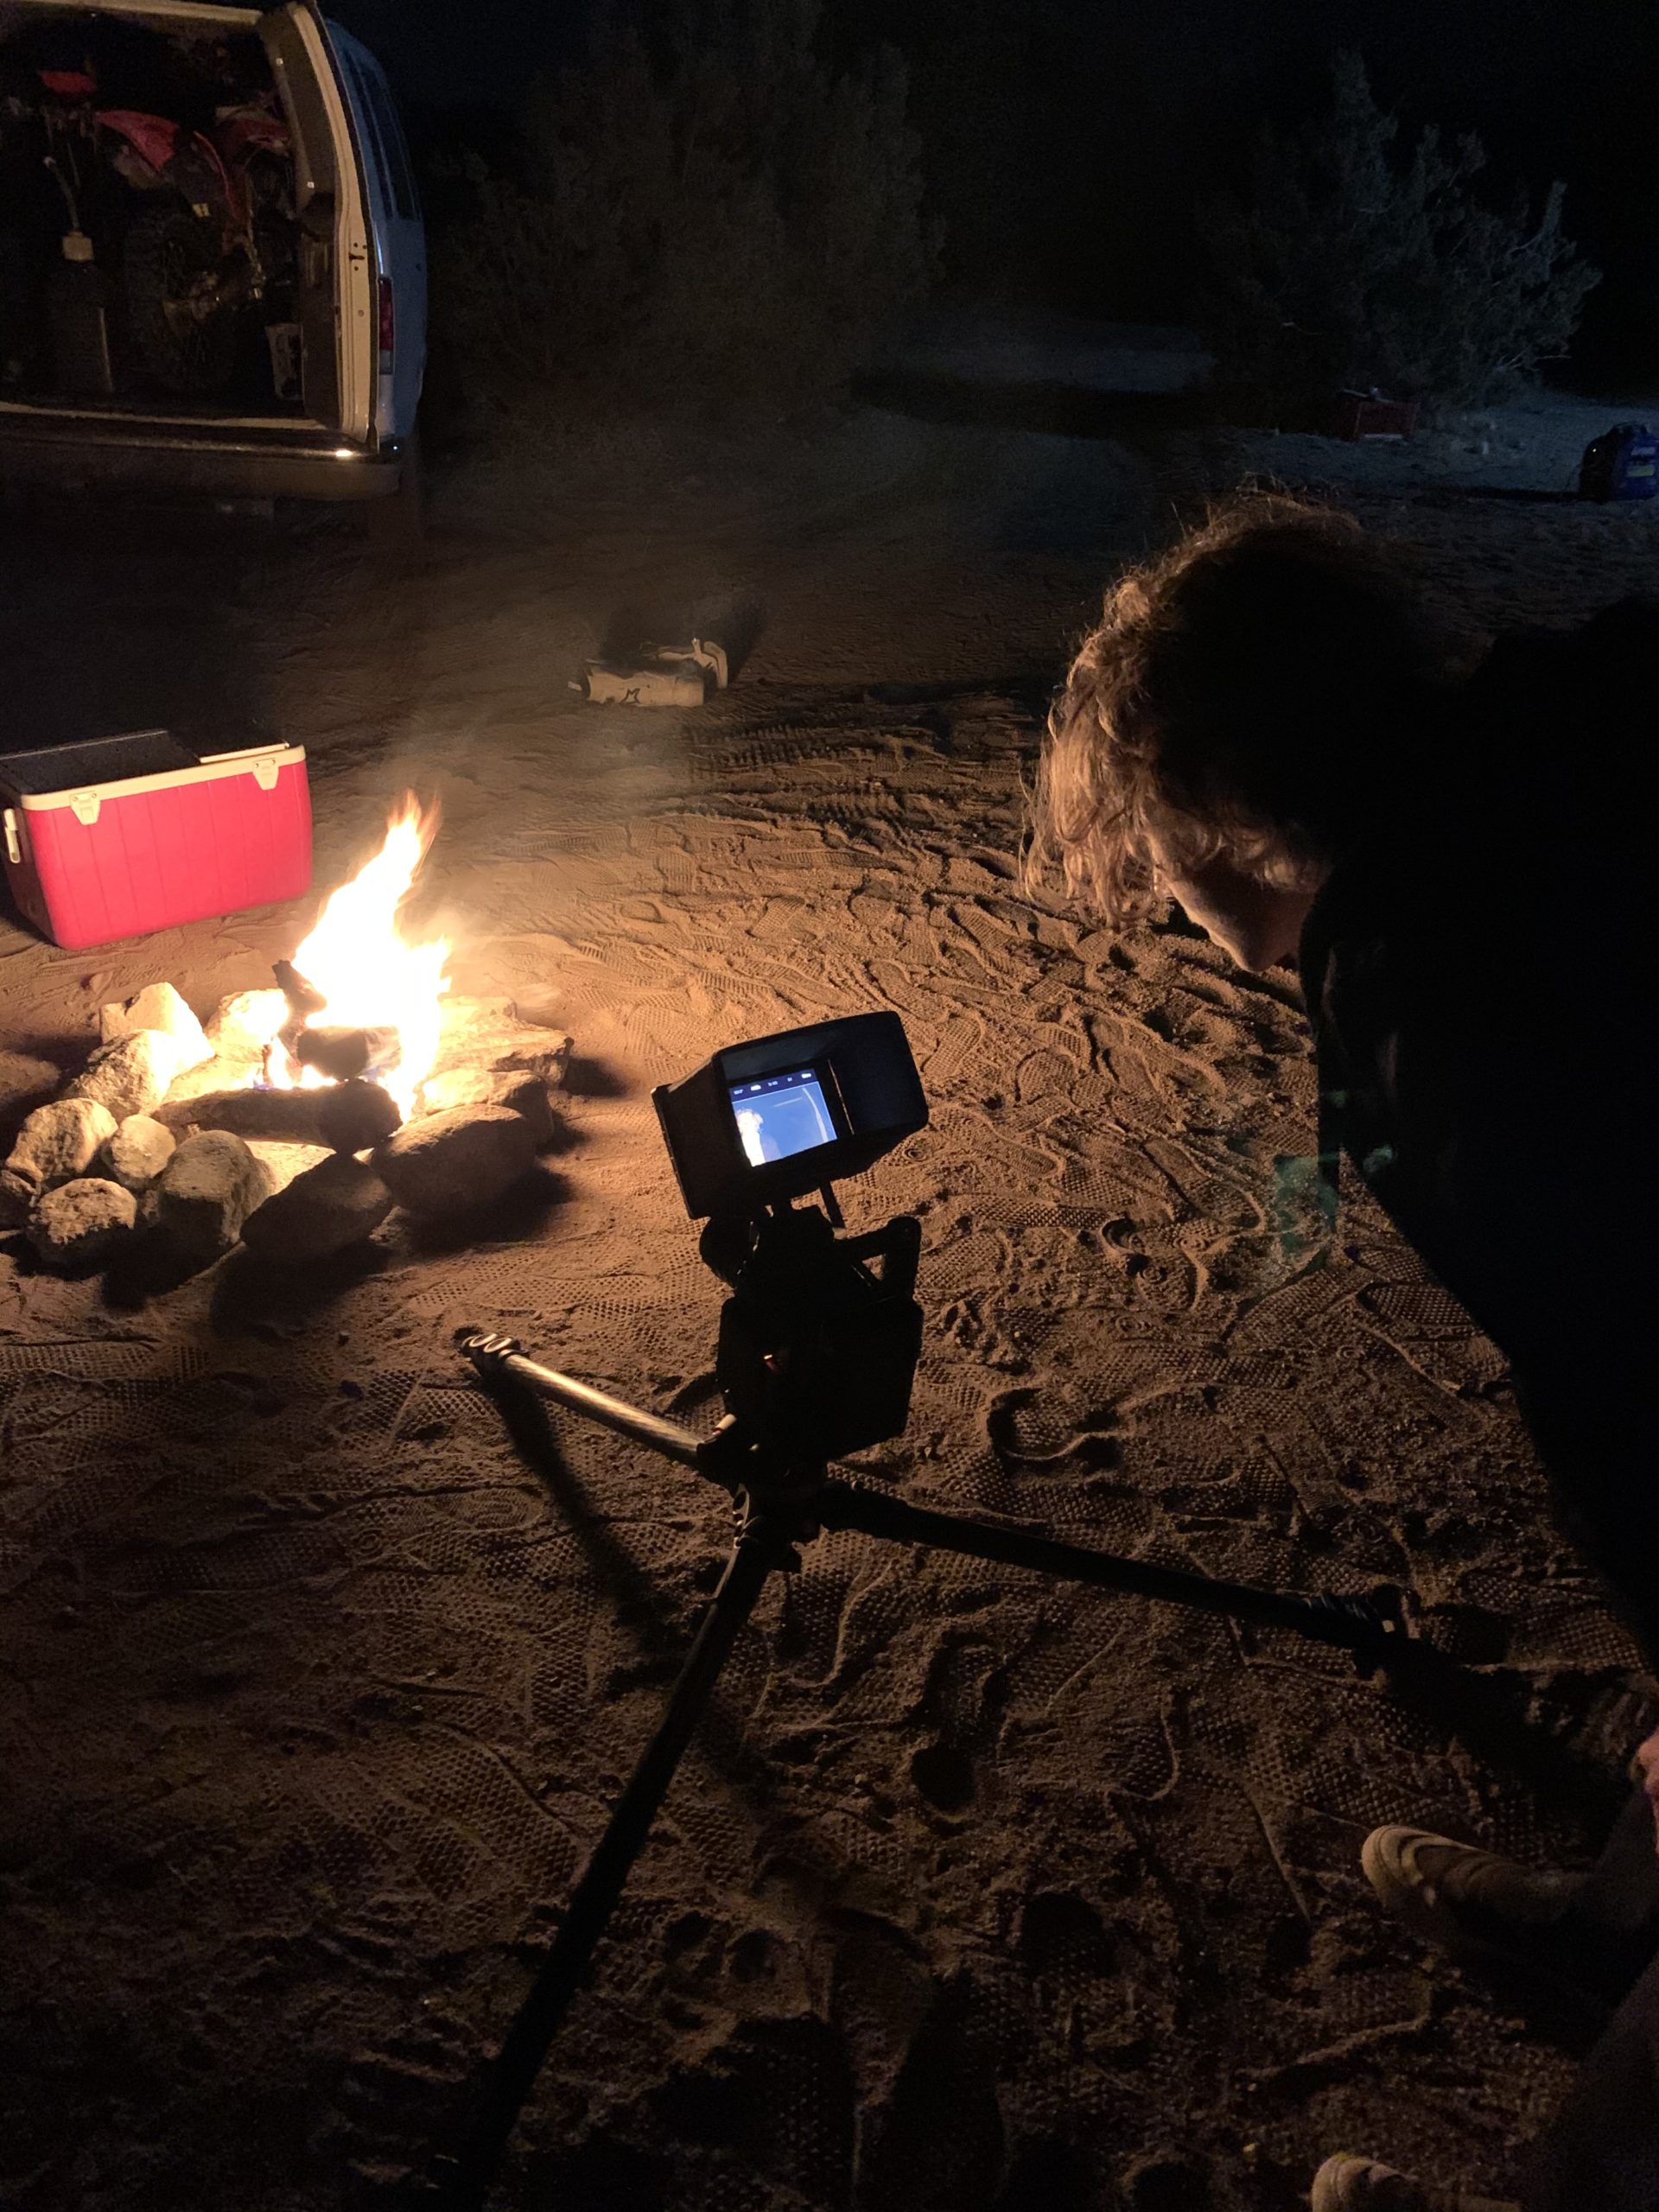
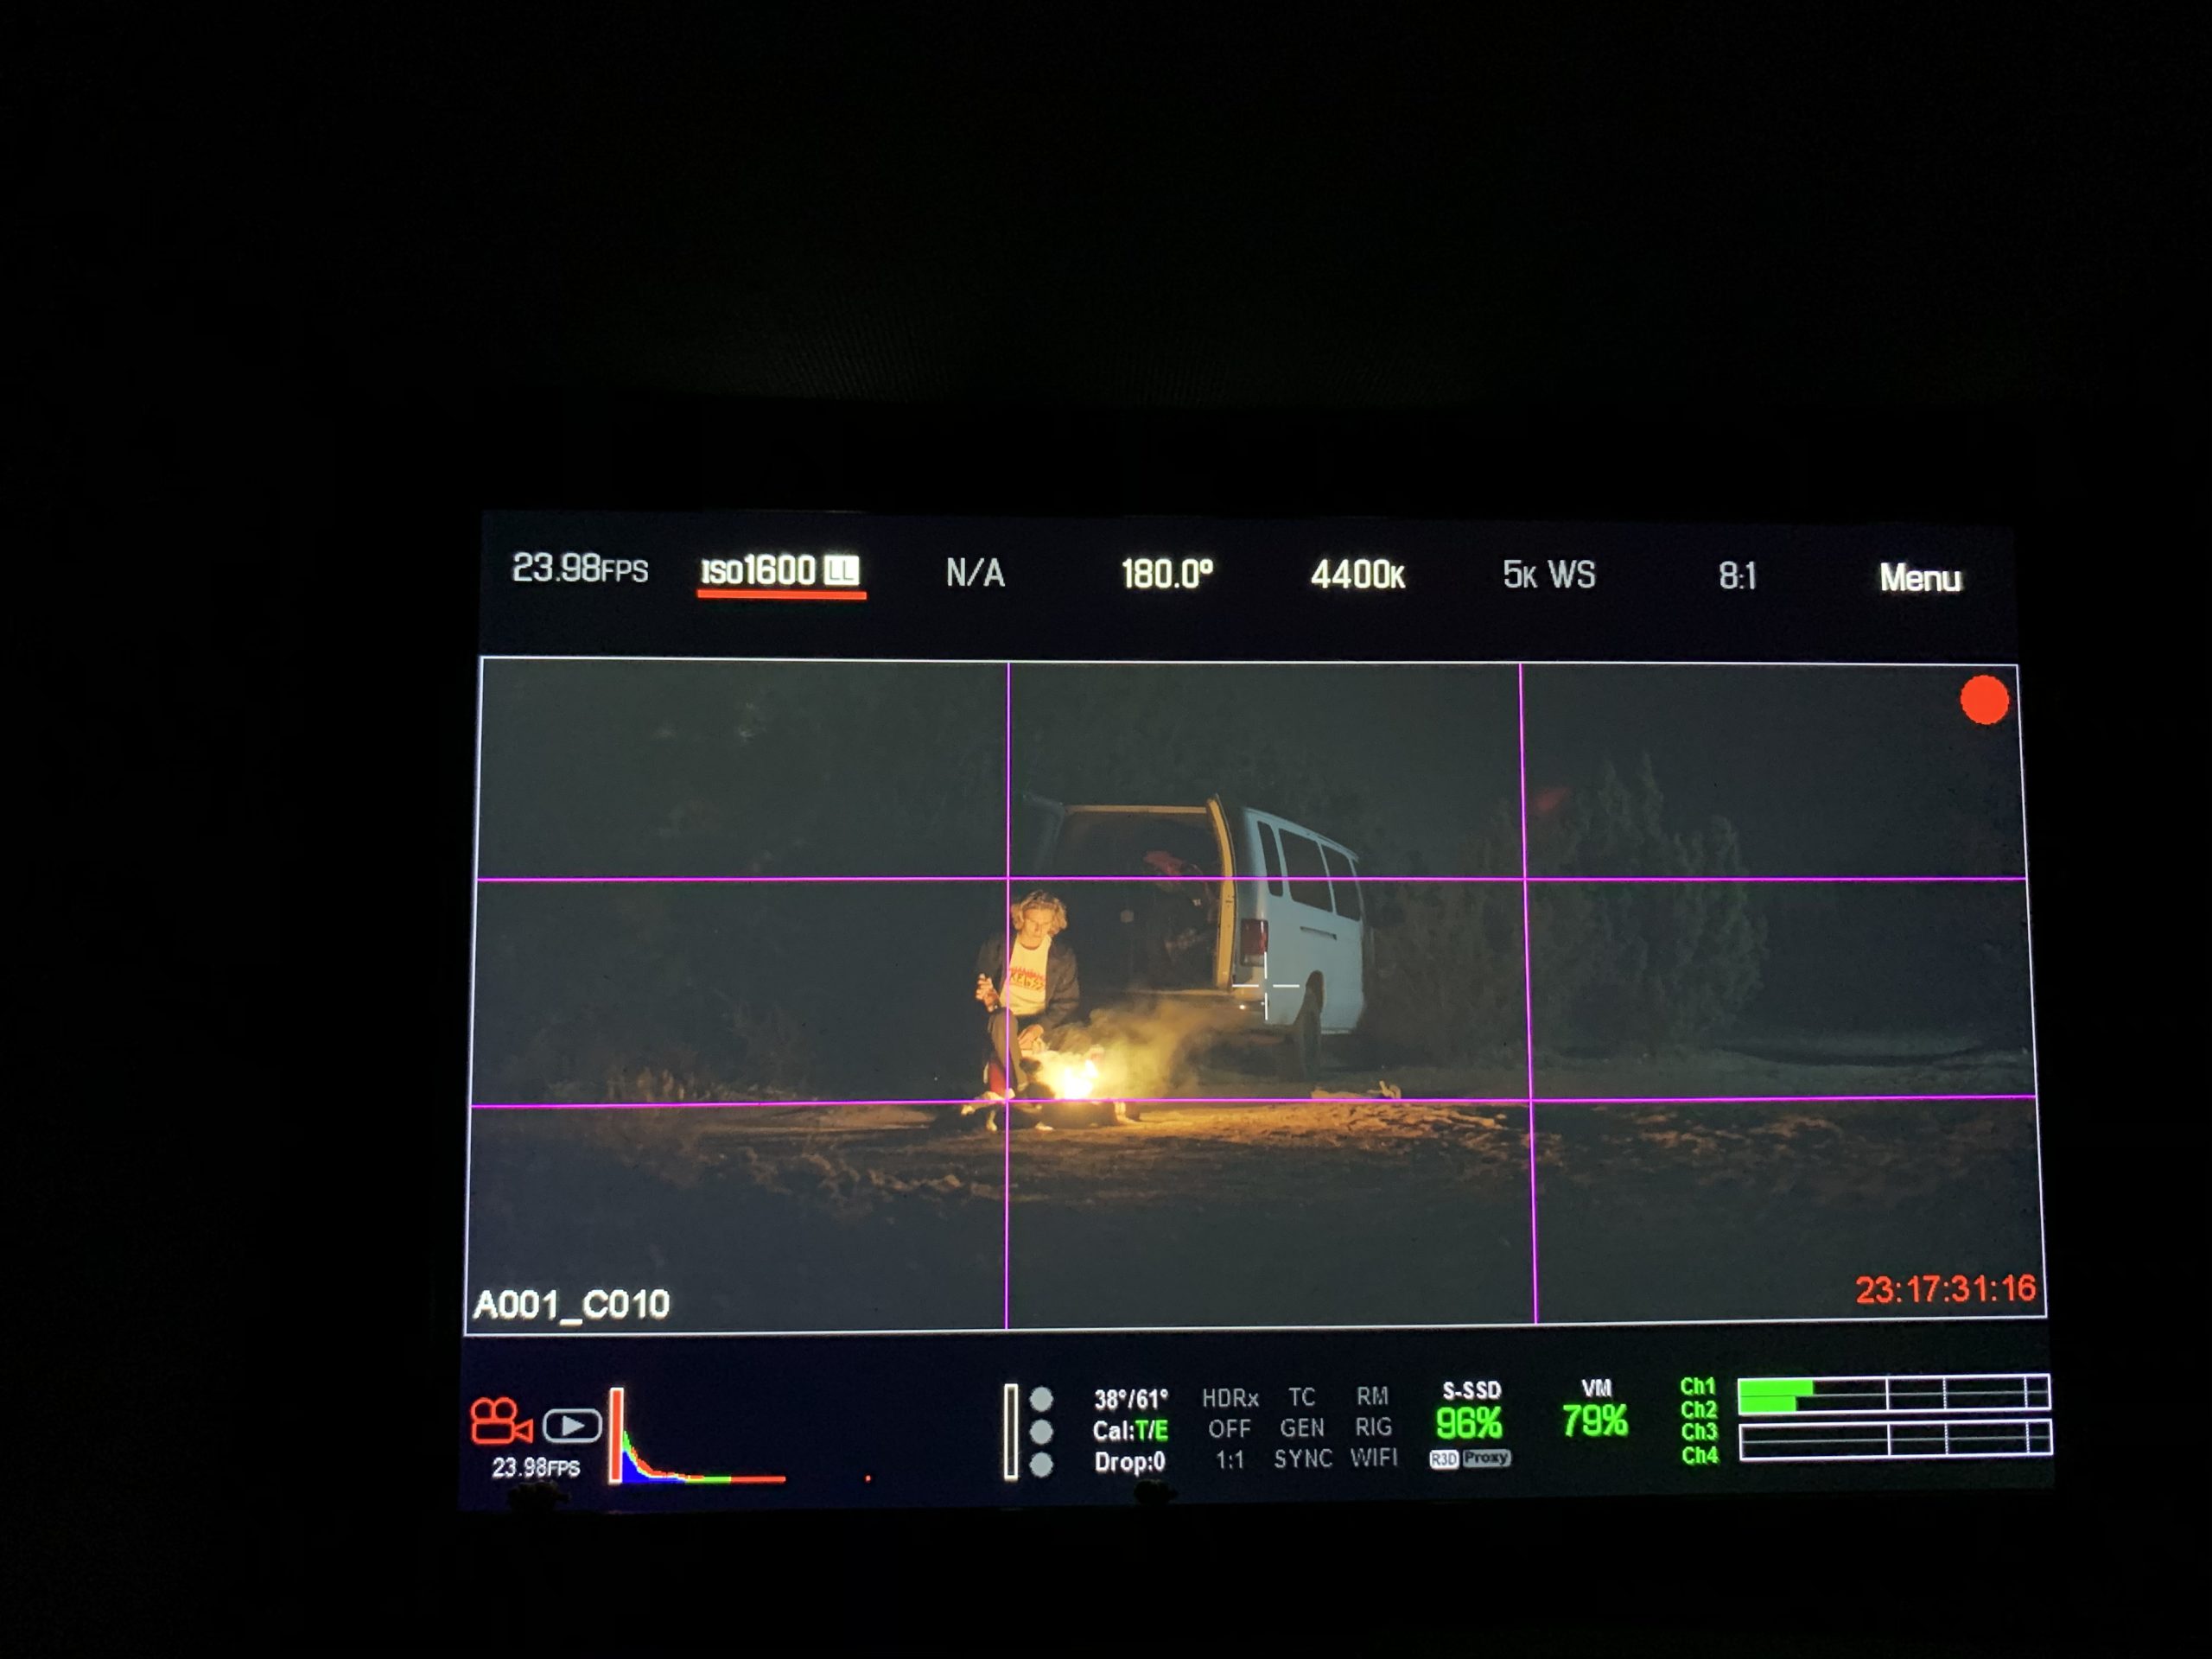
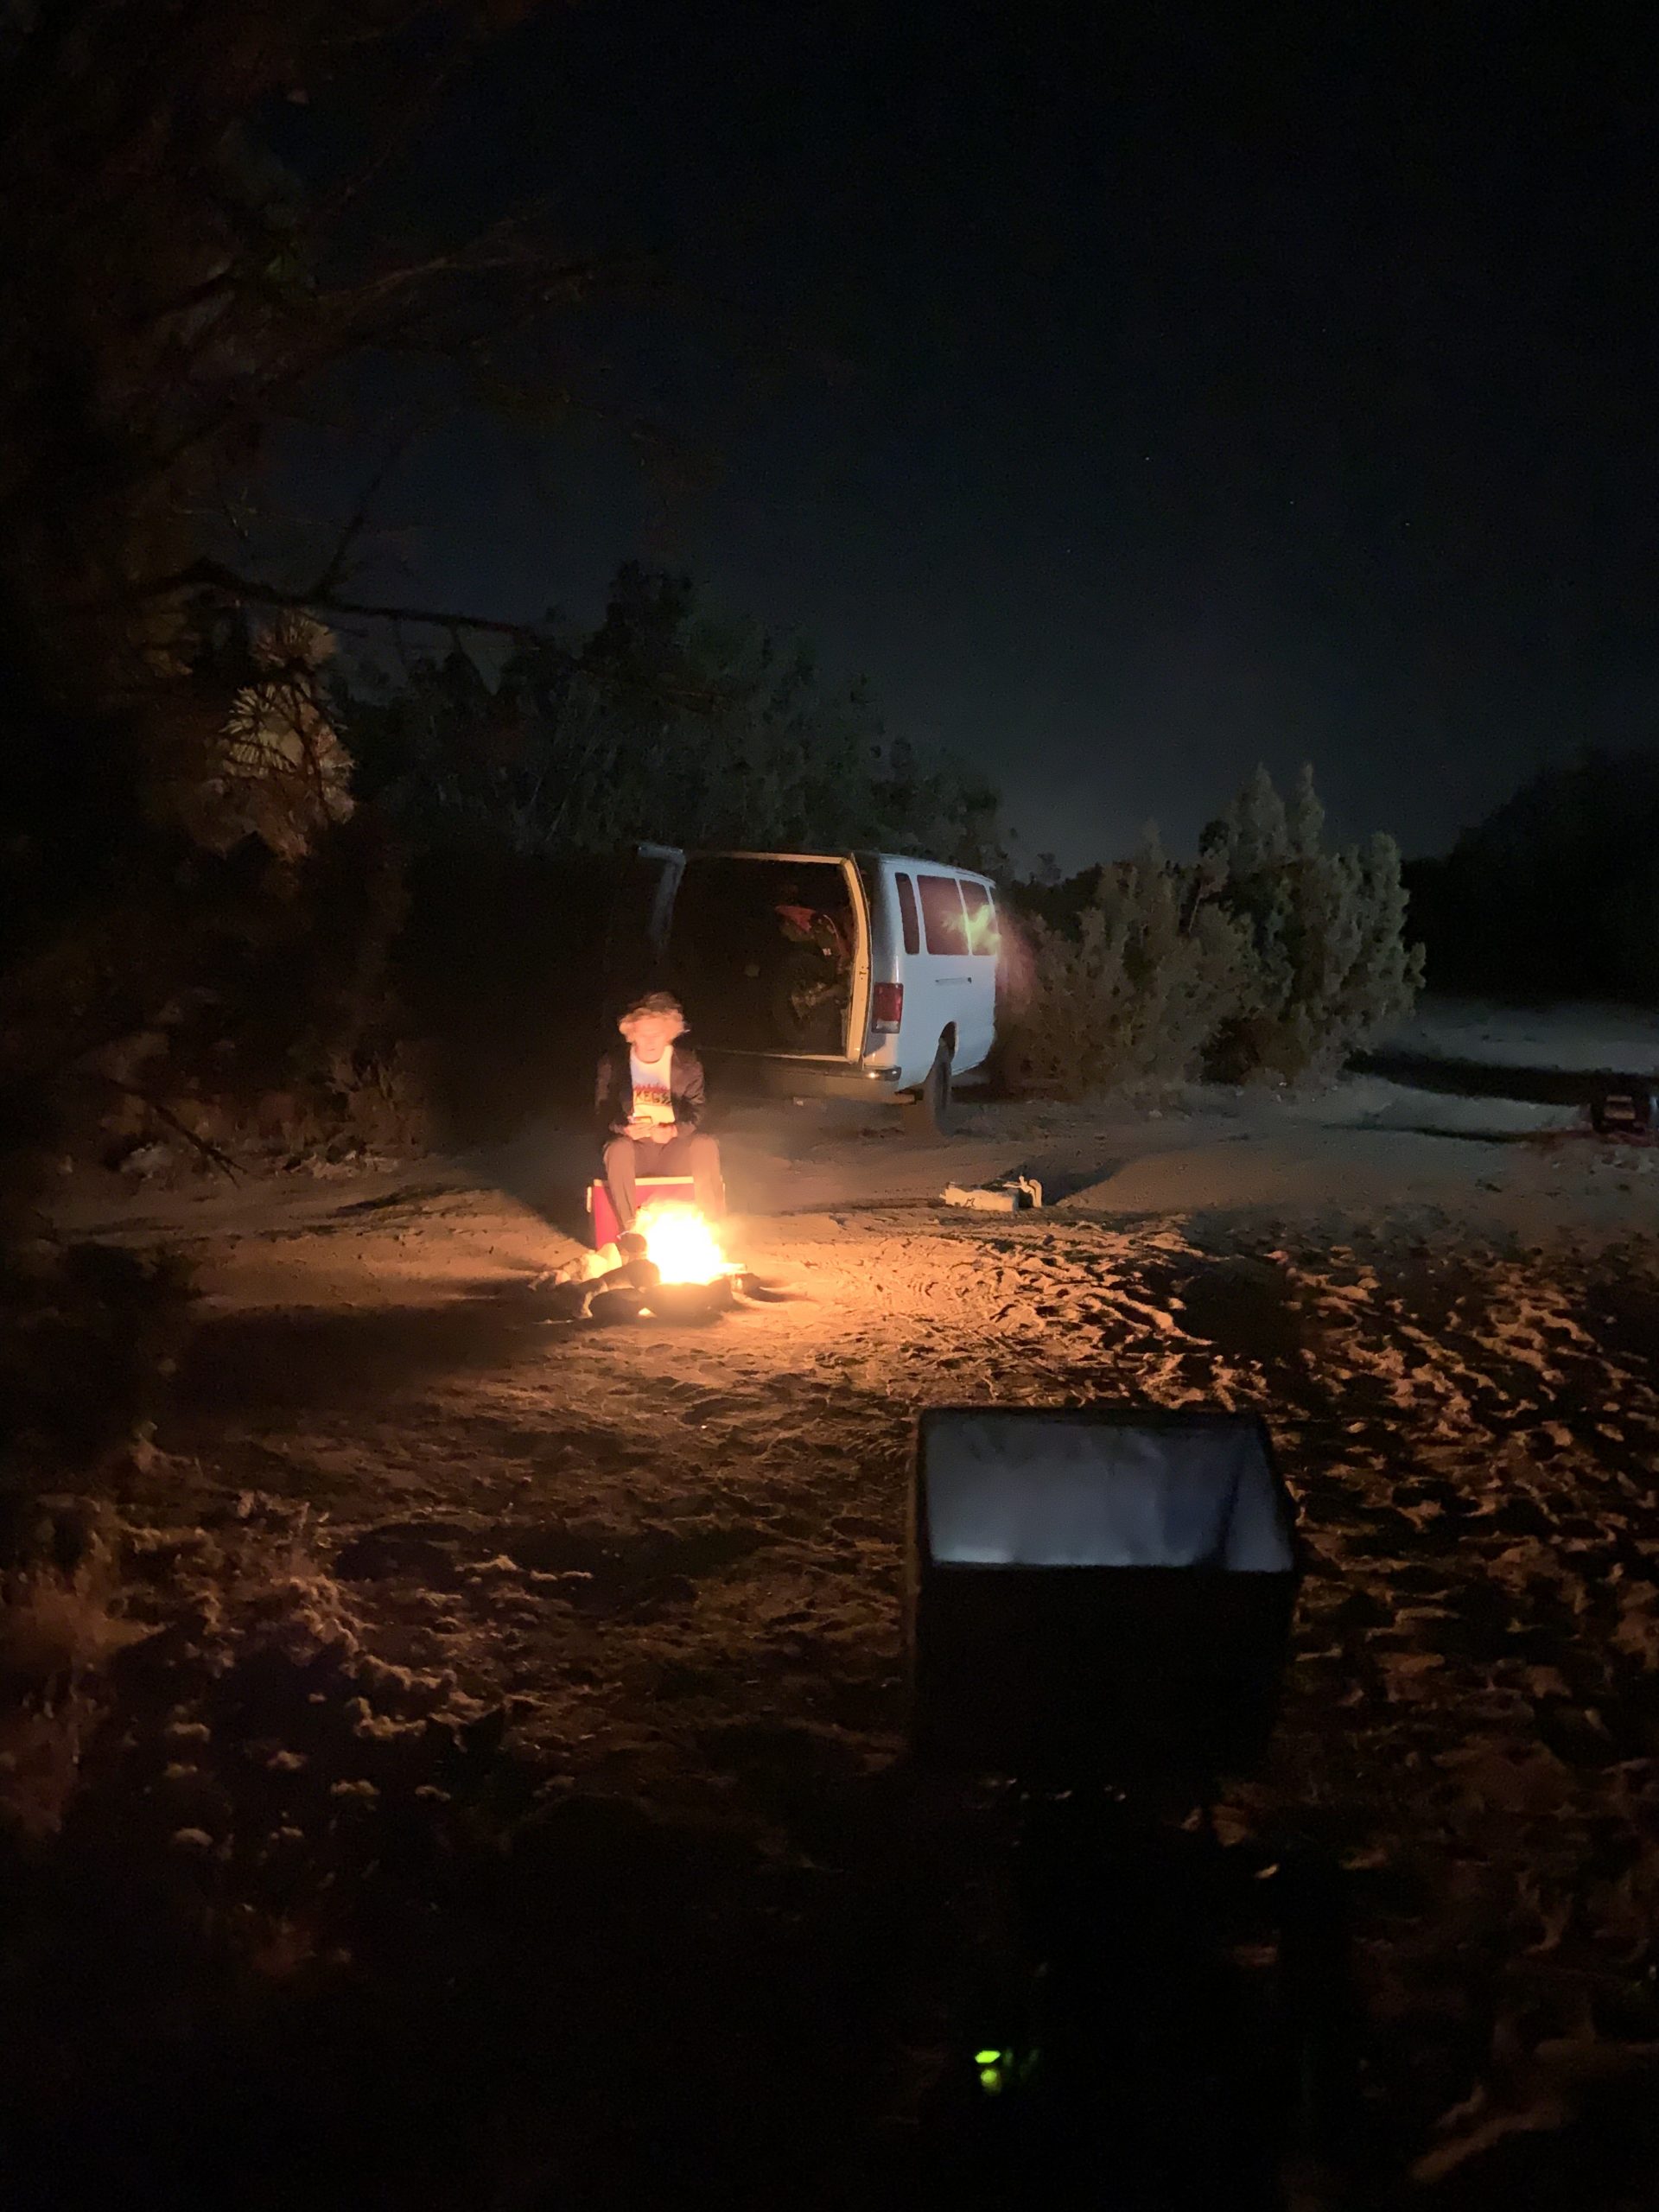
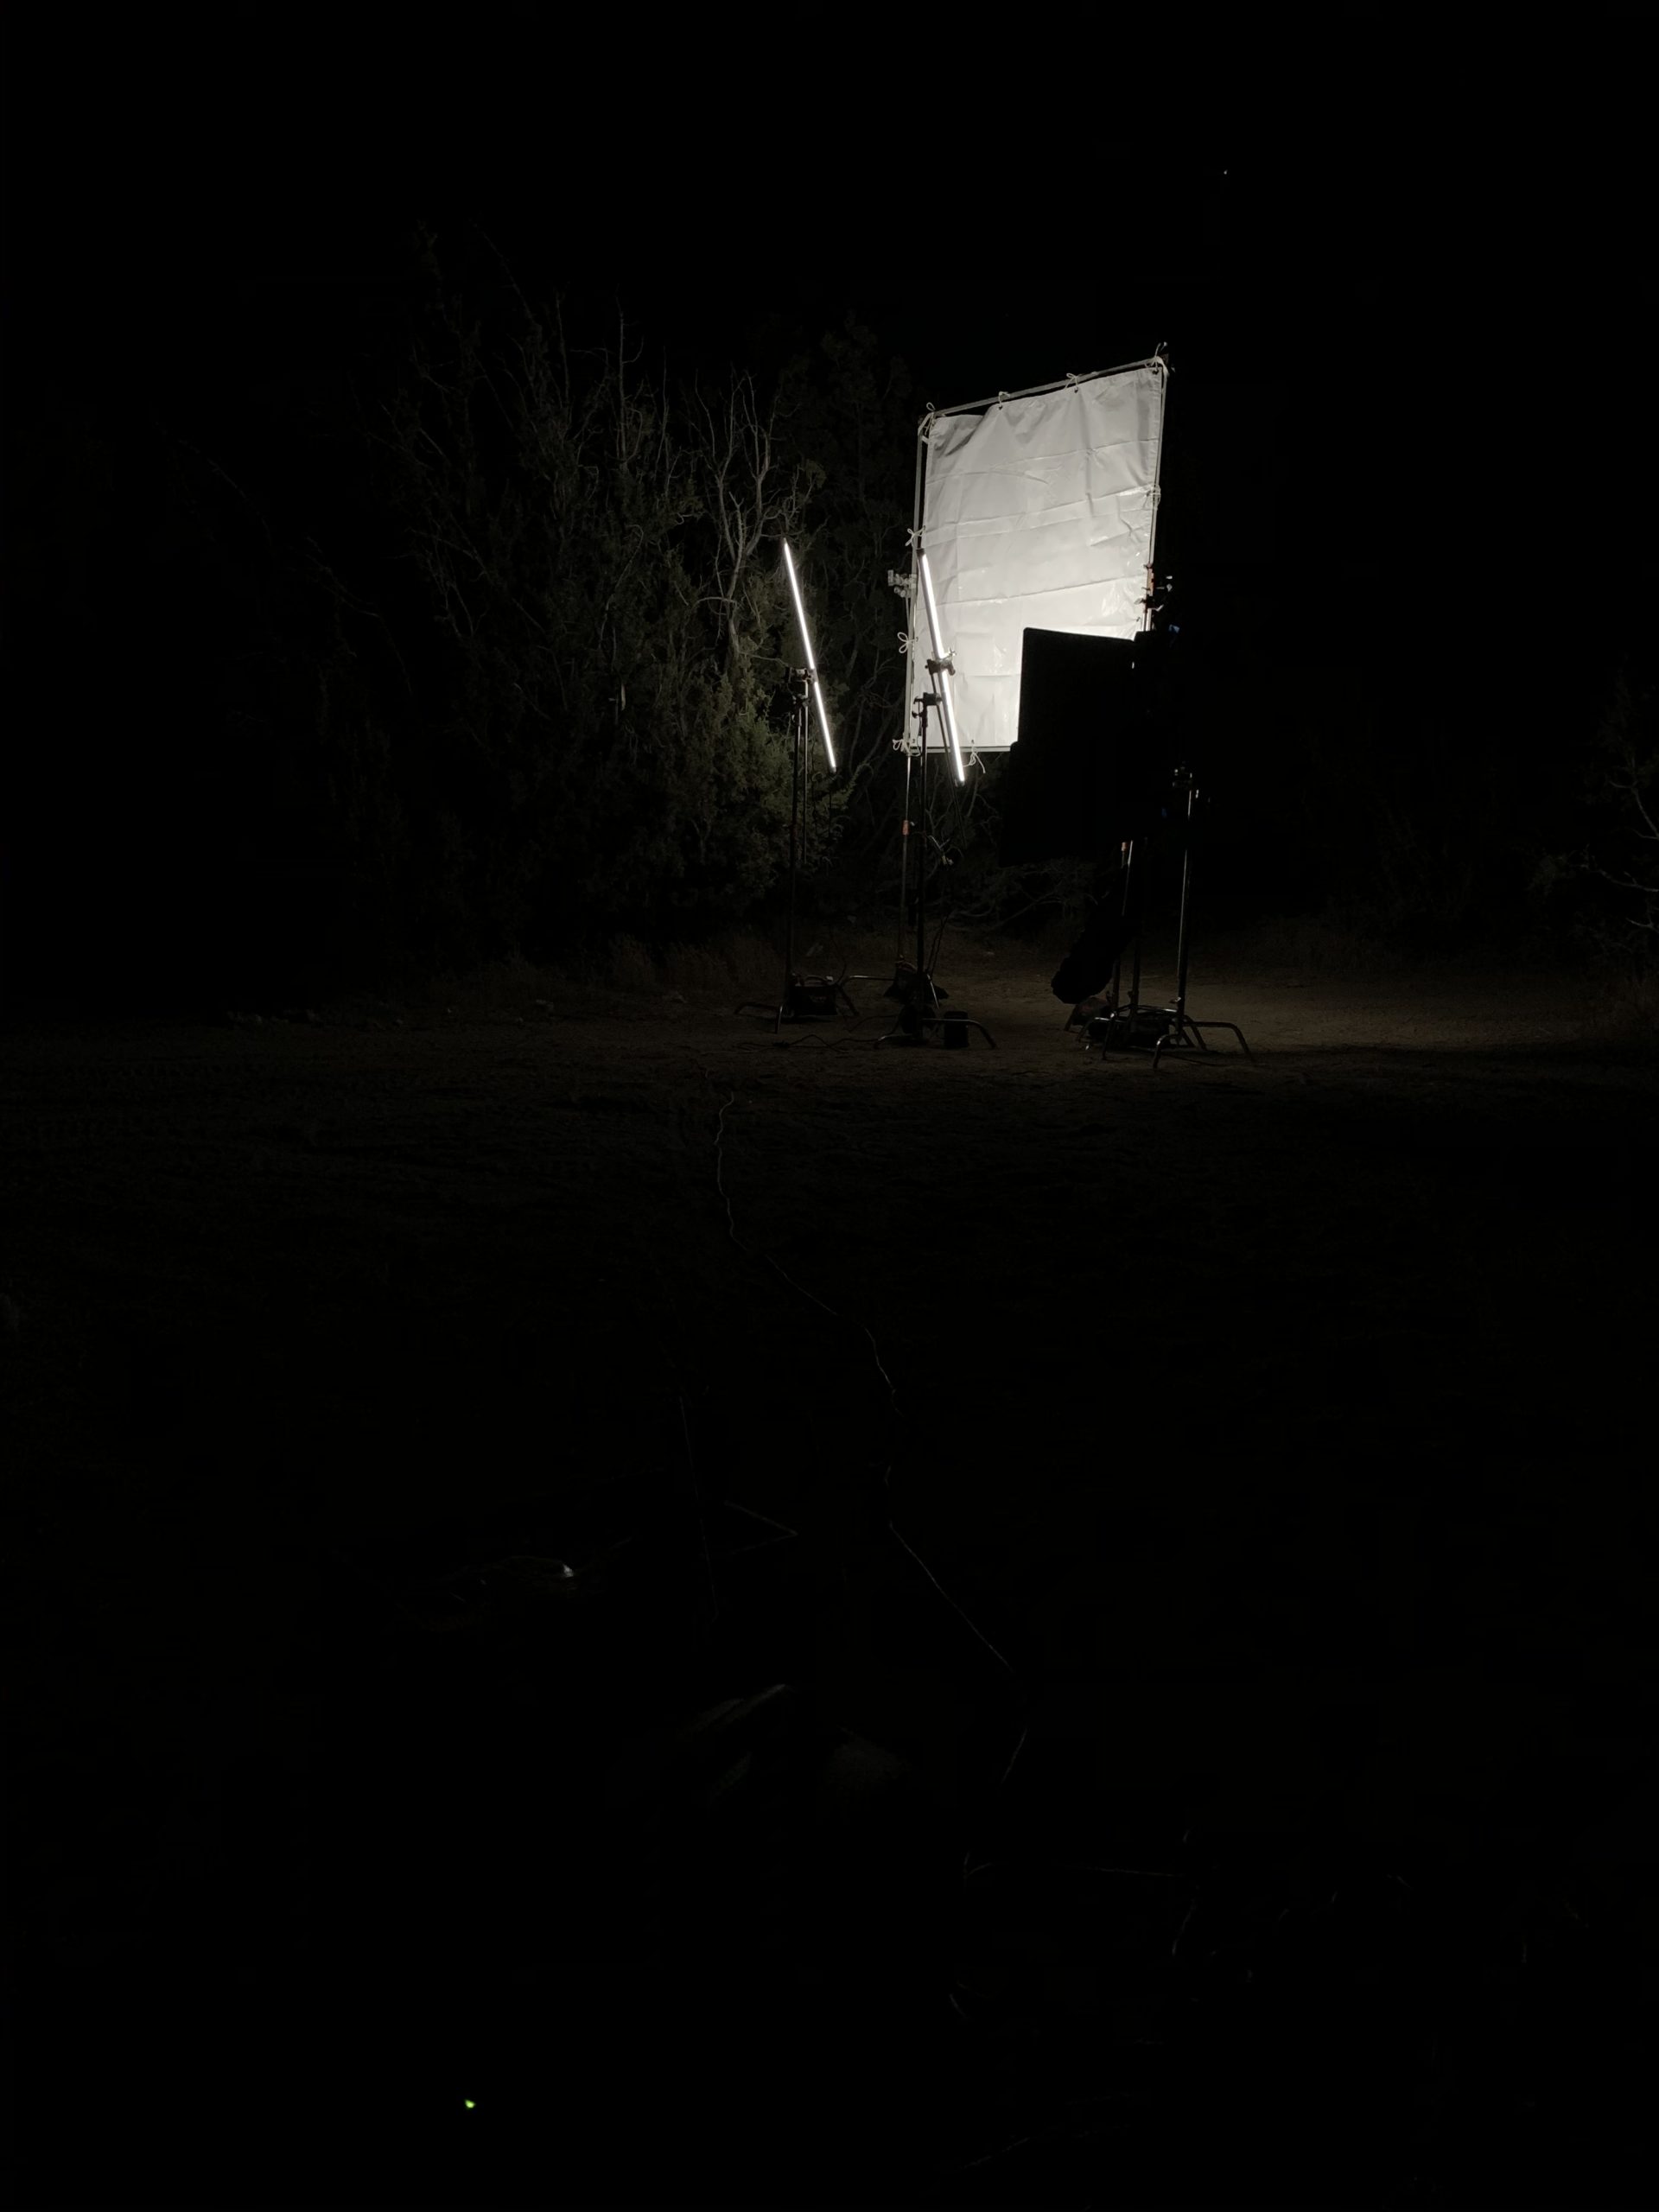
PRODUCTION – DAY 06 – EXT – CAMPFIRE
Somehow, someway, we’ve made it through the first five days of shooting without issue. Literally, every sequence shot has been looking exactly how I had envisioned in my mind and, I have to say, this maybe the first time that’s ever happened. But, we had day six, which was going to be the biggest test of them all. Lighting a night exterior and creating fake moon light. Yep, that’s right… I needed to create a fake moon light using only the gear I had available to me. Not only that, but this sequence is a pivotal moment within the film. And, if I couldn’t get this right, well… Those five days prior to this were a real fun exercise in futility. Yes, I have done a couple of night gigs on narrative film sets, but we were lighting interiors, and I had a professional union gaffer and grip handling those needs. So, now I am doing this without the help of professionals and without the benefit of proper lighting for such a setup. Seriously, guys. This was a legitimate make or break sequence for the film and I truly didn’t know if I’d be able to achieve the look I wanted or not. Not only was I concerned about how I was going to light this sequence, but we also had a couple of holes within the sequence (shot list wise) that I didn’t yet have figured out. So, let’s get to it and see if I pulled it off or not, shall we?
To start, the premise of this sequence is that Trevor is in the middle of nowhere, camping. He’s sitting by a fire writing in his journal about the situation he’s in. So, our key light was always going to be the fire. However, I agonized for months over this sequence. How the hell was I going to light this to achieve a fake moon light? And, how the hell could I do it in a way that felt authentic and not corny? I spent time scouring YouTube tutorials and all that was doing was making me more uncertain and terrified. Eventually, after a ton of thought, I came up with a solution to create a fake moon light. We would build our 6×6 frame with solid white reflective material and then take our two 4’ Quasar tubes, balance them to 6000k and 100% intensity and point them directly into our 6×6 that was facing in the direction of Trevor’s white van and back into the desert behind him. Now, I literally had no idea if this was going to work or not. In theory, it made sense and seemed like it could work. However, being in the middle of the desert, light falls off real quick, so I didn’t know if it’d just fall flat or actually work decently. Plus, we are doing this setup with Quasar tube, not proper 1k or 2k HMI units, etc.
We arrived at our location around 5:00 p.m. on a Wednesday and immediately got Trevor’s van in place and walked him through our shots, blocking, etc. Once we got all of our golden hour shots in the can, we got the 6×6, Quasars, and generator in place to fake our moon light and waited for it to be pitch dark outside (also, I should mention I made sure this was not happening when the real moon wasn’t going to be full or close to it. By shooting on a night when the moon wouldn’t be popping, it allowed us full control of our own DIY moon light). Once we were in full darkness, we powered up camera, fired up our generator and struck our lights. It was the moment of truth. Would this actually work or did I just waste everybody’s time and energy? Well, somehow, someway, our no budget DIY moon light trick worked like a gem! I have to admit, I was as gitty and excited as a kid on Christmas morning. I was so impressed with the output of light from these Quasars, not to mention the quality of light they were putting out that, once we had that going and we could see it worked, it made the rest of that evening and the following morning’s shoot so simple and easy. We wrapped around 11:00pm that night and had to be back at the same location the following morning at 7:00am to shoot our morning sequence and what would be the very last day of production on No Runners. I recall Brandon and I driving home that night, not giving a shit that we had an hour drive home and probably four hours of asleep ahead of us before our call time in the morning, because we couldn’t believe how well that entire setup worked and looked. Not to mention Trevor’s performance was truly incredible. We were all smiles! And, still, as I write this, I can’t help but laugh that, somehow, it actually worked.

PRODUCTION – THIS BLOG INSTALLMENT IS FINALLY OVER – YAY
Something I want people to keep in mind when they watch this film is Trevor’s performance. He is not an actor (obviously), nor is he somebody that has any type of schooling or training in acting or performing. But he absolutely excelled every time the camera was on. His performance felt authentic and real throughout.
This isn’t a film with interviews and just documenting him going through the day. This is an actual narrative film that involves actual acting the entire time and, if you didn’t know any better, you would’ve thought Trevor has had some experience acting. He was not only incredibly comfortable in front of camera, but after takes, he would want to watch playback to see his performance and see what looked good, what looked bad, and how he could improve his performance. Also, I do believe that part of that comes from Trevor believing in the project and what means and, most importantly, there was incredible trust between myself and Trevor. We both understood the goal, and we trusted each other and listened to each other throughout the process. Everything we did was to stay true to what he had experienced and, some areas where we exaggerated, we would discuss it before hand to talk about the emotion and tone. Does this feel authentic to how you were feeling? If so, great, let’s do it. If not? Okay, let’s talk about this and find the right emotion and reaction to said emotion.
I am not a director. In fact, I hate directing. But, having to wear so many hats on this project, director was part of my title and, I think I did an okay job of doing so. This entire thing was a process. The lighting, being the most difficult part. I realize I explain it here as if, “Yeah, no duh. Do this.” But, the reality is, that wasn’t the case in the moment. It took me time to figure out everything I wanted and a while to setup and dial in properly in the moment. It’s a massive learning process for me. I am still learning and, while I am so incredibly proud of what we have achieved, there is always room for improvement, right? That’s one of many things that keeps me pushing forward with this craft and, specifically with this project, to create something nobody else within this industry would do and face fears and attempt to conquer them. In the words of David Goggins, “Be uncommon amongst the uncommon.”
Okay, this shit is way too long and you definitely didn’t make it this far. But, if you did, congratulations. Currently, I like you more than Wes Williams, and you are on step closer to winning my chocolate factory that I don’t actually have because I am using sarcasm and humor. Anyways, my hands hurt, I am tired, I hope this was interesting. If not, well, fuck me. If so, and you have questions about production that I didn’t answer, ask them in the comments below and I will get back to ya. Because of my insecurities, I check the comments on my FoMblogs every four minutes to see if people like me or not. Usually, the answer is that they don’t like me. So, I am going to go get a Mocha Frappe from McDonald’s to make myself feel better. See ya next week when we talk about post-production (editing, coloring, sound, music, VO, poster art, and Willy Wonka).